Troubleshooting, Dépannage, Reparación – MAAX URBAN User Manual
Page 12: Urban
12
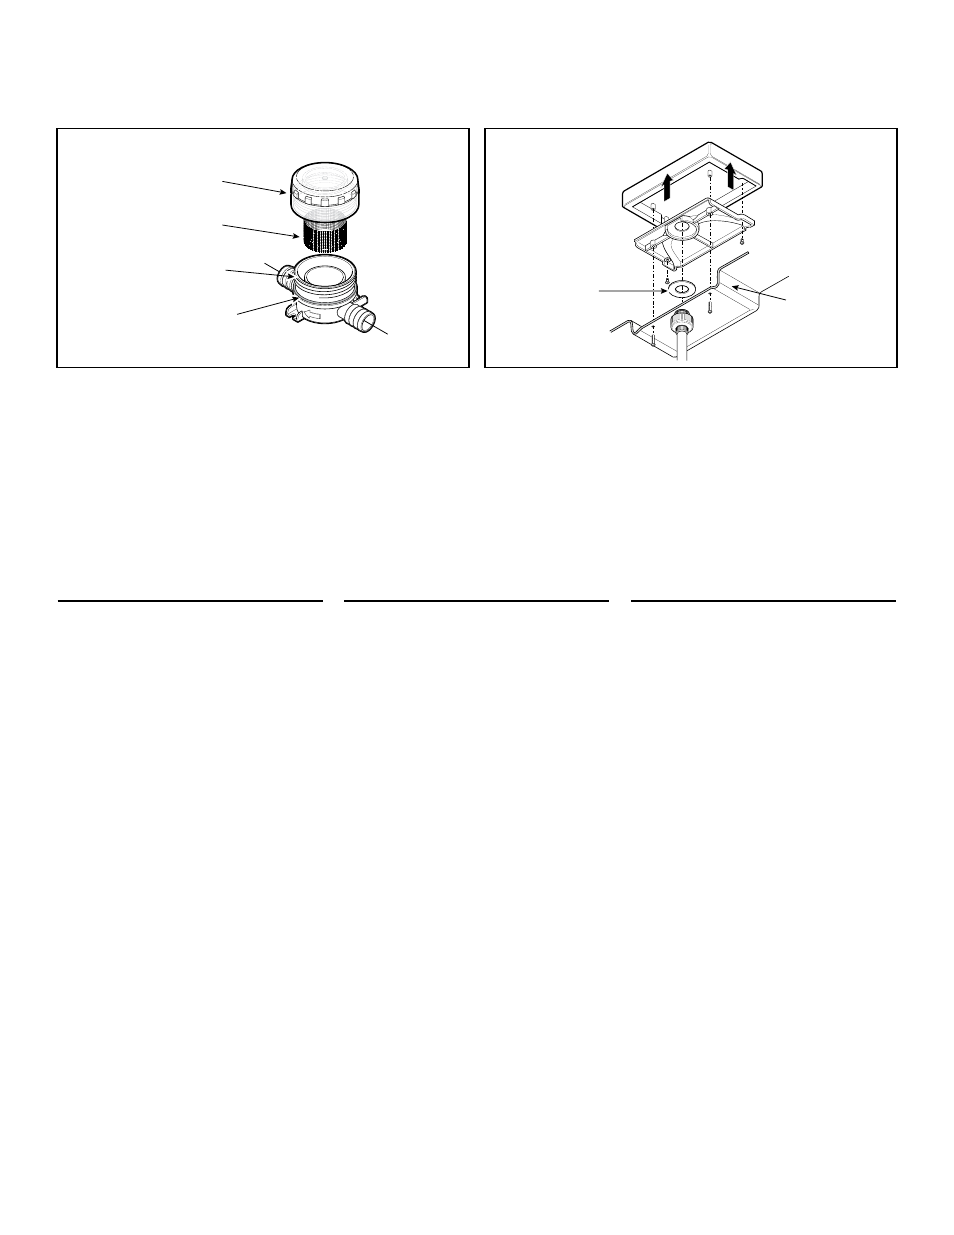
grill. Place the grill back inside and screw
on the cap.
Note: do not screw the cap
on too tightly. (See Fig. 17.)
slate-gray Minimalist Block
Raise the bathtub ring (see Bathtubs with
Detachable Ring). On the underside of
the ring, remove the two screws holding
the waterfall head in place. Lift the head
and remove the two screws holding it
together. Separate the top of the head, and
clean the interior according to the general
maintenance instructions. Place the seal
gasket back in position, and reassemble
the waterfall head. (See Fig. 18.)
tRoUBlesHootiNG
b
athtub
Water accumulates around the drain and
the bathtub does not empty all the way.
• Make sure the bathtub is level and sitting
firmly on its base. If necessary, use wood
wedges to shim the unit’s wood feet.
Bathtub shifts during use.
• Bathtub is not sitting firmly on its base. If
necessary, use wood wedges to shim the
unit’s wood feet.
polyethylene film will not come off.
• Use a hair dryer to heat the surface.
URBAN
®
.P
re
-
Plumbed
.F
aucet
iMpoRtANt! turn off the water supply
before conducting any repairs or
adjustments.
little to no water is coming out of the
faucet.
• Make sure the supply pipe valves are opened
to full capacity.
• Remove the cartridges and clean the piping.
• Make sure no gaskets are obstructing the
orifices.
filtre et nettoyer la grille. Remettre la grille
en position dans le capuchon et visser le
capuchon.
Attention: Ne pas trop serrer le
capuchon. Fig. 17.
Bloc minimaliste (pierre grise ardoise)
Soulever le rebord amovible de la baignoire
(voir Baignoires avec rebord amovible).
Par-dessous le rebord amovible, dévisser
les deux vis qui retiennent le bloc en
position. Soulever le bloc et dévisser les
deux autres vis. Retirer la partie supérieure
du bloc et nettoyer selon les instructions
d’entretien général. Replacer le joint
d’étanchéité et remettre les pièces en
position. Fig. 18.
dÉpANNAGe
b
aignoire
l’eau s’accumule autour du drain et la
baignoire ne se vide pas complètement.
• Vérifier si l’installation est de niveau et si la
baignoire est bien appuyée sur sa base. Si
nécessaire, utiliser des cales de bois sous la
base de bois seulement.
le fond de la baignoire bouge pendant
l’utilisation.
• La baignoire n’est pas bien ap puyée sur sa
base. Si né cessaire, utiliser des cales de bois.
la pellicule de plastique ne se décolle pas.
• Utiliser un séchoir à cheveux pour souffler de
l’air chaud sur la surface collée.
r
obinetterie
.
Préinstallée
.URBAN
MD
iMpoRtANt: avant toute réparation
ou ajustement, couper l’alimentation
en eau.
le débit d’eau est faible. Aucun débit
d’eau.
• Vérifier si l’alimentation en eau est ouverte à
pleine capacité.
• Retirer le cartouche et purger la tuyauterie.
• Vérifier qu’aucun joint d’étanchéité n’obstrue
un orifice.
Desenroscar la tapa del filtro y limpiar la
rejilla. Volver a colocar la rejilla en la tapa
y enroscar la tapa.
Atención: no apretar
demasiado la tapa. Fig. 17.
Bloque minimalista
Levantar el ribete amovible de la bañera
(refiarse a Bañeras con ribete amovible).
Por encima del ribete, desatornillar los dos
tornillos que mantienen el bloque en posición.
Levantar el bloque y desatornillar los otros
dos tornillos. Retirar la parte superior del
bloque y limpiar siguiendo las instrucciones
de mantenimiento general. Colocar de nuevo
la junta hermética y volver a poner las piezas
en su sitio. Fig. 18.
RepARAcióN
b
añera
el agua se acumula alrededor del sumidero
y la bañera no se vacía completamente.
• Verificar que la instalación esté nivelada y
la bañera bien afianzada en su ba se. Si es
necesario, calzar con cuñas de madera sólo
debajo de la base de madera.
el fondo de la bañera se mueve cuando
se usa.
• La bañera no está bien afianzada en su
base. Use cu ñas de madera si es necesario.
la membrana de plástico no se despega.
• Utilizar un secador de pelo para soplar aire
caliente en la superficie adherida.
g
riFería
.URBAN
®
iMpoRtANte : antes de cualquier
reparación o ajuste, cortar el suministro
de agua.
el flujo de agua es débil. sin caudal de
agua.
• Comprobar si la entrada de agua está
completamente abierta.
• Sacar el cartucho y desatascar la tubería.
• Comprobar que ninguna junta anular obture
los orificios.
Seal gasket
Joint d'étanchéité
Junta hermética
Cap
Capuchon
Caperuza
Filter gate
Grille (filtre)
Rejilla (filtro)
Filter body
Corps du fitre
Cuerpo del filtro
Fig. 17
Detachable ring
Rebord amovible
Ribete amovible
Bottom view
Vue de dessous
Vista de debajo
Seal gasket
Joint d'étanchéité
Junta hermética
Fig. 18