Fig. 6 fig. 7 – MAAX APEX 108 9 FT User Manual
Page 8
8
iMPoRtaNt: Some units are available
with left-hand or right-hand drain; check
the drain position before drilling the floor.
b
athtub
W
Ithout
D
rIllIng
t
emPlate
Lay the bathtub on the piece of plywood that
will be covering the island. Using a level or a
plumb line, mark the contour of the bathtub
on the piece of plywood. Cut 3/4" inside
the line traced previously. Fig. 8. Install the
piece of plywood on top of the island.
S
ecurIng
the
b
athtub
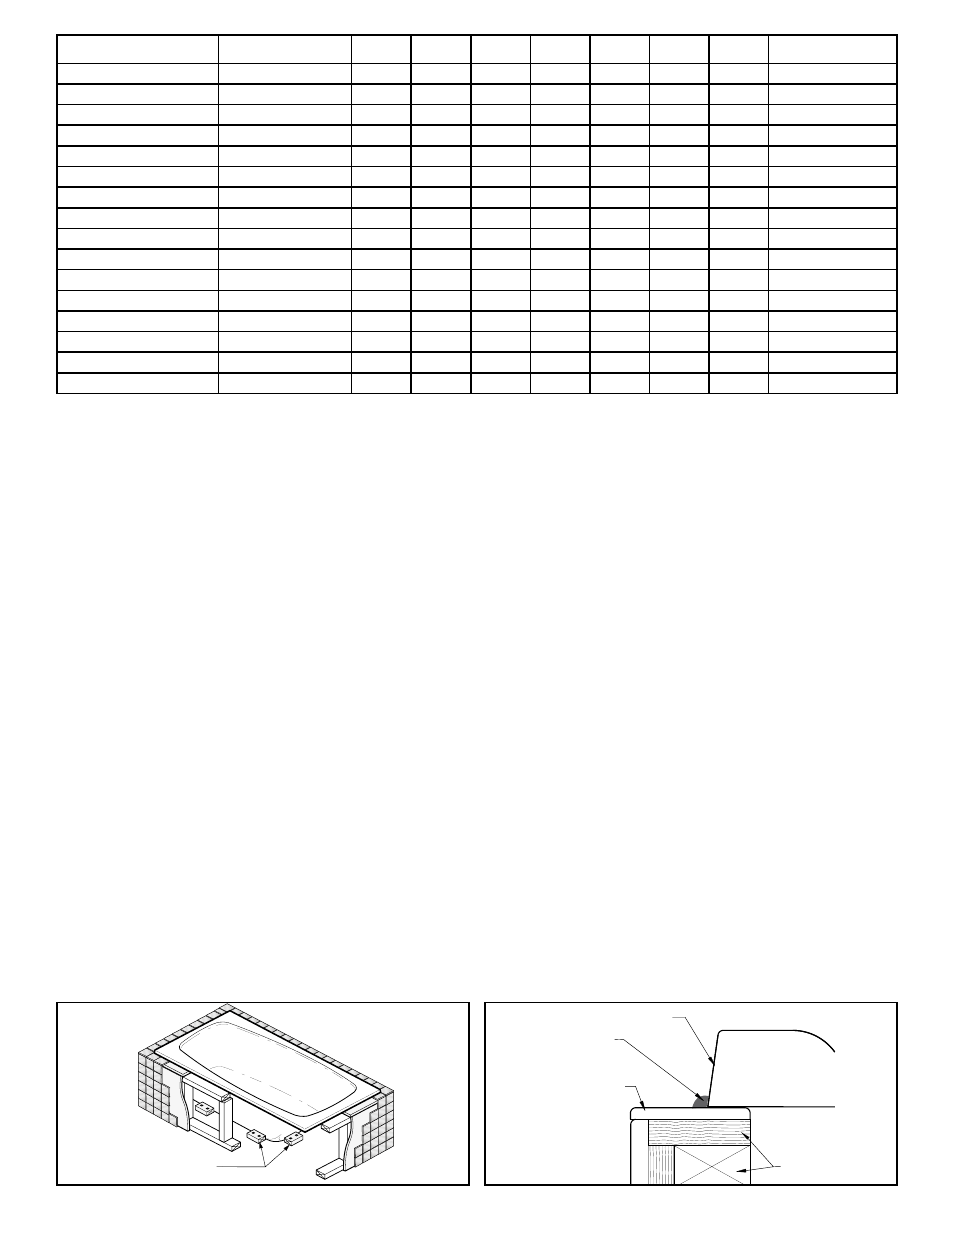
Fasten six (6) wood blocks around the
bathtub to secure it in place (Blocks not
supplied). Fig. 6.
the bathtub must be
supported by the island (3/4" (19 mm)
Fig. 5.1) and the floor, never by the
island alone. if necessary, remove wood
blocks under edge of bathtub.
c
onnectIng
the
P
lumbIng
Connect the plumbing (drain, overflow,
faucets, etc.) according to local standards
and to the general rules in this guide. Make
sure that all joints are waterproof. Fill up
the bathtub and inspect for leaks.
f
InIShIng
u
P
Install the finish covering over the island
and fill the joints with silicone sealant.
Fig.7.
iMPoRtaNt: Certaines unités sont
offertes avec drain à gauche ou à droite;
vérifier l’emplacement du drain de l’unité
avant de percer le plancher.
b
aIgnoIre
SanS
gabarIt
De
Perçage
Déposer la baignoire sur la pièce de contre-
plaqué qui recouvrira le podium. À l’aide d’un
niveau ou d’un fil à plomb, tracer, sur le contre-
plaqué, une ligne correspondant au rebord
extérieur de la baignoire. Découper а 3/4" а
l’intérieur de la forme tracée précédemment.
Fig. 8. Installer le contre-plaqué sur le podium.
f
IxatIon
Installer la baignoire dans le podium et fixer
six (6) blocs de bois (non inclus) autour de la
baignoire pour l’empêcher de se déplacer. Fig.
6.
La baignoire ne doit jamais être soutenue
seulement par le cadre du podium mais doit
reposer à la fois sur celui-ci (3/4" (19 mm)
Fig. 5.1) et sur le plancher. si nécessaire,
retirer les blocs de bois sous le rebord de la
baignoire.
r
accorDement
De
la
PlomberIe
Effectuer le raccordement de la plomberie
(drain, robinet, trop-plein, etc.) selon les normes
locales et les règles générales au début de ce
guide. Remplir la baignoire et vérifier s’il y a des
fuites.
f
InItIon
Aposer le revêtement de finition sur tout
le podium et recouvrir les joints avec un
scellant au silicone. Fig. 7.
iMPoRtaNte: Algunas unidades están
disponibles con desagüe al la izquierda
o a la derecha; verifique la posición del
desagüe antes de taladrar el piso.
b
añera
SIn
PlanIlla
Para
PerforacIón
Deposite la bañera sobre la madera
contrachapada que va recubrir el islote.
Usando un nivel o un hilo de plomo, dibuje
el contorno de la bañera sobre la madera
contrachapada. Recorte a 3/4" hacia el interior
respecto de la traza precedente. Fig. 8. Instale
la madera contrachapada sobre el islote.
f
IjacIón
Instale la bañera y sujétela a su alrededor
con seis (6) bloques de madera (no incluidos)
para evitar que se mueva. Fig. 6.
La bañera
debe estar sostenida por el marco del
islote y el piso, nunca debe estar sólo
sostenida por el marco del islote. si fuese
necesario, quite los bloques de madera
bajo el borde de la bañera.
c
onexIón
De
la
Plomería
Conecte la tubería (desagüe, grifos, rebosadero,
etc.) según las normas locales y reglas generales
que se encuentran al inicio de esta guía. Llene la
bañera de agua y compruebe si hay fugas.
a
cabaDo
Colocar el revestimiento de acabado sobre
todo el podio y cubrir las junturas con
sellador de silicona. Fig. 7.
Wood blocks
Blocs de bois
Bloques de madera
BATHTUB
BAIGNOIRE
BAÑERA
SILICONE SEALANT
SCELLANT AU SILICONE
SILICO NO SCILA DORA
PODIUM COVERING
REVÊTEMENT DE FINITION
REVESTIMIENTO DE ACABADO
FRAME SUPPORT
SUPPORT DE BAIN
SOPORTE DE LA BAÑERA
Fig. 6
Fig. 7
1
: this bathtub is equipped with a drill jig. / cette baignoire est dotée d’un gabarit de perçage. / esta bañera viene con planilla para perforación.
ModeL
ModèLe
ModeLo
#
a
a’
B
B’
c
d
e
overflow height
hauteur trop-plein
altura del rebosadero
Tarot 5 ½
2
101146
64 1/8
(1629)
-
31 1/2
(800)
-
16
(406)
15 3/4
(400)
7 1/8
(181)
14 3/4
(375)
Tarot 6
2
101147
70
(1778)
-
34
(864)
-
18 3/8
(467)
17
(432)
8 1/4
(210)
16
(406)
Temptation 4 ½
2
100036
53 1/4
(1353)
29 1/2
(749)
53 1/4
(1353)
29 1/2
(749)
17 1/4
(438)
33 3/4
(857)
33 3/4
(857)
15 1/2
(394)
Temptation 5
100054
58 1/2
(1486)
24 1/4
(616)
58 1/2
(1486)
24 1/4
(616)
18 3/4
(476)
34 1/2
(876)
34 1/2
(876)
15 3/4
(400)
Temptation II 5
2
101079
58
(1473)
25 5/8
(651)
58
(1473)
25 5/8
(651)
17 3/4
(451)
34 1/4
(870)
34 1/4
(870)
15 7/8
(403)
Tempest
2
100103, 100861
58 3/8 (1483)
-
34 1/4 (870)
-
17 3/8 (441)
17 1/8 (435)
8 5/8
(219)
16 1/8
(410)
Temple
2
100027
58 1/4 (1480)
-
39 1/4 (997)
-
17 1/4 (438)
19 3/4 (502)
8 5/8
(219)
15 1/2
(394)
Tigress
2
100031
70 1/2
(1791)
-
46
(1168)
-
17 3/8
(441)
23 1/4
(591)
7 1/4
(184)
15 3/8
(391)
Timeless
2
100104
70 1/8
(1781)
-
34
(864)
-
17 1/2
(445)
17
(432)
8 (1/8)
(206)
15 3/4
(400)
Tryst
2
100053
57 3/4
(1467)
21 1/8
(537)
57 3/4
(1467)
21 1/8
(537)
18 5/8
(476)
31 3/8
(797)
31 3/8
(797)
15 5/8
(397)
Twilight
1-2
100021
58
(1473)
-
39 3/4
(1010)
-
18 1/4
(464)
19 3/4
(502)
9 3/4
(248)
16 1/2
(491)
Tympani
1-2
100026
70 1/4
(1784)
-
40
(1016)
-
18 1/4
(464)
8 1/2
(216)
34 3/4
(883)
15 3/4
(400)
Valley Oval 5’ 6042
2
140114
58
(1473)
-
40
(1016)
-
16 1/2
(419)
20
(508)
7 1/4
(184)
14 1/2
(368)
Valley Oval 5’ ½ 6642
2
140115
64
(1626)
-
40
(1016)
-
16 1/2
(419)
20
(508)
8
(203)
14 1/2
(368)
Valley Oval 6’ 7242
2
140116
70
(1778)
-
40
(1016)
-
16 1/2
(419)
20
(508)
9
(229)
14 1/2
(368)
Valley Corner Oval 5’ 6060
2
140117
57 1/2
(1461)
25 3/4
(654)
57 1/2
(1461)
25 3/4
(654)
17
(432)
34 5/8
(879)
34 5/8
(879)
12 3/4
(324)
- APEX 96 8 FT ASTM-1P/3P BLAKELY 6 FT CALYPSO CALYPSO 1-PIECE AFR CAMANO CASA 6030 CASA 6030 - DOUBLE TILING FLANGE CASA 6030 AFR CASA 6032 CASA 6032 AFR CASA 6632 AFR CASA 7234 AFR CONCERTO I EXHIBIT 6032 (IF) EXHIBIT 6032 (IF) - DOUBLE TILING FLANGE EXHIBIT 603x (IFS) EXHIBIT 603x (IFS) - DOUBLE TILING FLANGE EXHIBIT 6060 EXHIBIT TSC 102 FIGARO I FIGARO II FRASER SLR6030 5 FT ISLANDER AFR ISLANDER AFR - DOUBLE TILING FLANGE LOPEZ MODEST MONTEGO I MONTEGO II PACIFIC LINE PL PACIFIC LINE PLN PACIFIC LINE PLREA Rubix 6030/6032 Rubix 6030/6032 Double Tiling Flange RUBIX 6632 SAMISH SANTA MARIA SERENADE SIMPLICITE SKYLINE 603x - DOUBLE TILING FLANGE SKYLINE 603x (AFR) SKYLINE 603x A - DOUBLE TILING FLANGE SKYLINE 603x A (AFR) SLIM LINE OVAL TALISMAN TANDEM TEMPEST TEMPLE TEMPTATION TENDERNESS TIMELESS TRANSITIONS TRYST TWILIGHT VALLEY CORNER OVAL VOC6060 5 FT VO6042