Collection, genna, maax-premium lachine – MAAX APEX 108 9 FT User Manual
Page 11
11
S
ecurIng
the
b
athtub
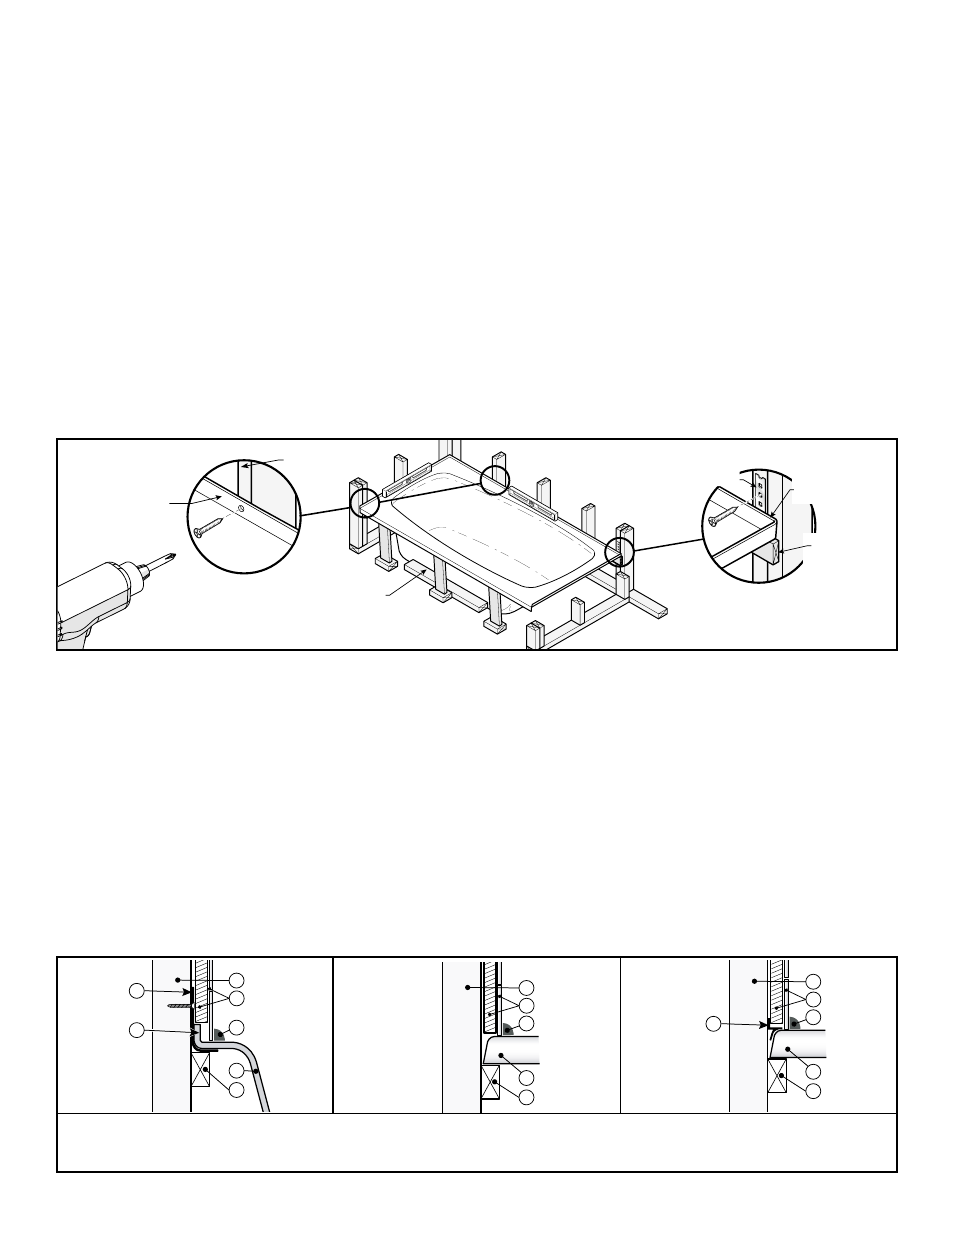
Install a standard 1" x 3" piece of wood (not
provided) (3/4" x 2 1/2") (20 mm x 63 mm)
all around the alcove, at C height. Fig. 9.
The 1" x 3" must be cut down to 1¼" inside
dimension B.
Secure a vertical support in front of the
bathtub (leave a space in front of the
support so as not to interfere with the
installation of the apron, if applicable).
Make
sure the vertical support does not press
on the jets or piping. Incline the support
as required to allow easy installation.
the bathtub must never be sup ported
by the wood stud under neath the tiling
flange, but by the wood stud and the
floor, use wood shingles if necessary. The
flange is not designed to carry the weight
of the bathtub.
Drill the tiling flange and fasten the bathtub
to the studs.
c
onnectIng
the
P
lumbIng
Connect plumbing (drain, overflow, faucets,
etc.) according to local stan dards and to
general rules in this guide. Make sure that
all joints are waterproof.
f
InIShIng
u
P
Note: the apron and wall, if applicable
must be installed before the finish.
Install wall finish around bathtub. The
integrated tiling flange should be
overlapped with the wall finish (2). Seal
the joint between the bathtub and the wall
finish with silicone (3). Fig. 10.
f
IxatIon
Fixer une pièce de bois (non fournie) de
1"x 3" standard (3/4" x 2 1/2") (20 mm
x 63 mm) tout autour de l’alcôve, à la
hauteur C. Fig. 9. Les pièces de 1" x 3"
doivent être coupées а 1 1/4" а l’intérieur
de la dimension B.
Fixer un support vertical à l’avant de
la baignoire (laisser un espace devant
le support afin de ne pas nuire à
l’installation du tablier, si applicable).
Ne
pas appuyer le support contre les jets
ou la tuyauterie. Incliner le support pour
faciliter l’installation.
La baignoire ne doit jamais être
soutenue par la pièce de bois située
en-dessous de la lèvre, mais doit
reposer à la fois sur celle-ci et sur le
plancher; utilisez des cales de bois au
besoin. Cette dernière n’est pas conçue
pour soutenir le poids de la baignoire.
Percer la bride de carrelage et fixer la
baignoire aux montants.
r
accorDement
De
la
PlomberIe
Effectuer le raccordement de la plomberie
(drain, robinet, trop-plein, etc.) selon les
normes locales et les règles générales au
début de ce guide.
f
InItIon
Note: le tablier et les murs, si applicable,
doivent être installés avant de faire la
finition.
Descendre le revêtement de finition
jusqu’à la baignoire. Recouvrir la bride de
carrelage intégrée avec le revêtement de
finition (2). Finir le joint entre la baignoire
et le revêtement de finition avec un scellant
au silicone (3). Fig. 10.
f
IjacIón
Clave un listón de madera estándar de 1"
x 3" (no suministrado) (3/4" x 2 1/2") (20
mm x 63 mm) todo alrededor del nicho, a la
altura C. Fig. 9. Las piezas de 1" x 3" tienen
que cortarse a 1 1/4" por el interior de la
dimensión B.
Fije un soporte vertical delante de la
bañera (dejar un espacio delante del
soporte con miras a no dañar la instalación
del faldón, si procede).
el soporte nunca
debe apoyarse en los chorros o en la
tubería. Incline el soporte para facilitar la
instalación.
La bañera no debe nunca estar sostenida
por el listón de madera colocado debajo
del reborde, sino que debe apoyarse al
mismo tiempo en el listón y en el piso.
Utilice cuñas de madera si hace falta. El listón
de madera no está hecho para sostener el
peso de la bañera.
Taladar el reborde para azulejo y sujetar el
bañera en los montantes.
c
onexIón
De
la
tubería
Conecte la tubería (desagüe, llaves,
rebosadero, etc.) según las normas legales
y las reglas generales que se encuentran
al principio de esta guía.
a
cabaDo
Nota: el faldón y las paredes, si
procede, deben estar instalados antes
del revestimiento de acabado.
Ponga el revestimiento de acabado hasta
la bañera. Cubra la brida de ensolado
integrado con el acabado (2). Cubra la
juntura entre la bañera y el revestimiento
de acabado con silicona selladora (3).
Fig. 10.
1 Framing / Encadrement / Estructura
2 Wall covering / Revêtement de finition / Revestimiento de acabado
3 Sealant / Scellant / Silicona
4 Metal square / Équerre de métal / Escuadra metálica
5 Bathtub / Baignoire / Bañera
6 Wood stud / Latte de bois / Listón de madera 1"x3" standard (3/4" x 2 1/2")
7 Integrated tiling flange / Bride de carrelage intégrée / Pestaña moldeada de azulejo
8 Removable tiling flange / Bride de carrelage amovible / Pestaña de azulejo amovible
Acrylica (Collection, Genna, MAAX-Premium)
Lachine
FVM, Bremen
2
1
3
5
6
8
2
1
3
5
6
2
1
3
5
6
7
2
1
3
5
6
2
1
3
5
6
4
7
2
1
3
4
5
6
2
1
3
4
5
6
2
1
3
5
6
7
2
1
3
5
6
2
1
3
4
5
6
Acrylica (Collection, Genna, MAAX-Premium)
Lachine
FVM, Bremen
2
1
3
5
6
8
2
1
3
5
6
2
1
3
5
6
7
2
1
3
5
6
2
1
3
5
6
4
7
2
1
3
4
5
6
2
1
3
4
5
6
2
1
3
5
6
7
2
1
3
5
6
2
1
3
4
5
6
Fig. 10
Tiling flange
Bride de carrelage
Reborde para azulejo
Wood stud
Latte de bois
Listón de madera
1" x 3"
Drill / Percer / Perforar
1/8" DIA
Vertical supports
Supports verticaux
Soportes verticales
Collection, genna, MAAX-Premium
Lachine
Bracket
Attache métallique
Abrazadera metálica
Tiling flange
Bride de carrelage
Reborde para azulejo
Wood stud
Latte de bois
Listón de madera
1" x 3"
Vertical supports
Supports verticaux
Soportes verticales
Fig. 9
Acrylica (Collection, Genna, MAAX-Premium)
Lachine
FVM, Bremen
2
1
3
5
6
8
2
1
3
5
6
2
1
3
5
6
7
2
1
3
5
6
2
1
3
5
6
4
7
2
1
3
4
5
6
2
1
3
4
5
6
2
1
3
5
6
7
2
1
3
5
6
2
1
3
4
5
6
Wood stud
Montant Mural
Montante Mural
Tiling flange
Bride de carrelage
Reborde para azulejo
- APEX 96 8 FT ASTM-1P/3P BLAKELY 6 FT CALYPSO CALYPSO 1-PIECE AFR CAMANO CASA 6030 CASA 6030 - DOUBLE TILING FLANGE CASA 6030 AFR CASA 6032 CASA 6032 AFR CASA 6632 AFR CASA 7234 AFR CONCERTO I EXHIBIT 6032 (IF) EXHIBIT 6032 (IF) - DOUBLE TILING FLANGE EXHIBIT 603x (IFS) EXHIBIT 603x (IFS) - DOUBLE TILING FLANGE EXHIBIT 6060 EXHIBIT TSC 102 FIGARO I FIGARO II FRASER SLR6030 5 FT ISLANDER AFR ISLANDER AFR - DOUBLE TILING FLANGE LOPEZ MODEST MONTEGO I MONTEGO II PACIFIC LINE PL PACIFIC LINE PLN PACIFIC LINE PLREA Rubix 6030/6032 Rubix 6030/6032 Double Tiling Flange RUBIX 6632 SAMISH SANTA MARIA SERENADE SIMPLICITE SKYLINE 603x - DOUBLE TILING FLANGE SKYLINE 603x (AFR) SKYLINE 603x A - DOUBLE TILING FLANGE SKYLINE 603x A (AFR) SLIM LINE OVAL TALISMAN TANDEM TEMPEST TEMPLE TEMPTATION TENDERNESS TIMELESS TRANSITIONS TRYST TWILIGHT VALLEY CORNER OVAL VOC6060 5 FT VO6042