Bore illustration – MEDC Weatherproof FernTel IP User Manual
Page 8
Page 8
Short manual FernTel IP / IP150
1.3
Mounting and Installing
1.3.1
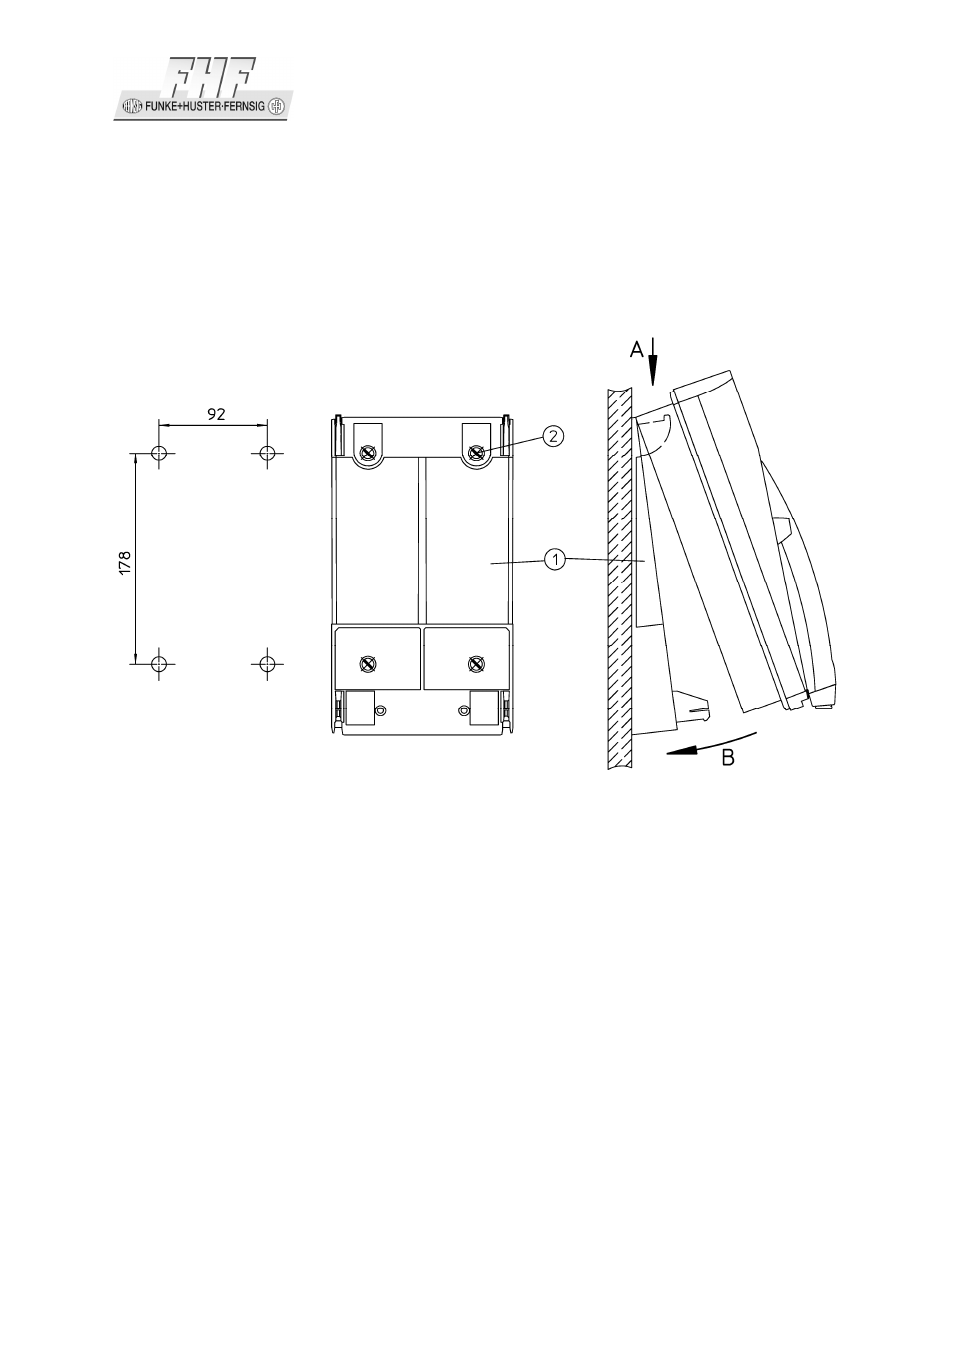
Wall Version
Fasten the telephone mount with 4 screws (2). Place the provided washers Ø 18 mm
under the screw head.
Figure 4: Mounting on a Wall
Place the telephone in the upper latches (A), swing it downwards until the lower
latches audibly engage (B).
Remove the keypad plate (6), and tighten the two locking screws (3) as far as they
will go.
Important: This preserves the IP65 degree of protection.
The security screws may be used only mounting the telephone on a wall.
Bore
illustration
(not to scale)
See also other documents in the category MEDC Sensors:
- PB (8 pages)
- PB (32 pages)
- PB (24 pages)
- BG3 (8 pages)
- BG2 (12 pages)
- PB (12 pages)
- PH1 (20 pages)
- PH1 (8 pages)
- PAS1 (4 pages)
- SM87BG (28 pages)
- SM87BG (28 pages)
- XB13 Flashing Beacon (8 pages)
- SM87HXB (28 pages)
- FB11UL (4 pages)
- Expertline (16 pages)
- FB11 (20 pages)
- FB12 (20 pages)
- XB4 (24 pages)
- FB15 (4 pages)
- FB15 (16 pages)
- FL12 (20 pages)
- FL11 (20 pages)
- SM87 LU3 (24 pages)
- LD15 (32 pages)
- XB12 (20 pages)
- XB11 (24 pages)
- SM87LED (20 pages)
- XB10 (20 pages)
- XB12 (20 pages)
- XB13 (2 pages)
- XB15 (24 pages)
- XB15 (32 pages)
- XB16 (8 pages)
- XB9 (16 pages)
- XB8 (20 pages)
- dSLB 20 (4 pages)
- dSLB 20 LED (8 pages)
- DB1 (8 pages)
- PAS2 (4 pages)
- PAS2 (4 pages)
- DB1 (20 pages)
- HD1 Range (4 pages)
- HD1 Range (24 pages)
- CU1 (36 pages)
- JB11 (4 pages)