Sealey VS7002 User Manual
Oil seal removal/installation kit, Vs7002, Instructions for
INSTRUCTIONS FOR:
OIL SEAL REMOVAL/INStALLAtION KIt
MODEL No:
VS7002
1. SAFEtY INStRUCtIONS
Thank you for purchasing a Sealey product. Manufactured to a high standard this product will, if used according to these instructions and properly
maintained, give you years of trouble free performance.
IMPORTANT: PLEASE READ tHESE INStRUCtIONS CAREFULLY. NOtE tHE SAFE OPERAtIONAL REQUIREMENtS, WARNINGS AND CAUtIONS.
USE tHE PRODUCt CORRECtLY AND WItH CARE FOR tHE PURPOSE FOR WHICH It IS INtENDED. FAILURE tO DO SO MAY CAUSE DAMAGE
AND/OR PERSONAL INJURY AND WILL INVALIDAtE tHE WARRANtY. PLEASE KEEP INStRUCtIONS SAFE FOR FUtURE USE.
2. INtRODUCtION & CONtENtS
WARNING! Ensure Health and Safety, local authority and general workshop practice regulations are adhered to when using tools.
DO NOt use tools if damaged.
Maintain tools in good and clean condition for best and safest performance.
Ensure that a vehicle which has been jacked up is adequately supported with axle stands.
Wear approved eye protection. A full range of personal safety equipment is available from your Sealey dealer.
Wear suitable clothing to avoid snagging. Do not wear jewellery and tie back long hair.
Account for all tools, locking bolts, pins and parts being used and do not leave them in or near the engine.
IMPORTANT: These instructions are provided as a guide only. Always refer to the vehicle manufacturer’s service instructions, or a proprietary
manual, to establish the current procedure and data.
Introduction
Comprehensive kit for the removal and installation of oil seals without damaging the new seal or housing. Kit includes a seal removal puller and
seven adaptors to fit most sizes of seal. Designed to allow original pulley/flange bolt to be used to press in the new seal, ensuring a squarely
seated seal every time.
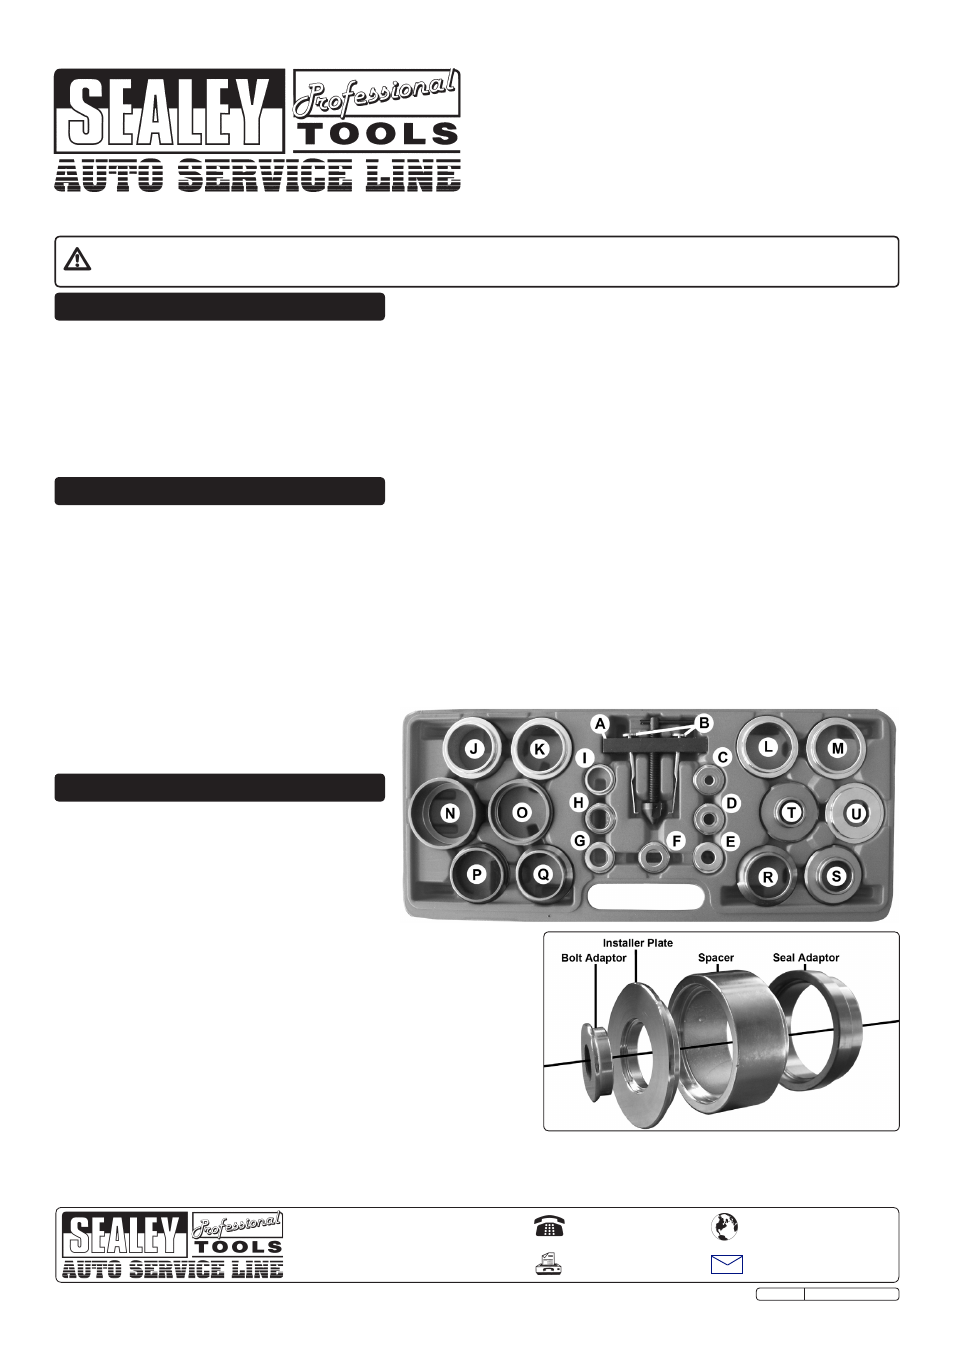
Contents
Ref..
Description . . . . . . . Part No.
A . . . Puller . . . . . . . . . . . . VS7002.01
B . . . Seal Hooks . . . . . . . . VS7002.02
C. . . Bolt Adaptor 8mm . . . VS7002.04
D. . . Bolt Adaptor 10mm . . VS7002.05
E . . Bolt Adaptor 12mm . . VS7002.06
F . . . Bolt Adaptor 14mm . . VS7002.07
G. . . Bolt Adaptor 16mm . . VS7002.08
H. . . Bolt Adaptor 18mm . . VS7002.09
I. . . . Bolt Adaptor 20mm . . VS7002.10
J . . . Spacer 27mm . . . . . . VS7002.14
K . . . Spacer 22mm . . . . . . VS7002.13
L . . . Spacer 18mm . . . . . . VS7002.12
M. . . Spacer 10mm . . . . . . VS7002.11
N. . . Seal Adaptor 64mm. . VS7002.19
O. . . Seal Adaptor 56mm. . VS7002.18
P . . . Seal Adaptor 49mm. . VS7002.17
Q. . . Seal Adaptor 46mm. . VS7002.16
R. . . Seal Adaptor 42mm. . VS7002.21
S . . . Seal Adaptor 34mm. . VS7002.20
T . . . Seal Adaptor 28mm. . VS7002.15
U. . . Installer Plate. . . . . . . VS7002.03
NOTE: It is our policy to continually improve products and as such we reserve the right to alter data, specifications and component parts without prior notice.
IMPORtANt: No liability is accepted for incorrect use of this product.
WARRANtY: Guarantee is 12 months from purchase date, proof of which will be required for any claim.
INFORMAtION: For a copy of our latest catalogue and promotions call us on 01284 757525 and leave your full name and address, including postcode.
Sole UK Distributor, Sealey Group,
Kempson Way, Suffolk Business Park
,
Bury St. Edmunds, Suffolk,
IP32 7AR
Original Language Version
VS7002 Issue: 1 - 10/03/11
01284 757500
01284 703534
www.sealey.co.uk
Web
3. OPERAtION
3.1 Removing old seal.
3.1.1 Remove pulley as per proprietary manual.
3.1.2 Insert the seal hooks (fig.1B) into the inner edge of
the seal 180° apart.
3.1.3 Insert the legs of the hooks into the arm of the seal
puller (fi.1A) , screw down and seat the puller force
screw into the end of the shaft.
3.1.3 Screw in the force screw to remove the oil seal.
3.2 Installing new seal
3.2.1 Take an appropriately sized bolt adapter and insert it into the installer
plate (fig.2).
3.2.2 When the shaft protrudes a distance from the block/head a spacer has to be
used. Any combination of the 4 different length spacers may be needed to
ensure the bolt can be screwed in enough to seat the seal. (fig.2)
3.2.3 Finally use a seal adaptor that is relative to the size of the seal. (fig.2)
3.2.4 Slide the oil seal and installation assembly over the shaft and screw the pulley
bolt into the shaft through the bolt adaptor.
3.2.5 Screw in the bolt ensuring the oil seal is square as it is compressed into the
seal housing. Continue to tighten the bolt until the oil seal if seated fully.
Unscrew the bolt and replace pulley as per proprietary manual.
fig.2
fig.1