Sealey CVS18 User Manual
Cvs18, Instructions for, Model no
INSTRUCTIONS FOR:
UNIVERSAL SPLIT CVJ BOOT
Ø56-120mm
Model No:
CVS18
1.
SAFETY INSTRUCTIONS
2.
INTROdUCTION & SPECIFICATIONS
Thank you for purchasing a Sealey product. Manufactured to a high standard this product will, if used according to these instructions and properly maintained, give
you years of trouble free performance.
IMPORTANT: READ THESE INSTRUCTIONS CAREFULLY. NOTE THE SAFE OPERATIONAL REQUIREMENTS, WARNINGS AND CAUTIONS.
USE THE TOOL CORRECTLY AND WITH CARE FOR THE PURPOSE FOR WHICH IT IS INTENDED. FAILURE TO DO SO MAY CAUSE DAMAGE
AND/OR PERSONAL INJURY AND WILL INVALIDATE THE WARRANTY. PLEASE KEEP INSTRUCTIONS SAFE FOR FUTURE USE.
WARNING! Ensure Health and Safety, local authority and general
workshop practice regulations are adhered to when using tools.
Ensure that a vehicle which has been jacked up is adequately
supported with axle stands and that the wheels are chocked,
refer to the vehicle manufacturer’s service instructions, or a
proprietary manual.
Wear approved eye protection. A full range of personal safety
equipment is available from your Sealey dealer.
Wear suitable clothing to avoid snagging. Do not wear jewellery
and tie back long hair.
IMPORTANT: This manual is provided as a guide only, refer
to the vehicle manufacturer’s service instructions, or a
proprietary manual, to establish the current procedure and
data.
WARNING! Failure to heed safety and warning instructions may
result in damage and/or personal injury and will invalidate the
warranty.
WARNING! The warnings, cautions and instructions
referred to in this manual cannot cover all possible
conditions and situations that may occur. It must be
understood that common sense and caution are factors
which cannot be built into this product, but must be
applied by the operator.
3. OPERATION
3.1. Access will be improved by removal of the wheel and brake
caliper, although this is not essential.
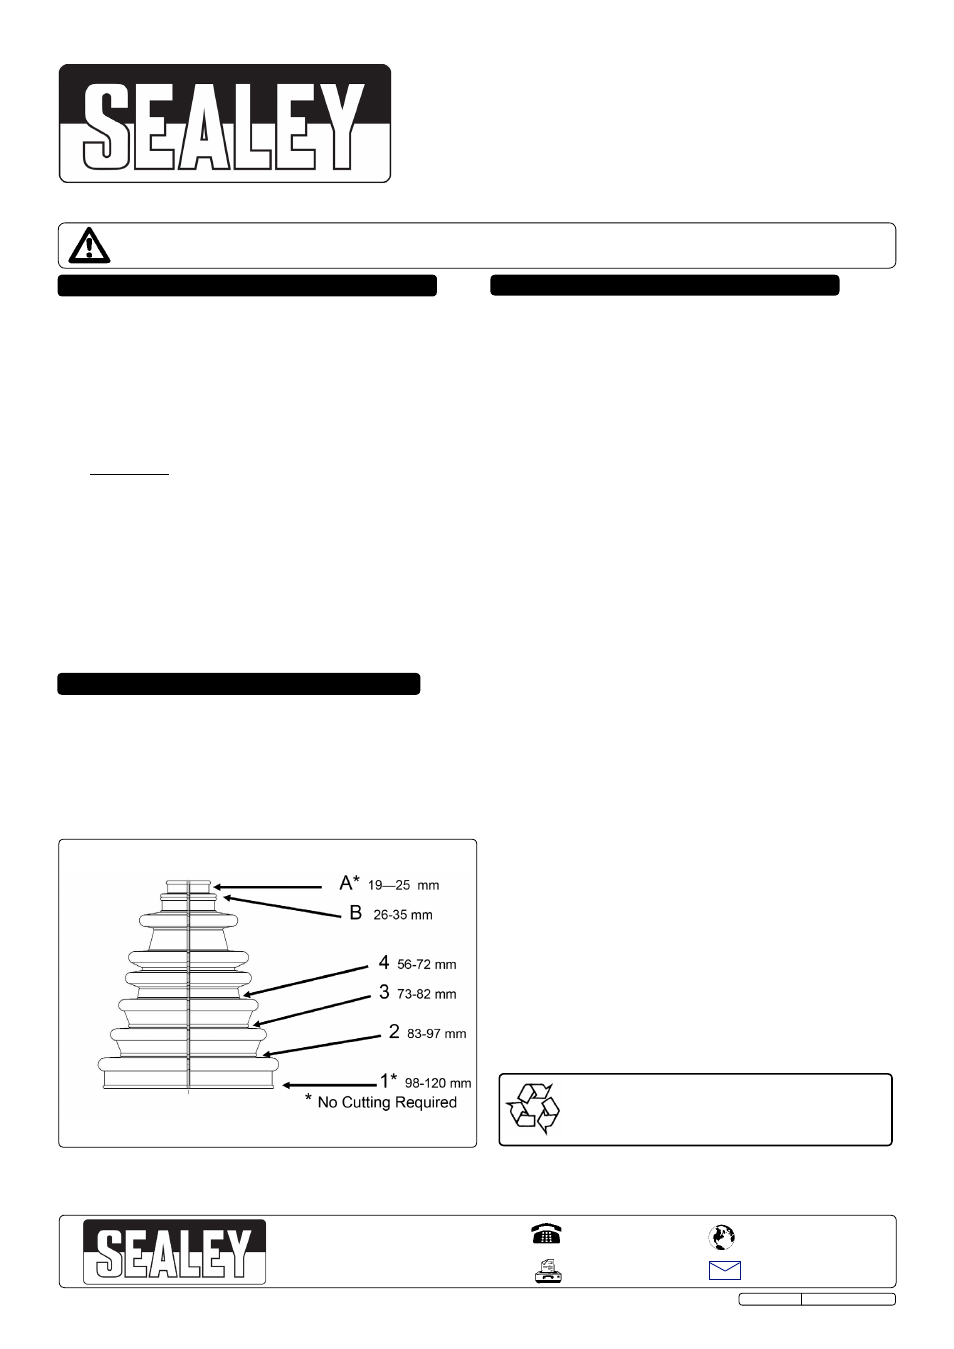
3.2. Check the size required for your CVJ boot. Remove the old boot
and assess the required size by measuring it, and the CV joint
once it has been cleaned.
3.3. Wipe away the old grease. If the CV joint contains water or dirt,
clean it as much as possible. Clean the driveshaft and flange
thoroughly. If the working area is awkward, wrap the joint
and shaft in film, such as Clingfilm or a seat protector to avoid
contaminating the new boot with grease.
3.4. Wash and dry your hands thoroughly. The following steps cannot
be done with oily or wet hands. Before glueing, practice fitting
the boot joint faces together, 1 or 2 centimetres at a time,
starting with the small end. Don’t try to hold the whole seam
together, it is almost impossible without the glue.
3.5. Put on the rubber gloves provided. Stretch the boot at the small
end. There is no risk of tearing the rubber. Put the small end
of the boot around the shaft. Stretch the boot at the small end,
pulling each side around the shaft so that it overlaps at the join if
you can. Hold it overlapped for a few seconds to take the tension
out of the rubber.
3.6. Starting at the small end, smear a little glue across the joint face
and fill the groove for about 2 centimetres, to the start of the first
convolution. Now make the joint carefully, readjusting until the
tongue and groove are neatly settled in. Hold the join still for
about 60 seconds to allow the glue to set. Ensure that fingers are
kept well clear of the glue to avoid accidental adhesion.
3.7. In very cold or very dry weather allow a little more time for the
glue to set. Release carefully to make sure the joint has taken. If
glue has squeezed out and formed a blob on the surface, it will
take time to harden but the join will not be affected. Scrape away
the excess glue with a piece of card at the end of the job.
3.8. Glue the next 2 centimetres and assemble in the same way. As
it is not under tension, it only needs to be held together for 20
seconds. Repeat to the end of the boot, then allow the glue to
cure for 20 minutes.
3.9. Cut the corner of the grease sachet and direct the grease into
the joint. There is no need to put grease into the boot, but it
doesn’t matter if you do – once made, the glued joint is not
affected by the grease.
3.10. Fit the boot over the CV joint and fit the ties securely at both
ends. Ensure that any components removed from the vehicle are
replaced securely before lowering.
NOTE: It is our policy to continually improve products and as such we reserve the right to alter data, specifications and component parts without prior notice.
IMPORTANT: No liability is accepted for incorrect use of this product.
WARRANTY: Guarantee is 12 months from purchase date, proof of which will be required for any claim.
INFORMATION: For a copy of our latest catalogue and promotions call us on 01284 757525 and leave your full name and address, including postcode.
Sole UK distributor, Sealey Group,
Kempson Way, Suffolk Business Park
,
Bury St. Edmunds, Suffolk,
IP32 7AR
©Jack Sealey Ltd Original Language Version
CVS18 Issue: 1 24/01/14
01284 757500
01284 703534
www.sealey.co.uk
W e b
Universal CV boot made from high quality neoprene that is resistant to
grease, water, ozone, abrasion and extremes of temperature. Suitable
for 98% of cars and car derived vans. No dismantling of joint/shaft re-
quired and fitted in 20 minutes. Supplied with fitting kit including clips,
grease sachet, disposable gloves, glue and cutting guide.
Model No:
CVS18
Joint Diameter:
56-120mm
Shaft Diameter:
19-35mm
Environmental Protection.
Recycle unwanted materials instead of disposing of them as
waste. All tools, accessories and packaging should be sorted,
taken to a recycling centre and disposed of in a manner which
is compatible with the environment.