Instructions – Sealey VS301 User Manual
Page 2
4. inSTrucTionS
VS301 Issue No: 3(I)- 06/01/14
NOTE: It is our policy to continually improve products and as such we reserve the right to alter data, specifications and component parts without prior notice.
iMporTanT: No liability is accepted for incorrect use of this product.
WarranTY: Guarantee is 12 months from purchase date, proof of which will be required for any claim.
inForMaTion: For a copy of our latest catalogue and promotions call us on 01284 757525 and leave your full name and address, including postcode.
noTe: To minimise the possibility of damage to the engine, it is
advisable to remove the cylinder head from the engine
prior to commencing work of this nature. Alternatively
use a suitable method of removing any swarf/debris from
the combustion chamber, ensuring that the piston is at
top dead centre. Wear eye protection when removing any
swarf/debris from the engine. A full range of personal safety
equipment is available from your Sealey Dealer.
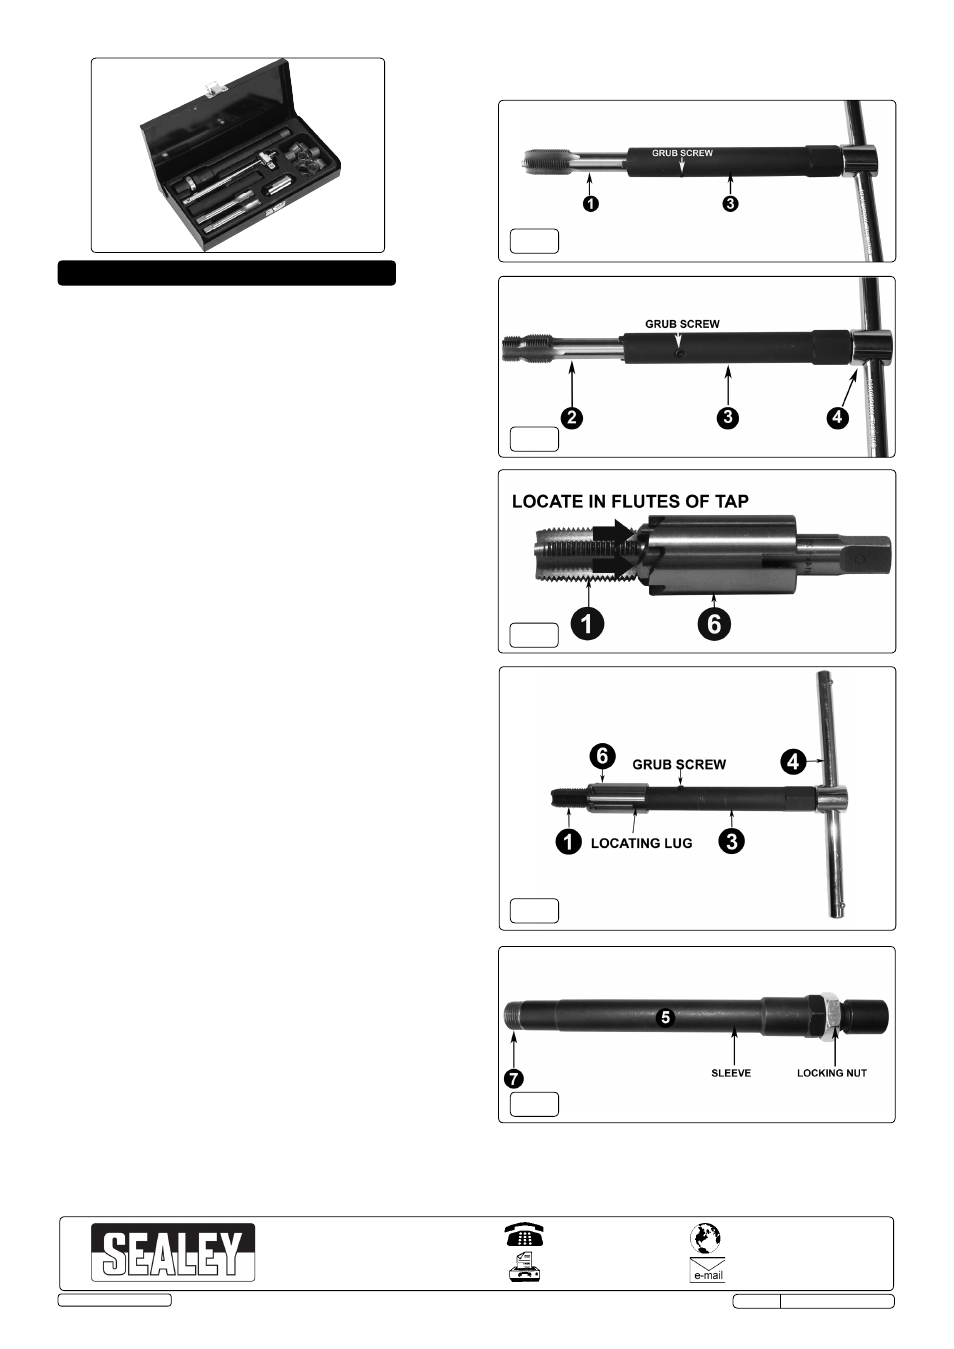
4.1.
Remove the spark plug from the cylinder head.
4.2.
Place the plug tap (1) into the wrench (3) and lock into
place with the grub screw using the allen key (8) (fig.1).
4.3.
Attach the T-bar (4) to the wrench (3) and run the plug tap
(1) down the damaged spark plug hole in the cylinder head.
Remove the swarf/debris.
4.4.
Remove the plug tap (1) from the wrench (3). Insert the
step tap (2) into the wrench (3) and lock into place with the
grub screw using the allen key (8). Attach the T-bar (4) to
the top of the wrench (3) (fig.2).
4.5.
Carefully cut a M16x1.25 thread (using a suitable cutting
fluid) into the damaged spark plug hole in the cylinder head
and remove the swarf/debris.
4.6.
Remove the step tap (2) from the wrench (3) and place
the seat cleaner (6) over the plug tap (1) so that it locates
in the flutes (fig.3). Place the plug tap (1) and the seat
cleaner (6) into the wrench (3) so that the lugs on the
wrench (3) locate into the seat cleaner recesses (6). Lock
into place with the grub screw using the allen key (8) (fig.4).
4.7.
Attach the T-bar (4) to the top of the wrench (3). Carefully
place the seat cleaner (6) over the spark plug seat on the
cylinder head and using a suitable lubricant, clean the
spark plug seat by rotating the seat cleaner clockwise
whilst applying moderate pressure.
do noT apply
excessive force. Remove any debris.
4.8.
Select the size of insert (7) required and screw about three
quarters of the way onto the insert drive (5). Check the
insert (7) is flush and tight against the insert drive sleeve
and lock into position with the locking nut on the insert drive
(5) using suitable spanners (fig.5).
4.9.
Apply a suitable thread locking solution to the exterior
thread of the insert (7). Attach the T-bar (4) to the insert
drive (5) and carefully screw the insert (7) into the
M16x1.25 threaded hole in the cylinder head until it is
fully located. Loosen the locking nut on the insert drive
(5) and release the sleeve from the insert (7). Tighten
the lock nut and carefully completely remove the insert
drive (5) from the insert (7). Allow sufficient time for the
thread lock to cure before proceeding to the next step.
4.10.
Thoroughly clean away any swarf/debris, especially any
that may have accumulated in the combustion chamber if
the cylinder head has not been removed. Test the internal
thread of the insert (7) with a spark plug.
4.11.
Ensure that all tools are removed from the work area/
engine bay and returned to the tool tray. Store in a safe,
dry, childproof location.
01284 757500
www.sealey.co.uk
01284 703534
Web
Sole uk distributor, Sealey group,
Kempson Way, Suffolk Business Park,
Bury St. Edmunds, Suffolk
IP32 7AR
Original Language Version
fig.2
fig.4
fig.1
fig.3
fig.5
© Jack Sealey Limited