Fig. 2, Fig. 3, Operation 5. adjustments – Sealey SM65 User Manual
Page 3: Motor pulley blade pulley
WARNING! BEFORE MAKING ANY ADJUSTMENTS, DISCONNECT SAW FROM POWER SUPPLY.
5.1.
Blade tension
5.1.1. Disconnect the machine from the power supply and then remove blade cover.
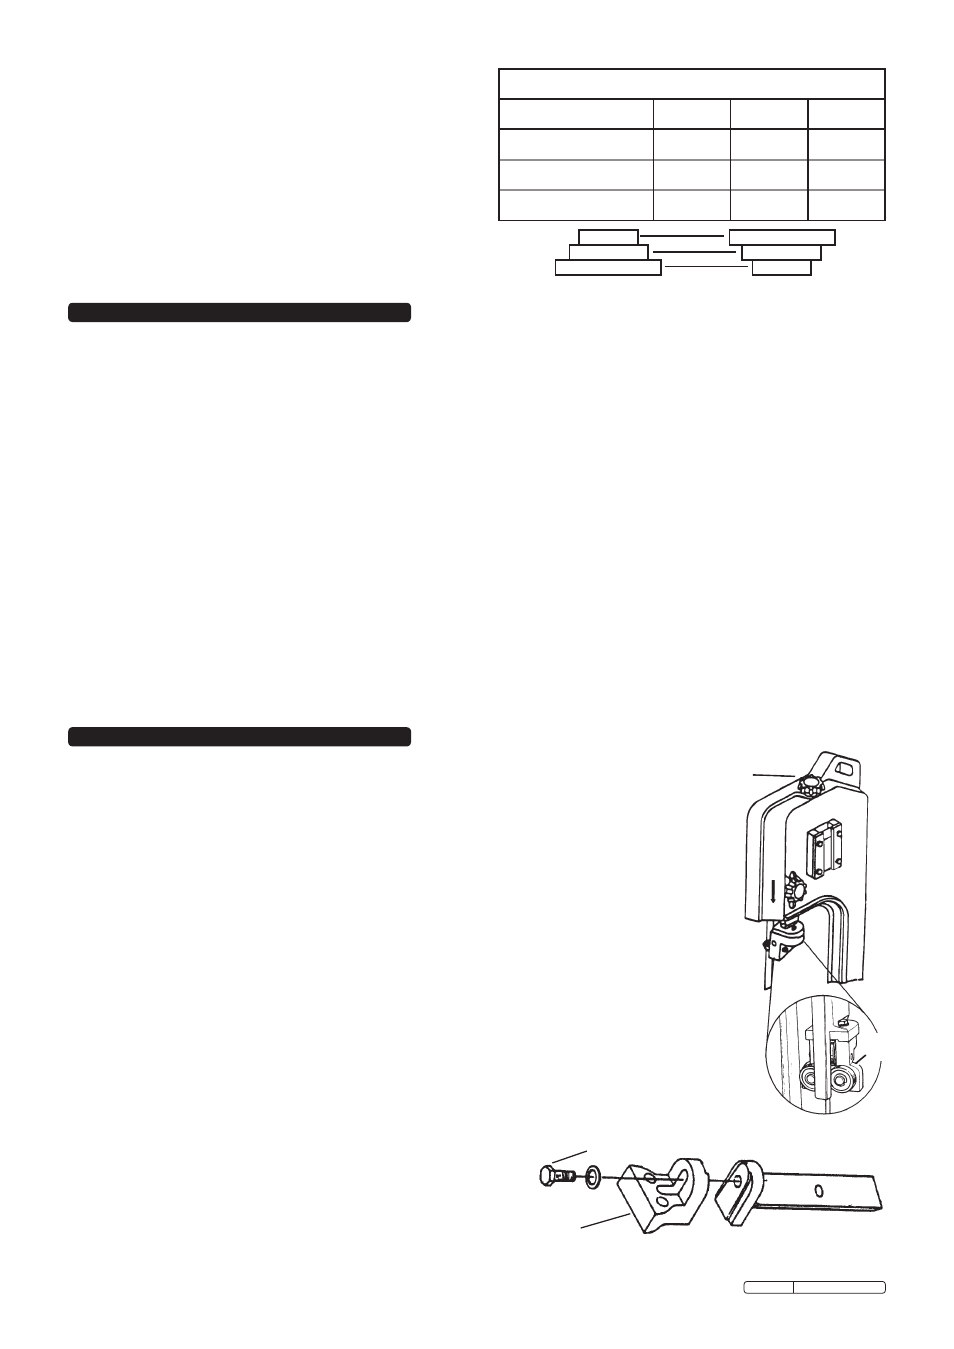
5.1.2. Adjust the blade tension with knob (95) (fig.2.A), so that light thumb pressure on the blade midway between
the blade wheels produces a deflection of approximately 1mm.
Do not over tighten.
5.1.3. Replace blade cover, reconnect to power source and run for two to three minutes to seat the blade.
5.1.4. Disconnect saw from the power source, remove blade cover and recheck tension. Replace blade cover.
5.2.
Blade guide bearing adjustment
Correct guide bearing (fig.2.B) adjustment is important so that the blade runs smoothly and evenly without
twisting or snagging anywhere. Each of the outer guide bearings is mounted on an adjustable eccentric bush.
5.2.1. Disconnect the machine from the power supply.
5.2.2. Loosen the bearing pivot (59) lock nut (12) while holding the pivot, immediately above the bearing, with an
open ended spanner.
5.2.3. Turn the pivot to adjust the bearing. The bearing should barely touch the blade (0.001” clearance).
Tighten the lock nut when satisfied with the bearing adjustment.
5.2.4. Adjust both outer guide bearings.
5.2.5. When satisfied that the adjustment is accurate, carefully turn the blade wheels by hand to see if the blade
snags or rubs at any point. Readjust bearing(s) if necessary.
5.3.
Blade guide adjustment
5.3.1. Disconnect the machine from the power supply.
5.3.2. Loosen hex bolt (fig.3.E) and pivot blade adjustment bracket (fig.3.F) until blade is perpendicular to vice bed (103).
5.3.3. Retighten the hex bolt (fig.3.E).
5.4.
Replacing the saw blade
We recommend you keep a small supply of commonly used saw blades to hand. Change saw blades frequently for
best results. Ensure you choose a blade with a pitch suitable for workpiece to be cut (see cutting chart, Section 3).
WARNING! Take care when handling saw blades, blade teeth are
very sharp.
5.4.1. Loosen the blade tension, move both front guide bearings away from
blade (see para. 5.2.) and remove blade cover.
5.4.2. Carefully remove old blade and install new one ensuring that tooth
direction is consistent with the blade travelling left-to-right in the cutting
area.
5.4.3. Reset blade tension (see para. 5.1.), check tracking (see para. 5.5.), replace blade cover and adjust guide bearings
(see para. 5.2.).
WARNING! Before operating the bandsaw ensure that you read, understand and apply the safety instructions in Section 1.
NOTE: Before operating the machine certain checks and adjustments will need to be carried out. It is very important that
these instructions are followed carefully in order that the machine is set up safely and correctly.
WARNING! The machine is designed for the cutting of light metal in engineering workshops, garages, metal fabricators, etc.
The SM65.V2 must not be used to cut any other materials (including wood). To do so will invalidate your insurance cover and your
warranty and may cause damage and/or personal injury.
Note: The harder the material being cut, the slower the cutting speed should be. The use of a cutting oil is recommended with the
higher blade speeds.
4.1.
Horizontal Cutting
WARNING! BEFORE MAKING ANY ADJUSTMENTS, DISCONNECT SAW FROM POWER SUPPLY.
4.1.1. Adjust the blade speed to suit the workpiece (see para. 3.3).
4.1.2. Raise the saw arm as far as possible.
4.1.3. Adjust the stock stop rod (104) to the desired length.
4.1.4. Raise the handle of quick grip vice (103) to unlock and slide back vice jaw. Insert workpiece against fixed jaw. Slide vice jaw up to
workpiece and firmly press down vice handle to clamp it securely.
4.1.5. If an angled cut is required slacken lever nut (36). Rotate bevel holder (31) and saw arm to angle required and tighten lever nut (36).
4.1.6. Adjust the two blade guides, by slackening the knob (99) and the screw (43), so that they are close to the workpiece but will not foul it.
4.1.7. Gently lower the arm until the blade is just above the workpiece. Connect the saw to the power supply and start the saw.
DO NOT turn on the machine until the workpiece is secured and the blade has been lowered to just above workpiece.
4.1.8. Bring the blade into contact with the workpiece and then release the arm. If the blade jams and the saw does not automatically shut
off, immediately disconnect it from the power supply. Refer to the ‘Troubleshooting’ section for common problems.
4.1.9. When sawing is completed disconnect from the power supply, raise blade and remove workpiece.
Never raise the blade when the machine is running and never run the machine when the blade is raised.
4. OPERATION
5. ADJUSTMENTS
3.3.
Adjusting blade speed
Adjust the blade speed to suit the metal to be cut. The recommended
pulley selections are shown in the chart to the right.
3.3.1. Disconnect saw from power supply and open the pulley cover (52).
3.3.2. Loosen the motor securing nuts (12) on the motor plate to slacken
the belt.
3.3.3. Move the belt to the required pulley grooves (see chart).
3.3.4. Tension belt and tighten nuts (12), close and secure the pulley cover
using screw (30) and washer (7).
Motor Pulley
Blade Pulley
A
B
C
D
E
F
Recommended Pulley Selection for Various Metals
Material
Motor Pulley Blade Pulley Blade Speed
Tool, stainless or alloy steel.
Bearing bronze.
Small (A)
Large (D)
20m/min
Low to medium carbon steel.
Medium (B)
Medium (E)
29m/min
Aluminium. Copper. Brass.
Large (C)
Small (F
)
50m/min
B
A
fig. 2
E
F
fig. 3
Original Language Version
SM65.V2 Issue: 3 - 08/01/10