Fig.3, Fig.2, Maintenance – Sealey SB993 User Manual
Page 2: Operation, Assembly
6. MAINTENANCE
WARNING! Disconnect from the air supply before performing any
maintenance!
WARNING! Wear approved ear, eye, hand and respiratory
protection when performing any maintenance.
WARNING! Ensure the air supply does not exceed 120psi
(8bar) while operating the unit.
6.1. Changing the blasting medium.
6.1.1. It is not necessary to remove the blasting medium from the
cabinet after every use, however it must be cleaned out when a
different blasting medium is to be used.
6.1.2. Tip the contents of the hopper into a suitable container. Remove
the gun from the hose by loosening the hose clip.
6.1.3. Use a low pressure air line (10 psi) to blow through the hose.
6.1.4. When the cabinet is clean, refit the gun to the hose and tighten
the hose clip.
6.2. Gun maintenance.
6.2.1. Remove the gun from the hose by loosening the hose clip.
6.2.2. Lubricate the gun with a few drops of good grade air tool oil, such
as Sealey ATO500 or ATO1000, dripped into the air inlet.
6.2.3. Lubricate the plunger, between the trigger and the gun handle.
6.2.4. Refit the gun to the hose and tighten the hose clip.
6.2.5. Attach an airline to the gun and operate the blaster for a few
seconds.
5. OPERATION
WARNING! Ensure that you read, understand and apply the
safety instructions in Section 1 before use.
WARNING! Wear approved ear, eye, hand and respiratory
protection when operating the blaster.
WARNING! Ensure the air supply does not exceed 120psi
(8bar) while operating the unit.
5.1. Fill the cabinet with the required abrasive, checking to ensure it is
clean and dry.
5.2. Attach an airline to the gun and press the trigger.
5.3. Before blasting unfamiliar material, spot test to ensure that
damage/pitting will not occur to the material.
5.4. Use even passes of the blaster to remove material such as rust,
body filler or other soft materials. Do not blast in any one area for
more than a few seconds at a time.
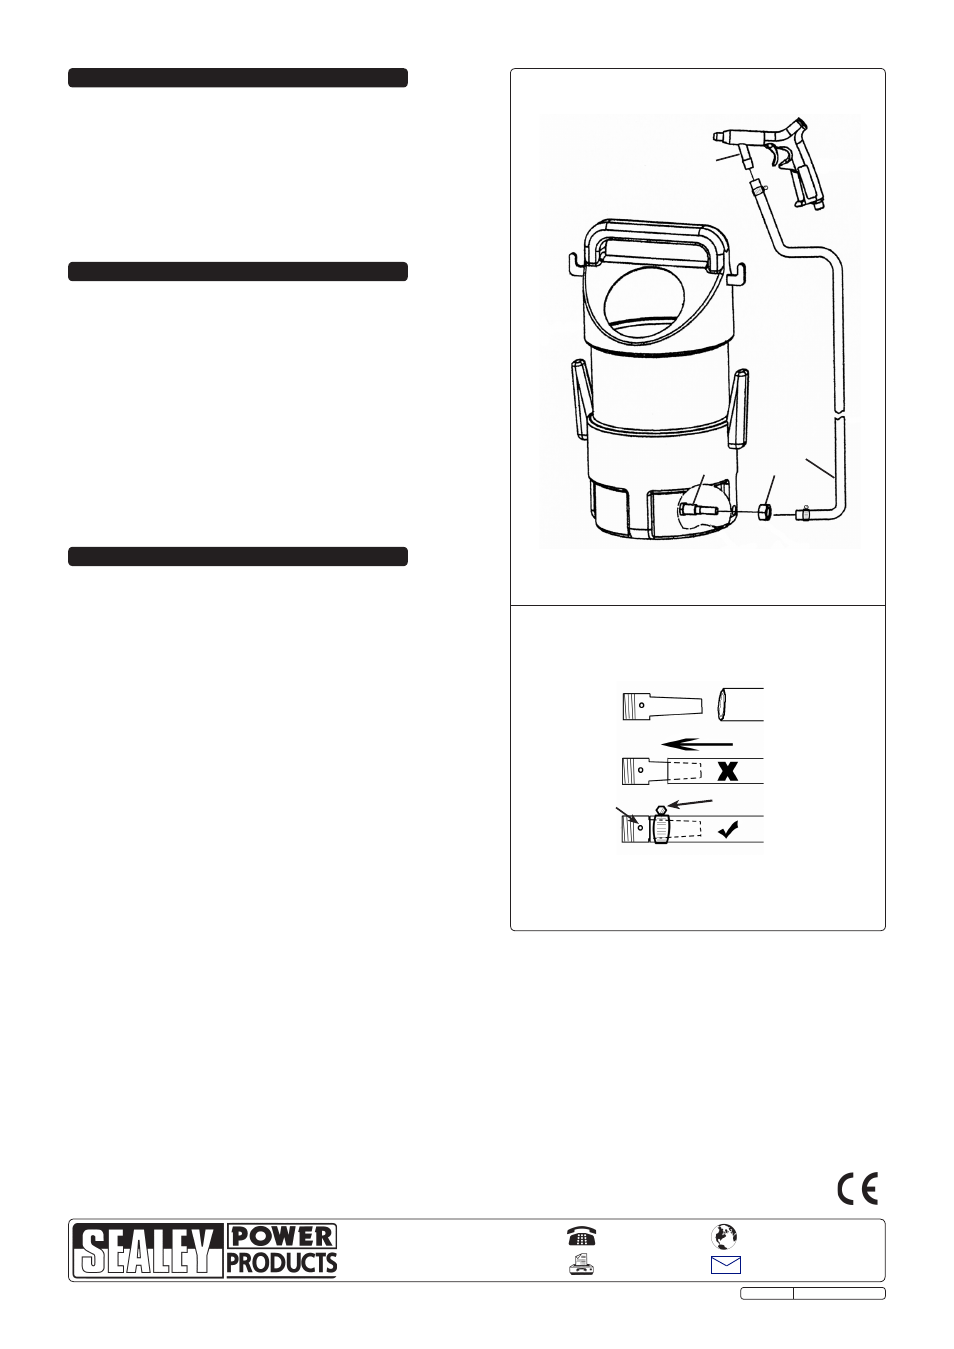
4. ASSEMBLY
4.1.
Fit the set screw (fig.2.1) through the hole in cabinet and secure
using the lock nut (fig.2.2).
4.2.
Fit one end of the hose (fig.2.3) onto the set screw ensuring it is
as far onto the set screw as possible and secured with a hose
clip as shown in fig.3.
4.3.
Attach the other end of the hose to the gun and secure with a
hose clip (fig.2.4).
4.4.
Ensure all fittings have been correctly tightened and the kit is
ready to use.
fig.3
SECURE WITH HOSE CLIP
KEEP HOLE CLEAR
fig.2
2
3
4
1
NOTE: It is our policy to continually improve products and as such we reserve the right to alter data, specifications and component parts without prior notice.
IMPORTANT: No liability is accepted for incorrect use of this product.
WARRANTY: Guarantee is 12 months from purchase date, proof of which will be required for any claim.
INFORMATION: For a copy of our latest catalogue and promotions call us on 01284 757525 and leave your full name and address, including postcode.
01284 757500
01284 703534
Sole UK Distributor, Sealey Group,
Kempson Way, Suffolk Business Park
,
Bury St. Edmunds, Suffolk,
IP32 7AR
www.sealey.co.uk
Web
Original Language Version
SB993.V2 Issue: 2 - 19/11/09