Sealey AK2941 User Manual
Page 2
NOTE: It is our policy to continually improve products and as such we reserve the right to alter data, specifications and component parts without prior notice.
IMPORTANT: No liability is accepted for incorrect use of this product.
WARRANTY: Guarantee is 12 months from purchase date, proof of which will be required for any claim.
INFORMATION: For a copy of our latest catalogue and promotions call us on 01284 757525 and leave your full name and address, including postcode.
01284 757500
01284 703534
Sole UK Distributor, Sealey
Group, Kempson Way, Suffolk
Business Park
,
Bury St. Edmunds, Suffolk,
IP32 7AR
www.sealey.co.uk
Web
Original Language Version
AK2941, AK2953 Issue: 3 - 9/08/11
4.
OPERATION
4.2.
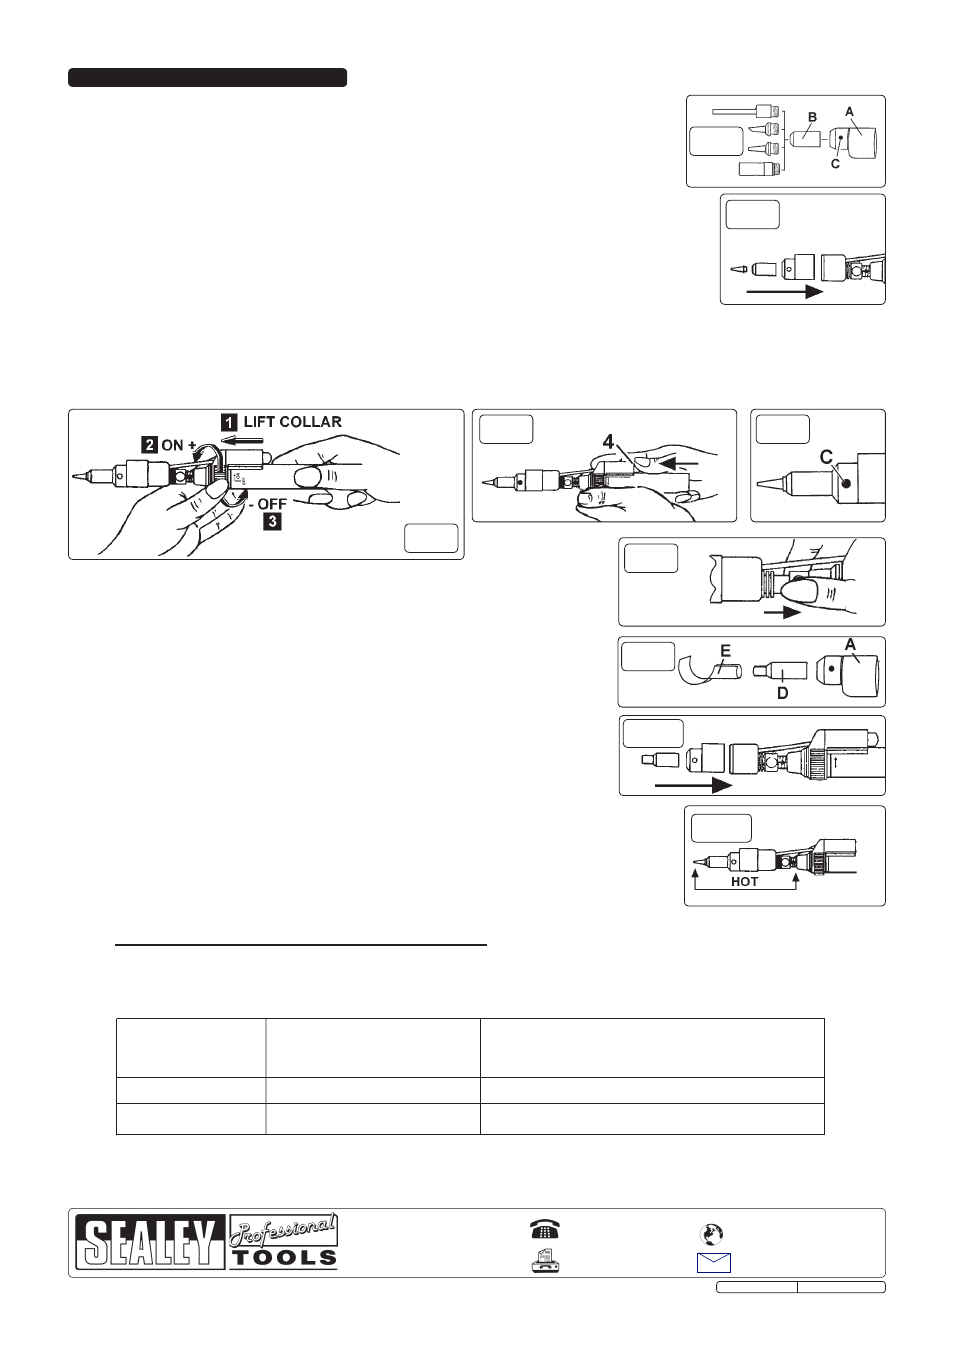
TO USE AS A HOT IRON (for shrink wrapping etc).
4.2.1. Screw the hot air burner head (fig 9.D) onto the burner holder (fig 9.A). This head
has a non-threaded output end and contains a ceramic heating element in the base.
4.2.2. Push the burner assembly onto the top of the torch as far as it will go (fig 10).
4.2.3. Fit the scoop (fig 9.E) if required.
4.2.4. For ignition follow steps 3.2.3. to 3.2.8. above.
The torch is now ready for use as a heat source for shrink wrapping etc.
4.3.
TO USE AS A BURNER (with naked blue flame for burning or heating).
4.3.1. Remove the burner holder (fig 9.A). No cover is required for this mode.
4.3.2. Ignite the torch as in 3.2.3. to 3.2.5. above.
4.3.3. Adjust the flame length by turning the ribbed switch collar.
4.3.4. Apply flame to task. Only use the minimum flame required for the job.
A large flame is less stable and wastes fuel.
4.4.
TURNING THE TORCH OFF.
When the job is complete, turn the red switch collar away from the “ON” symbol arrow
towards the
“OFF” symbol (fig 5.3). When the switch collar reaches the “OFF” position, the collar
will drop down by 1mm and lock. (When you next come to use the torch, remember to lift the
switch collar before attempting to turn it.)
WARNING! The torch head is very hot above the ribbed switch collar (fig.11), allow it to cool
before handling.
4.5.
GENERAL INFORMATION.
When adjusting the flame or switching ON or OFF always hold the the ribbed portion of the switch collar only.
Do not attempt to adjust the torch by turning the torch head.
The torch should not be used continuously for more than 15 minutes at a time. After 15 minutes allow the torch to cool then
continue with the task for a maximum of another 15 minutes. Keep the torch clean and store safely. For spare soldering tips and parts
contact your local Sealey dealer.
4.1.
TO USE AS A SOLDERING IRON or POLYFOAM CUTTER.
▲
CAUTION: ENSURE ALL PARTS ARE COOL FROM ANY PREVIOUS USE BEFORE PROCEEDING.
4.1.1. Screw the required soldering tip (or cutter) (fig.3) to the threaded burner head (fig 3.B). This head
contains a ceramic heating element. Screw the head onto the burner holder (fig 3.A).
4.1.2. Push the burner assembly onto the top of the torch as far as it will go (fig.4).
4.1.3. To turn on the gas flow prior to ignition, hold the main body of the torch so that the
on/off symbol
is facing you. With the other hand hold the ribbed portion of the red plastic switch collar and lift it
(fig 5.1) before turning it in the direction of the “ON” arrow (fig 5.2) until you can hear the gas escaping,
(
the red switch collar will not turn until you lift it).
4.1.4. Press the red ignition button (fig.6.4) to ignite the gas.
4.1.5. Allow the blue flame to burn for about 5-10 seconds in order to heat the element in the head. Observe
the element through the air hole (fig.7.C) - it should glow red.
4.1.6. Take the shuttle lever (fig 8) and pull it back on its spring as far as it will go and release it.
This will adjust the air supply to the flame and convert the hot blue flame to a gas jet which will burn
on and above the head element.
DO NOT hold the shuttle lever down as this may extinguish the supply
to the element allowing it to cool to a point where it will not ignite the gas when the lever is released.
▲
CAUTION! DO NOT TOUCH THE SHUTTLE LEVER AGAIN AS IT BECOMES VERY HOT.
4.1.7. Turn the ribbed collar (fig 5.3) to adjust the gas flow to a minimum in order to sustain the ceramic glow.
4.1.8. Allow the torch to stand for about 2 minutes in order to achieve maximum output. The torch may now be used as required.
Note: If you cease working and intend to restart, allow all parts to cool before following above procedure again.
Torch will not ignite.
No fuel.
To high or low gas pressure.
Air holes blocked.
Damaged torch.
Refill with butane gas.
Adjust the gas open/close valve.
Check that all holes are clear.
Contact service agent.
Tip does not heat up.
Hot blue flame does not
convert when shuttle used.
The flame continues to burn.
The ceramic tip is worn or damaged.
Poor gas pressure.
Change the tip.
Re-fill with gas.
Push the shutter lever down once again and hold for 2-3 seconds.
4.6.
TROUBLE SHOOTING.
fig.3
fig.4
fig.5
fig.6
fig.7
fig.8
fig.9
fig.10
fig.11