Filling & operation fig.1 fig.2 – Sealey SD400K User Manual
Page 2
NOTE: It is our policy to continually improve products and as such we reserve the right to alter data, specifications and component parts without prior notice.
IMPORTANT: No liability is accepted for incorrect use of this product.
WARRANTY: Guarantee is 12 months from purchase date, proof of which will be required for any claim.
INFORMATION: For a copy of our latest catalogue and promotions call us on 01284 757525 and leave your full name and address, including postcode.
01284 757500
01284 703534
Sole UK Distributor, Sealey Group,
Kempson Way, Suffolk Business Park
,
Bury St. Edmunds, Suffolk,
IP32 7AR
www.sealey.co.uk
Original Language Version
© Jack Sealey Limited
Environmental Protection
Recycle unwanted materials instead of disposing of them as waste. All tools, accessories and packaging should be sorted, taken to a recycling centre
and disposed of in a manner which is compatible with the environment.
SD400K Issue: 1 - 02/09/14
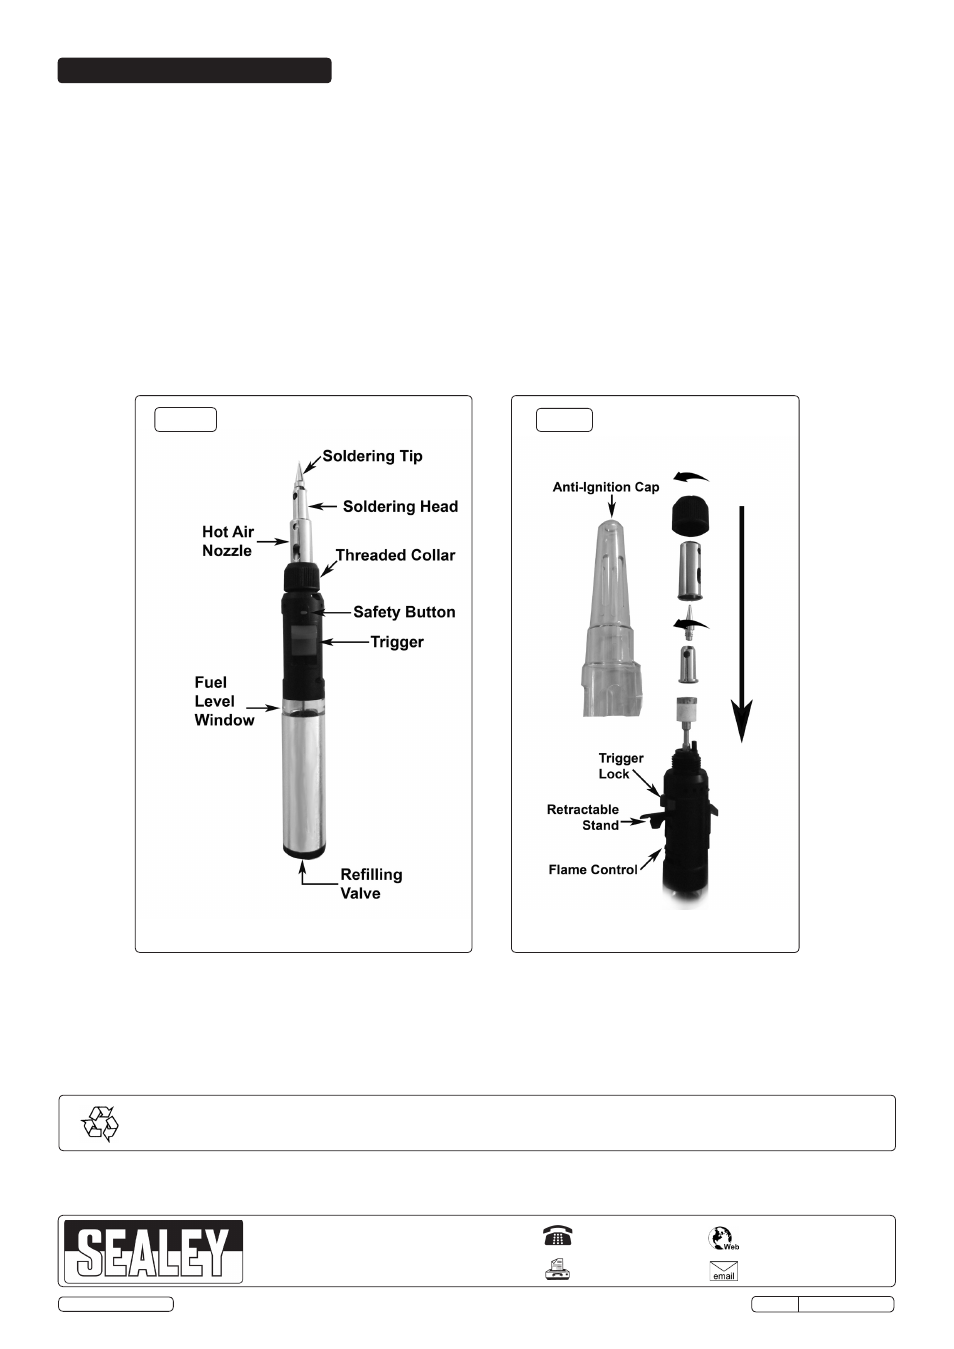
4. FILLING & OPERATION
fig.1
fig.2
4.1.
Filling:
Use standard butane fuel. Fill in a well ventilated area away from open flame. Turn the torch off, make sure the flame is out, allow to cool
down for five minutes before filling.
4.1.1. Hold the torch upside down and insert the filling can’s nozzle into the gas filling valve (fig.1). Press the nozzle into the valve and release
gas. Once gas begins to seep out around the edge of the nozzle, the gas tank is full. Remove the filling can.
4.1.2. The fuel level may be checked by looking in the fuel level window (fig.1).
4.2.
Operation:
4.2.1.
Remove the anti-ignition cap.
4.2.2. Select required flame size using the flame control (fig.2).
4.2.3.
Soldering Iron. Ensure soldering tip (fig.1) is fitted, press the safety button (fig.1) and pull the trigger down. Once the flame
is established, the trigger may be locked by sliding the trigger lock (fig.2) to the right.
4.2.4.
Pencil Torch. Remove the soldering head and ignite as in 4.2.3.
4.2.5.
Flameless Heat Source. Remove the soldering tip from the soldering head and ignite as in 4.2.3.
4.2.6. If the trigger has been locked, move the trigger lock to the left to extinguish the flame.
4.2.7. Deploy the retractable rest to stand the torch after use to avoid damaging the surface on which it stands.