Fig.1, Assembly 6. operation – Sealey IR1000 User Manual
Page 2
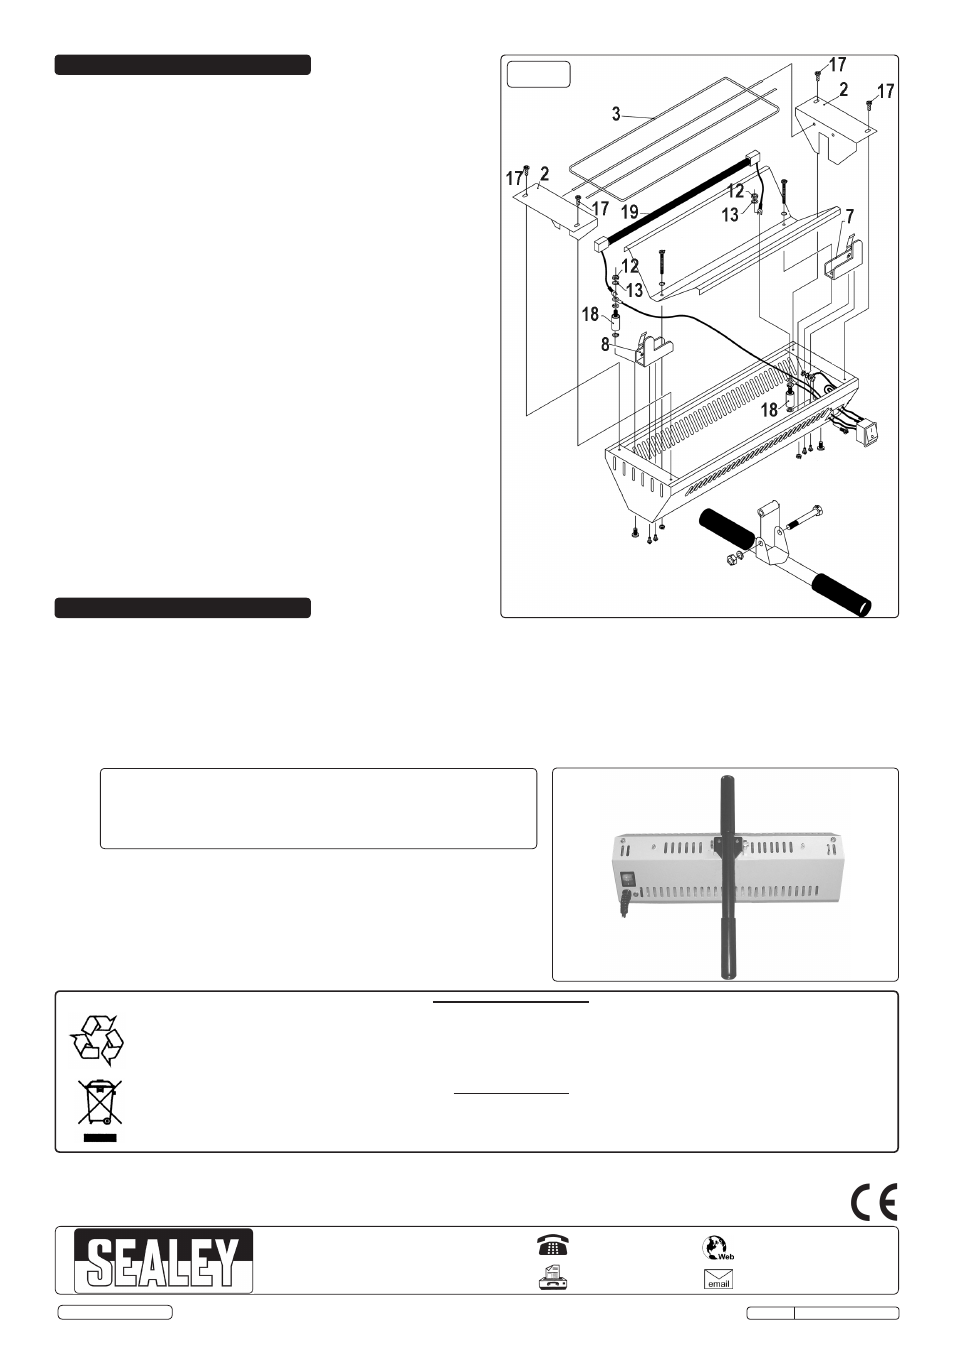
3.1.
Fit The Handle (FIG.1).
3.1.1. The IR1000 has been packed with a separate handle and lamp
ready for attachment and fitting to the heater. Please leave the
lamp in transit packing until ready to fit.
3.1.2. The handle should be attached to the main unit by means of the
bolt supplied, ensuring the spacer provided is fitted between the
two fixing posts of the heater. Please ensure the washer is
fitted under the nut, then fully tighten to secure.
3.1.3. When fitted, the pre-made hole in the grip of the handle should be
at the bottom of the heater. If correct you will be able to tilt the
body of the heater in a downward direction only.
3.2
Fit The Lamp (FIG.1).
3.2.1. Remove the two screws (17) from one end reflector (2), this will
release the guard (3) and expose one of the lamp terminal end
posts (18).
3.2.2. Now remove the other end reflector (2) exposing the other lamp
terminal (18).
3.2.3. Release the nuts (12) on the exposed terminal end posts just
enough to allow the fork terminals of the lamp leads to be pushed
under the washers (13).
3.2.4. Carefully remove the lamp (19) from its packing, holding it by the
porcelain end caps only, taking care not to handle the quartz
glass.
3.2.5. Carefully insert the end caps of the lamp under the spring
retaining clips (7 & 8) of the heater. The fork terminals on each
end of the lamp should now be inserted under the washer (13) of
the lamp end posts and nuts (12) tightened to make a good
connection.
3.2.6. The lamp leads should then be tucked away around the space at
each end of the heater.
3.2.7. Now replace the end reflectors (2) and guard (3) to complete the
assembly.
Fig.1
Material
Drying Time
Distance
Polyester stopper
08 - 12mins
600 - 700mm
MS primer
15 - 18mins
500 - 600mm
Water-based filler paint
15 - 18mins
500 - 600mm
Finishing paint
18 - 25mins
400 - 500mm
4.4
ON/OFF switch. To switch the unit on operate the rocker switch on the
underside of the unit. The ‘O’ symbol is the ‘OFF’ position and the ‘I’
symbol is the ‘ON’ position.
Important: Excessive drying time will burn the paint and may distort the
panel.
4.5.
When the heating period is over switch off at socket and then remove dryer
plug.
4.6.
Allow the dryer to cool before moving it to a safe, dry, childproof storage area.
5. ASSEMBLY
6. OPERATION
Environmental Protection
Recycle unwanted materials instead of disposing of them as waste. All tools, accessories and packaging should be sorted,
taken to a recycling centre and disposed of in a manner which is compatible with the environment.
When the product becomes completely unserviceable and requires disposal, drain off any fluids (if applicable)
into approved containers and dispose of the product and the fluids according to local regulations.
WEEE Regulations
Dispose of this product at the end of its working life in compliance with the EU Directive on
Waste Electrical and Electronic Equipment (WEEE). When the product is no longer required, it must be disposed
of in an environmentally protective way. Contact your local solid waste authority for recycling information.
NOTE: It is our policy to continually improve products and as such we reserve the right to alter data, specifications and component parts without prior notice.
IMPORTANT: No liability is accepted for incorrect use of this product.
WARRANTY: Guarantee is 12 months from purchase date, proof of which will be required for any claim.
INFORMATION: For a copy of our latest catalogue and promotions call us on 01284 757525 and leave your full name and address, including postcode.
01284 757500
01284 703534
Sole UK Distributor, Sealey Group,
Kempson Way, Suffolk Business Park
,
Bury St. Edmunds, Suffolk,
IP32 7AR
www.sealey.co.uk
Original Language Version
© Jack Sealey Limited
Note: The IR lamp is fragile and therefore it is important that the IR1000 is not subjected to any unnecessary shocks or vibration and
is not moved when the lamp is on.
WARNING! Ensure that you read, understand and apply the safety instructions in Section 1 before using the panel dryer.
4.1.
Allow a 4-5 minute 'flash-off' period for excess solvent to evaporate before close positioning of dryer to panel - solvent boil or popping may occur
if the panel temperature is raised too rapidly. Remove or otherwise protect, any trim items on or adjacent to the panel to prevent possible
distortion.
4.2.
Position the lamp approximately 500mm from the panel.
4.3.
Paint to lamp distance and heating time are dependant on a number of factors including the paint type and workshop conditions and are best
based on experience. However rough guidelines are as follows:
IR1000 Issue: 3(L) - 09/06/14