Fig.1 fig.2 – Sealey SA654 User Manual
Page 2
3.1. Air Supply
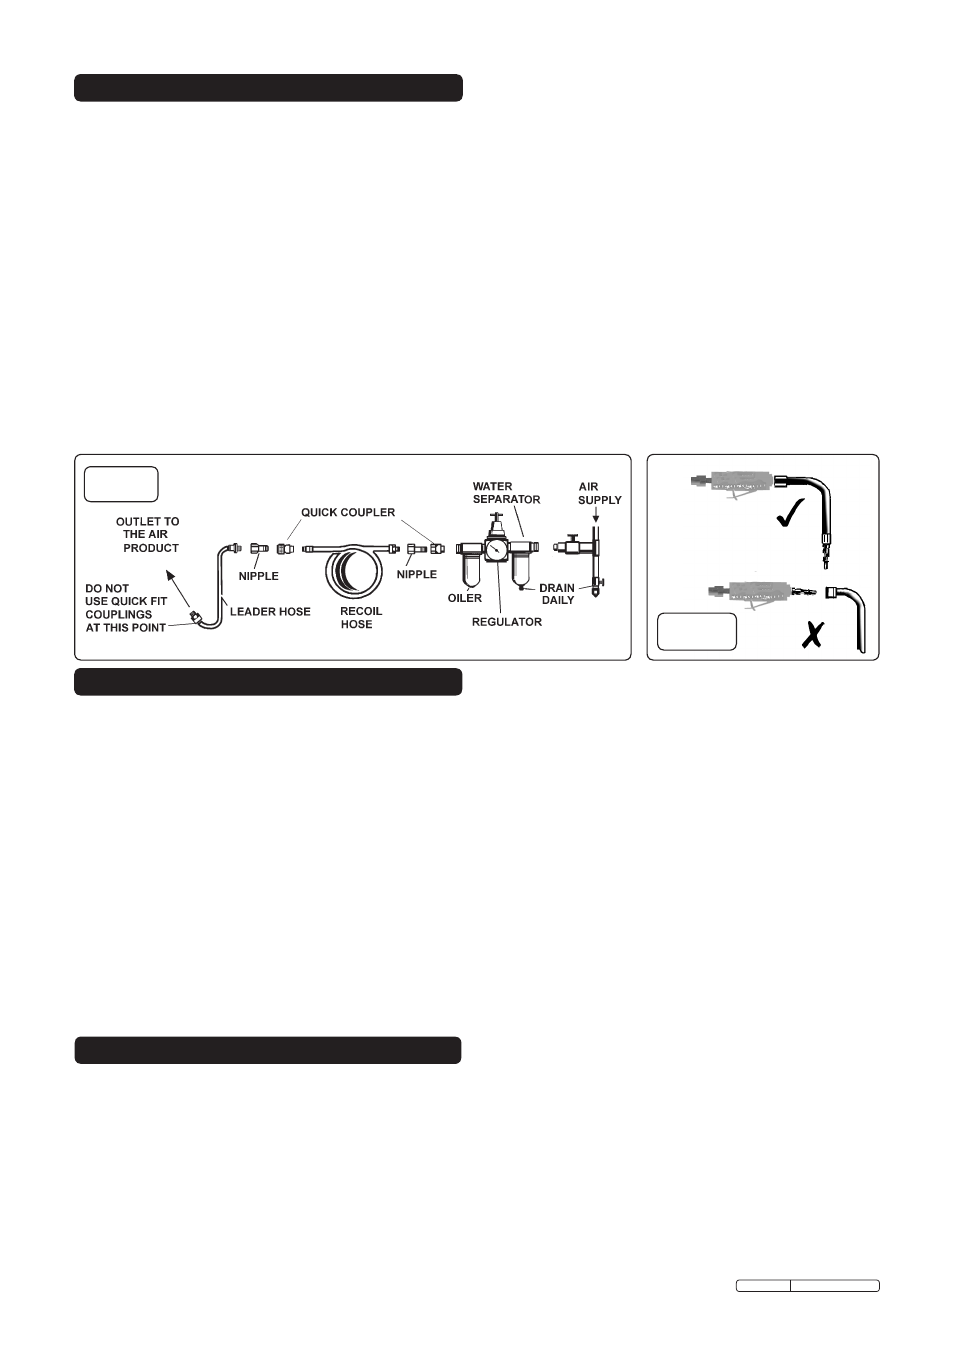
Recommended hook-up procedure is shown in fig.1.
3.1.1. Ensure die grinder air valve (or trigger) is in "off" position before connecting to the air supply.
3.1.2. You will require an air pressure of 90psi, and an air flow according to specification.
3.1.3.
WArninG! Ensure the air supply is clean and does not exceed 90psi while operating the die grinder.
Too high an air pressure and unclean air will shorten the product life due to excessive wear, and may be
dangerous causing damage and/or personal injury.
3.1.4. Drain the air tank daily. Water in the air line will damage the die grinder.
3.1.5. Clean air inlet filter weekly.
3.1.6. Line pressure should be increased to compensate for unusually long air hoses (over 8 metres).
The minimum hose diameter should be 1/4” I.D. and fittings must have the same inside dimensions.
3.1.7. Keep hose away from heat, oil and sharp edges. Check hose for wear, and make certain that all
connections are secure.
3.2. couplings.
Vibration may cause failure if a quick change coupling is connected directly to the die grinder.
To overcome this, connect a leader hose to the grinder. A quick change coupling may then be used to
connect the leader hose to the air line recoil hose. See fig.1 & 2.
3. PrEPArinG tooL For uSE
fig.1
fig.2
4. oPErAtinG inStructionS
4.1. FittinG Grinding Stone
WArninG! Disconnect from the air supply before changing grinding bit.
4.1.1. Check that grinding stones are not damaged in any way such as cracks, deformations or splinters etc.
Damaged stones must not be used.
4.1.2. Use wrenches enclosed to loosen collet locking collar. Insert grinding bit and re-lock collar.
4.2. oPErAtinG
WArninG! Ensure you have read, understood and apply safety instructions.
4.2.1. Connect the die grinder to the air supply.
4.2.2. To start, hold firmly and push the trigger locking lever forward whilst depressing trigger.
4.2.3. The bit must be running at its maximum speed before attempting to grind the workpiece.
4.2.4. Slowly and smoothly bring the grinding bit toward the workpiece (avoid jerky movements).
Exert adequate pressure on the die grinder to grind according to the type and size of the material you
are working with. Avoid subjecting bit to excessive strain or harsh impacts. Always hold die grinder
firmly and ease grinding bit against workpiece. Maintain a controlled progression.
DO NOT allow die grinder to free run for an extended period of time as this will shorten its life.
WArninG! Disconnect die grinder from air supply before changing accessories, servicing or performing
maintenance. Replace or repair damaged parts. Use genuine parts only. Unauthorised parts may be
dangerous and will invalidate the warranty.
5.1. If the air supply does not have an oiler, lubricate the air die grinder daily with a few drops of Sealey air
tool oil dripped into the air inlet to prolong its life.
5.2. Clean the die grinder after use.
5.3. Loss of power or erratic action may be due to the following:
a) Excessive drain on the air line. Moisture or restriction in the air pipe. Incorrect size or type of hose
connectors. To remedy check the air supply and follow instructions in chapter 3.
5. MAintEnAncE
Original Language Version
SA654.V3 Issue: 1 - 22/09/11