Using the built-in speaker, Status request, Auto setup – Casio EA-200 User Manual
Page 11
20020601
English
1-5
Using the Built-in Speaker
To output sound recorded by the built-in microphone
(1) Send Command 0 to initialize the EA-200 setup.
{0}
→ List 1_
_
_
_
_
Stores {0} to List 1. 0 is the command number.
Send (List 1)
_
_
_
_
_
Sending List 1 executes Command 0.
(2) Send Command 1 to specify microphone as the channel.
{1, 10}
→ List 1_
_
_
_
_
1 is the command number, and 10 indicates use of
Send (List 1)
_
_
_
_
_
the built-in microphone.
(3) Send Command 3 to configure measurement condition settings.
{3, 0.00005, 120000}
3 is the command number, 0.00005 is the sampling interval
→ List 1_
_
_
_
_
(50
µ
s), and 120000 is the number of samples.
Send (List 1)
^
^
^
^
^
You can change sampling conditions by using different
sampling interval and number of samples values, if you want.
At this time, the Ready lamp lights on the EA-200.
Press the EA-200 [START/STOP] key to start sampling.
When sampling is complete, press the calculator’s w key to restart the program.
^
^
^
^
^ (Disp command) causes processing to stop until you press the w key.
(4) Send Command 0 to initialize the EA-200 setup.
{0}
→ List 1_
_
_
_
_
Stores {0} to List 1. 0 is the command number.
Send (List 1)
_
_
_
_
_
Sending List 1 executes Command 0.
(5) After sampling is complete, use Command 1 to configure speaker settings.
{1,12, 5,10}
→ List 1_
_
_
_
_ 1 is the command number, 12 specifies the speaker as the
Send (List 1)
_
_
_
_
_
channel, 5 is the number of loops, and 10 specifies output of
values sampled by the microphone.
(6) Re-configure the sampling condition settings.
{3,0.00005,120000}
3 is the command number, 0.00005 is the sampling interval
→ List 1_
_
_
_
_
(50
µ
s), and 120000 is the number of samples.
Send (List 1)
^
^
^
^
^
You can change sampling conditions by using different
sampling interval and number of samples values, if you want.
(7) Press [START/STOP] to output the sound recorded with the microphone.
Status Request
This function can be used to fetch the current status of the EA-200.
To use Status Request
{7}
→ List 1_
_
_
_
_
Sends Command 7.
Send (List 1)
_
_
_
_
_
Receive (List 1)
_
_
_
_
_
Receives the status information and stores it in List 1.
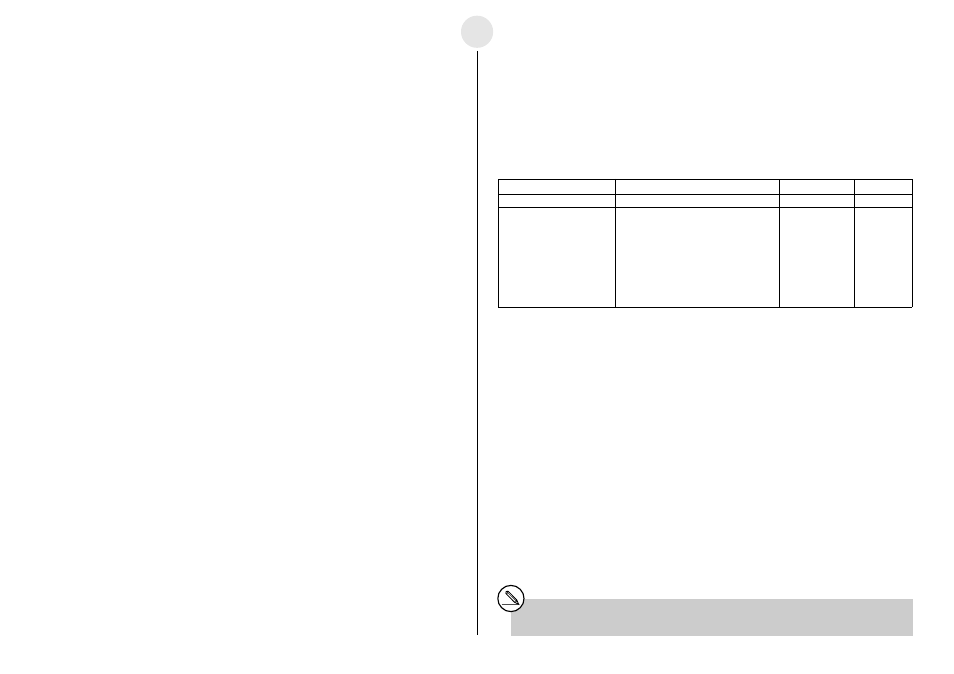
Line 1
Line 2
Line 3
Line 4
Status
Error Code
Battery Condition
OS Version
0: Standby
= O: Normal
0 to 999
Version No.
(No Sample Data in EA-200)
≠ O: Error
1: Ready
Integer: Command number
< 450:
2: Sampling
Decimal Part: Parameter position
low battery
3: Standby
(Sample Data in EA-200) Example: 3.2
Second parameter of Command 3.
Sampling interval value error
Auto Setup
Auto Setup detects the Auto-ID of a probe, and configures applicable settings automatically.
The three probes (voltage, temperature, optical) that come bundled with the EA-200 have
Auto-IDs.*
1
To use Auto Setup
1. Connect a probe to a channel.
2. Slide the [ON/OFF] switch to turn on power.
• This causes the Power lamp to light.
3. Press the [SET UP] key.
• This causes the Ready lamp to light.
*
1
The optional “Motion Sensor (EA-2)” does not have an Auto-ID.