Installation – Magnum Energy Battery Monitor Kit ME-BMK User Manual
Page 10
© 2010 Magnum Energy, Inc.
6
Installation
2.2.2 ME-BMK Sense Module Connections
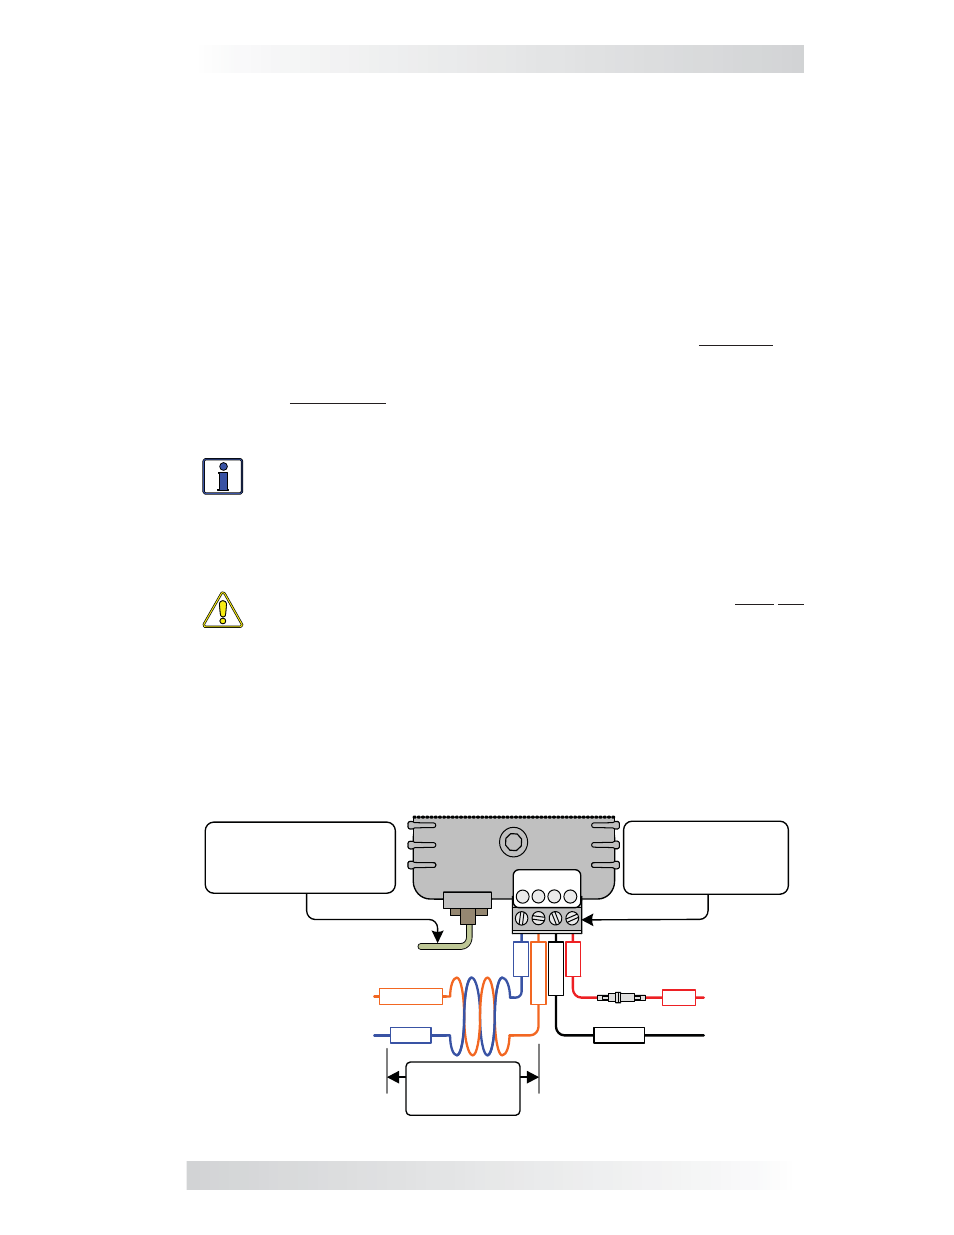
Once mounted, complete the following steps to connect the BMK (Fig. 2-3):
1. Run the communications cable between the ME-BMK Sense Module and the
inverter/charger. This cable is a 2-wire, twisted-pair, telephony standard with
RJ11 connectors on each end. A standard telephone cable may be substituted
if the provided remote cable is not able to be used or needs to be longer.
2. Connect the communications cable to the RJ11 Net port beside the green
label (Network port) on the Magnum inverter/charger (see Figure 2-1).
3. Unplug the 4-port terminal block from the Sense Module and
ensure the openings are unscrewed enough to allow wire insertion.
4. Using the supplied 5 foot twisted-pair wire: 1) Connect the blue wire
from the #1 terminal on the 4-port terminal block to the small screw on
the battery side of the shunt (negative shunt sense connection); then, 2)
Connect the orange wire from the #2 terminal on the 4-port terminal block
to the small screw on the load side of the shunt (positive shunt sense
connection).
Info: Ensure these blue and orange wires stay twisted together up
to the shunt to maintain accuracy.
5. Connect a wire (black) from terminal #3 on the 4-port terminal block to
the negative terminal of the battery. Then, connect a wire (red) with a 2-amp
in-line fuse from terminal #4 on the 4-port terminal block to the positive
terminal of the battery.
CAUTION: To prevent damage, the black and red power wires must not
be connected to the input sense terminals (terminals #1 and #2).
6. When all the connections are made and checked, plug the 4-port terminal
block into the Sense Module and then close the DC circuit breaker (or DC
disconnect) to supply power to the inverter and Sense Module.
7. Immediately after applying DC power, the LED on the Sense Module should
come on as the unit goes through a power-up self-test. After the initial self-
test completes, the LED should be green. If so, your battery monitor system
is now ready for setup; if not, please refer to the Troubleshooting section.
DC Fuse
(2 amps)
To Battery
Positive
To Battery
Negative
To Network Port
(on Magnum inverter)
To small shunt screw
(battery side)
To small shunt screw
(load side)
or
an
g
e
bl
ue
bl
a
ck re
d
Communications Cable
(2-conductor twisted pair;
a telephone-type cable
may be substituted ).
4-Port Terminal Block
(can be removed, and
each terminal accepts
30 to 12 AWG wire).
black
red
Terminals :
1 2
4
3
Twisted-pair
cable 5 feet
maximum
orange
blue
Figure 2-3, Sense Module Connections