Remote control – JBL Synthesis SDP-25 User Manual
Page 7
-
7
-
JBL SYNTHESIS SDP-25
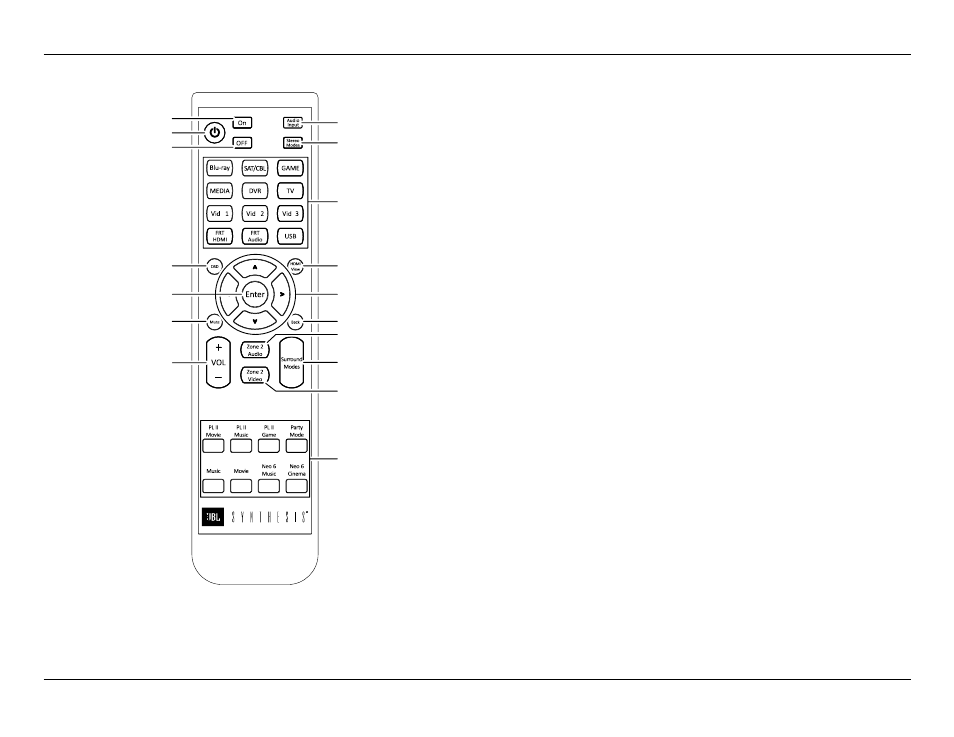
REMOTE CONTROL
Power Toggle: Press this button to turn the unit on or place it in the Standby Mode.
Power On: Press this button to turn the unit on.
Power Off: Press this button to place the unit in the Standby Mode.
Audio Input: Press this button to chose between the Primary Digital, Secondary Digital or
Analog audio source in use. See Page 12 for more information.
Stereo Modes: Press this button to select one of these stereo playback modes:
• Stereo 2.1 plays two-channel audio with bass information going to the subwoofer
• Stereo 2.0 sends a full range audio signal to the left and right speakers and no audio to the
subwoofer
• Party Mode plays stereo sound through all speakers except the Center
• Stereo Direct sends a two-channel analog audio input directly to the volume control and
outputs without any signal processing or bas management
Source Selectors: Press these buttons to choose the audio/video input played through the
main room system.
• The Source Selector buttons choose from the HDMI and analog sources connected to the
rear panel jacks.
• The TV Source Selector plays the audio from a TV with Audio Return Channel capability
(ARC) connected to the HDMI 1/ARC output. There is no video associated with this source.
• The USB Source Selector plays the audio from a computer or other compatible device
connected to the rear panel USB Audio jack.
OSD: Press this button to bring up the menus for system configuration and other adjustments.
Once the menus appear use the Navigation and Enter buttons to find and select the desired
menu items.
Mute: Press this button to momentarily silence the audio output. Audio may be restored by
pressing the Mute Button again, or by changing the Volume.
Navigation Buttons: Press these buttons to move up/down/left/right through menu items when
the OSD is on the screen.
Enter: Press this button to enter a setting into the system memory.
HDMI View: Press this button to view preview windows of the HDMI active inputs. When the
preview windows appear use the left/right Navigation Controls to highlight the source you want
to view and then press Enter to select it.
Back: When the OSD menus are on the screen, press this button to return to the previous menu
or setting.
Volume Control: Press this button up or down to raise or lower the system volume.
Zone 2 Video: When the Zone 2 Video option in the Zone 2 Setup Menu is set to "Enable",
pressing this button selects the video source for the second zone. Note that when the Zone 2
Video is active the HDMI Preview feature is not available. See page 17 for more information on
the Zone 2 system.
Zone 2 Audio: Press this button to select the audio input for the second zone. Note that the
audio format cannot be transcoded from one format to another. For example analog sources
may only be output via the analog outputs, optical digital via optical outputs, etc. See page 17
for more information.
Surround Mode Buttons: Press or toggle one of these buttons to select a surround or
processing mode other than the default setting set in the menus or activated by the digital data
stream.
Power On
Audio Input
Stereo Modes
Source Selectors
HDMI View
Navigation Buttons
Back
Zone 2 Audio
Zone 2 Video
Surround Modes
Surround Modes
Power Toggle
Power Off
OSD
Enter
Mute
Volume Control
Remote Control