Using the video setup – Denon DVD-3910 User Manual
Page 28
28
ENGLISH
STD(STANDARD)
M1(MEMORY1)
M2(MEMORY2)
M3(MEMORY3)
M4(MEMORY4)
M5(MEMORY5)
SET(PIC SETUP)
1(ADJUSTMENT 1)
2(ADJUSTMENT 2)
3(ADJUSTMENT 3)
GAMMA
CONTRAST
BRIGHTNESS
SHARPNESS(MID)
SHARPNESS(HI)
HUE
CCS
WHITE LEVEL
CHROMA LEVEL
CHROMA DELAY
DNR
ENHANCER V
ENHANCER H
G0~G9
SETUP LEVEL
H.POSITION
V.POSITION
PICTURE MODE
✽
1 Only effective for progressive scan.
✽
2 Only effective for HDMI, DVI and
progressive scan.
•
When HDMI and DVI signals are
output, the SHARPNESS (MID/HI),
CHROMA DELAY and Gamma
correction settings will have no
effect.
✽
1
7
When the Display Position is Selected and
Adjusted:
• Press the cursor button (ª), then select the
horizontal/vertical direction with the cursor
buttons (
0
,
1
), set the adjustment value with
the (• , ª ) cursor buttons, and press the
ENTER button.
SETUP LEVEL (0 IRE, 7.5 IRE)
• This corrects floating black.
H. POSITION (–7 to +7) (Factory default: 0)
• A 15-step portion of position adjustment is
permitted left and right.
V. POSITION (–3 to +7) (Factory default: 0)
• A 11-step portion of position adjustment is
permitted up and down.
✽ To exit the picture adjust mode
Press the PICTURE ADJUST button.
P I C T UR E MODE
S TD
M 1
M 2
M 3
M 4
M 5
SET
P I C S E T UP
S E T UP LE VE L
0
0
0
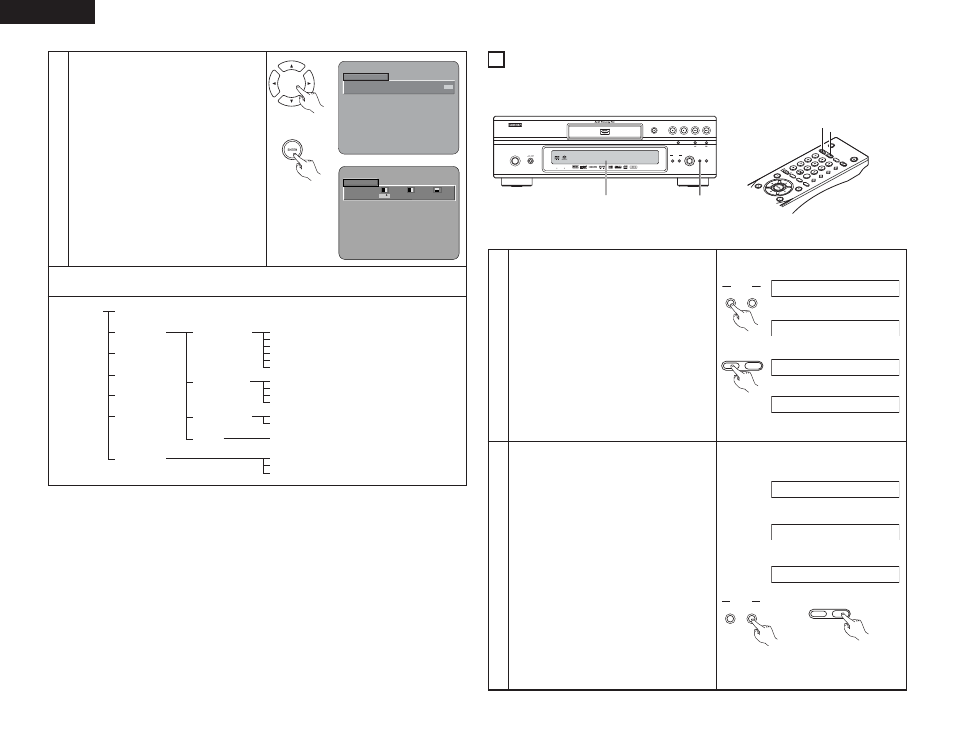
Remote control unit
Remote control unit
12
USING THE VIDEO SETUP
2
The video output setting of the HDMI and the DVI-D connectors can be changed.
2
The video output setting of the PICTURE MODE, PROGRESSIVE MODE and ADJUST MODE also can be
changed.
ON / STANDBY
SUPER
AUDIO CD
SETUP
SELECT
FORMAT
PURE
DIRECT
SELECT
VIDEO MODE
PUSH ENTER
HDMI / DVI
DVD AUDIO-VIDEO / SUPER AUDIO CD PLAYER
DVD-3910
STILL / PAUSE
PLAY
STOP
OPEN /CLOSE
DENON LINK
AL 24 PLUS
1
✽ The HDMI, DVI, 480P, 576P, 720P and 1080i
indicators flash when the connection is being
checked, then stop flashing, remaining lit, once
the check is completed.
1
Press the HDMI/DVI SELECT button.
• The modes described below will appear on the
display.
HDMI/DVI OFF (FACTORY DEFAULT)
No output signals from the HDMI and DVI-D
connectors.
This mode is set to use the COMPONENT VIDEO
OUT connector.
HDMI Y Cb Cr
Outputs the component signals from the HDMI
connector.
HDMI RGB
Outputs the RGB signals from the HDMI
connector.
DVI
Outputs the RGB signals from the DVI-D
connector.
✽ The video signals are only output from one of
the HDMI, DVI or progressive component
video output connectors.
SELECT
FORMAT
HDMI / DVI
Main unit
HDMI/DVI OFF
HDMI Y Cb Cr
HDMI R G B
2
Press the HDMI/DVI FORMAT button.
• The modes described below will appear on the
display.
Select the item you wish to set and press the
select knob to define it.
480P/576P (FACTORY DEFAULT)
Outputs the image from the HDMI or DVI-D
connector at 480P or 576P.
720P
Outputs the image from the HDMI or DVI-D
connector at 720P.
1080i
Outputs the image from the HDMI or DVI-D
connector at 1080i.
• When playing back a PAL-formated disc, be sure
to set the TV TYPE option to NTSC. (See pages 20,
21.)
• The video or audio signals may be interrupted
when the output setting mode is switched.
• Depending on the TV you are using, if the TV’s
input is not set to HDMI or DVI, the HDMI or DVI
OFF mode may be set. In this case, set the TV’s
input setting to HDMI or DVI before performing
the DVI setup procedure.
• Connect to an HDCP compatible display to view
images with DVI connections.
480P/576P
720P
1080i
SELECT
FORMAT
HDMI / DVI
Main unit
SELE
CT HDMI/D
VI
OPE
N/
SUP
ER A
UDIO
FOR
MAT
NTS
C/P
AL
CLO
SE
CD S
ETU
P
PRO
GRA
M
/DIR
ECT
CLEA
R
CALL
SEA
RCH
MO
DE
AUD
IO
SUB
TITLE
ANG
LE
PAG
E
DIM
MER
ZOO
M
A-B
URE
DIR
DIS
PLA
Y
TOP
MEN
U
RETU
RN
MEN
U
SKIP
SLO
W/S
EAR
CH
PLA
Y
STIL
L/PA
USE
STO
P
BAC
K LIG
HT
POW
ER O
FF
POW
ER O
N
1
2
DVI
SELECT
HDMI/DVI
FORMAT
Remote
control unit
SELECT
HDMI/DVI
FORMAT
Remote control unit
✽
2
✽
1
✽
2
✽
2
Display the setting mode