Q-See QSEE H264 User Manual
Page 29
56
57
Substream Tab
The substream is the data that is sent to remote monitoring devices. Due to bandwidth
concerns, these data streams are generally smaller than those sent directly to the DVR itself.
These streams run in parallel with the main stream sent to the hard drive and they do not
affect each other.
Definitions and descriptions of network configuration:
Parameter
Definition
HTTP Port
The network port number for accessing the DVR from a remote location.
The default port is 80
Server Port
The port number for data. The default port is 6036
Static IP
IP Address
The IP address of the DVR on your network
Subnet Mask
The server’s subnet mask
Gateway
The gateway of the router
DNS Server
The address of the Domain Name System (DNS) server
PPPoE
User Name
User name of the broadband account
Password
Password for broadband account
Substream settings are configured in the
same manner as that used for the primary
stream settings in the Record Bitrate
tab in Section 4.3 Certain settings will be
grayed out and cannot be changed due to
throughput concerns. The definitions are
repeated for your convenience:
PICTURE 4-24
Parameter
Options
What it Means
Resolution
D1, CIF
D1 = Full TV resolution, CIF = 1/2 D1. D1 takes more
room on the hard drive than CIF
FPS
1-30
Frames per second. More frames makes for smoother
video but takes up more room on the hard drive.
Encode
VBR, CBR
Variable Bit Rate versus Constant Bit Rate. VBR provides
better image quality for video with motion in it, but at the
expense of a larger file size.
Quality
Lowest
– Highest
Only available when VBR is selected. The higher the
quality, the more drive space required. CBR’s default
setting is for higher quality.
Max Bitrate
256-2084kbps
This sets the maximum bitrate that each camera will
record at with VBR encoding selected.
Email Tab
This tab allows you to set how your DVR will send out e-mail alerts. You will be able to send
e-mail alerts to three addresses.
NOTE! Depending upon your settings, the system can generate a lot of e-mail
alerts. For that reason, we recommend setting up a dedicated e-mail address
specifically for the system to send alert notices. If you do not have your own
e-mail system (such as a corporate mail server) you should consider using a
free e-mail provider. However, because many free e-mail services allow only
a limited amount of e-mail traffic we specifically recommend using Google’s
Gmail service with its higher limit. Similarly, you will want the alert e-mails to go to a different
account than the one sending them. This will ease your management of these alerts and help
keep your mail account from overflowing.
If you do not have your own e-mail system, please set up a free account which the DVR can
use to send out alerts before proceeding.
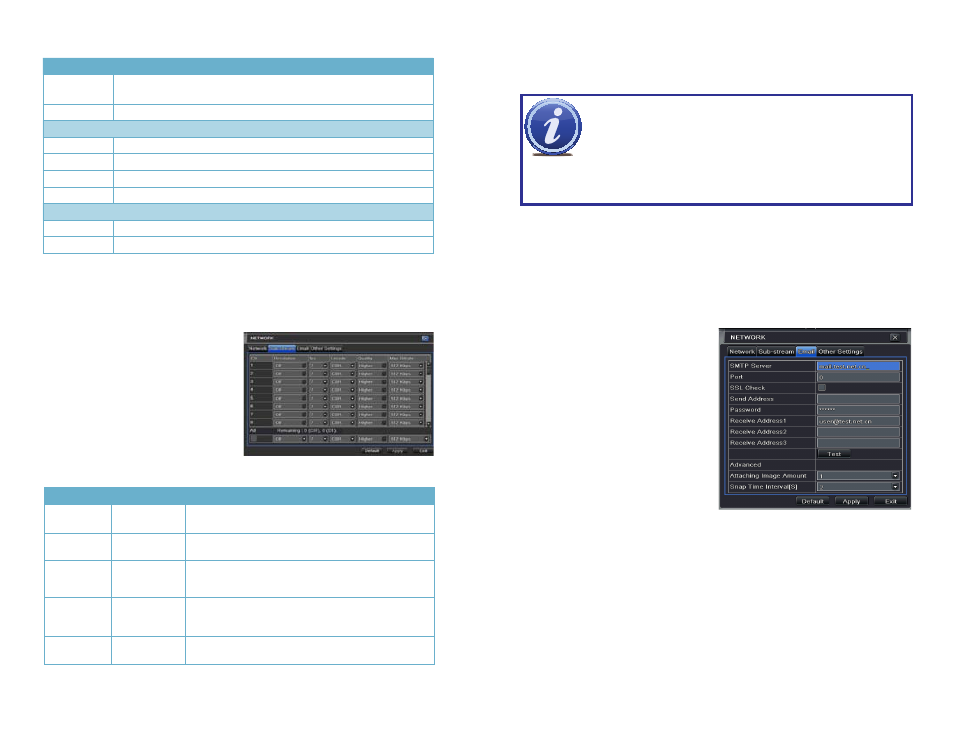
For the example below, we will use Gmail. The settings can be found under
Options when
logged into your Gmail account.
Clicking on any of the fields will bring up the virtual keyboard allowing you to enter the data.
The virtual keyboard is capable of handling upper and lower case letters as well as numbers
and symbols. Click the ENTER button to enter your input or ESC to exit the field without
applying any changes.
SMTP Server: smtp.gmail.com
Port: 465 (standard port for Gmail - others
may vary)
SSL Check: You will need to select this for
Gmail. Other ISPs may vary.
Send Address: Enter your new address. This
will appear on alert e-mails sent from
the DVR
Password: Enter the password you created
for this account. Remember, it will be
case-sensitive.
Receive Addresses: You may set up to three
e-mail addresses to receive alerts. It
is strongly advised that you do not
use the same address that the DVR is
using to send alerts.
PICTURE 4-25
Advanced
Attaching Image Amount: The alert e-mails can include up to three images
Snap Time Interval: The interval of the images can range from every second to every five
seconds.