3 remote control, 2 mouse – Q-See QSEE H264 User Manual
Page 19
36
37
1
2
3
4
5
10
11
6
7
8
9
12
13
14
15
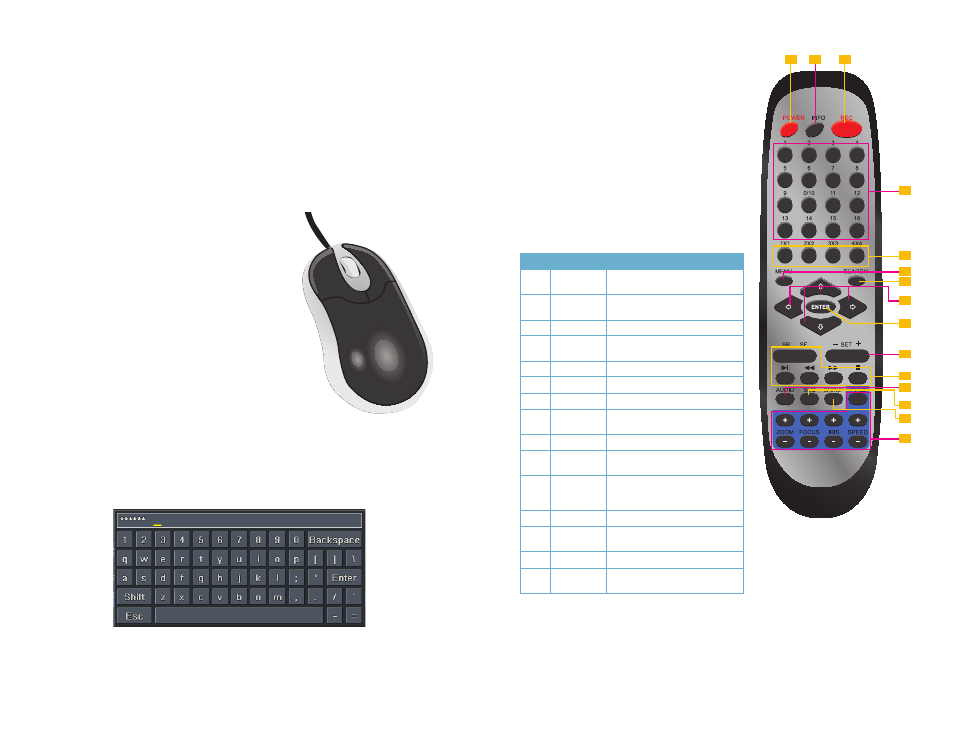
Item
Button
Function
1
POWER
Soft power down switch. Use this
before unplugging the DVR
2
INFO
Get information about the DVR such
as HDD space and firmware version
3
REC
Begin recording
4
Numbers
Input numbers in fields or select
camera
5
Multi-Screen
Choose multi-screen display mode
6
MENU
Opens
MENU
window
7
SEARCH
Enter
SEARCH
mode
8
Directional
Move cursor in set up or control PTZ
camera
9
ENTER
Confirm choice or settings
10
SET +/-
Increase or decrease value in
SETUP
mode
11
Playback
Controls playback functions, includ-
ing stop, single-frame, fast forward,
etc.
12
AUDIO
Enable audio input in live mode
13
SEQ
Returns to auto dwell display
sequence
14
BACKUP
Enters
BACKUP
menu
15
PTZ
Controls
Controls PTZ camera including
zoom, focus, iris and speed
2.3 REMOTE CONTROL
The remote control allows you to perform most of the
day-to-day functions from a convenient distance. It
functions as a typical remote control with additional
buttons allowing you to navigate through menus and
control functions. We recommend that you configure
your DVR using the mouse controls, reserving the
remote control for operations such as live viewing, file
search and playback.
It uses two AAA-sized batteries. If the remote’s
performance degrades, check the batteries as
well as that the IR receiver window on the DVR is
unobstructed.
2.2 MOUSE
The mouse is the default tool for navigating through the menus. Specific instructions for its use
within a function appear in the appropriate sections of the manual, but a basic overview is below:
In Live View:
Double-click the left button on any camera
view in split-screen mode to bring it to full-
screen display.
Double-click again to return to split-screen
mode.
Right-click to show the control bar at the
bottom of the screen.
Right-clicking again will hide the control bar.
In Setup:
Left-click to make a selection. Right-click to
cancel setup or return to previous screen.
To Input Values:
Move the cursor to a blank field and click. A virtual keyboard will appear which supports
numbers, letters and symbols. The Shift function will access symbols in addition to upper case
letters.
Certain values, such as time settings, can be changed using the mouse wheel.
In addition to the buttons on the front of the DVR, your system can be controlled through the
USB mouse and the remote control. We have found that the majority of our customers prefer
to operate their DVRs using the USB mouse because of its ease of use and flexibility and our
manual is set up with this in mind.