Q-See QSEE H264 User Manual
Page 23
44
45
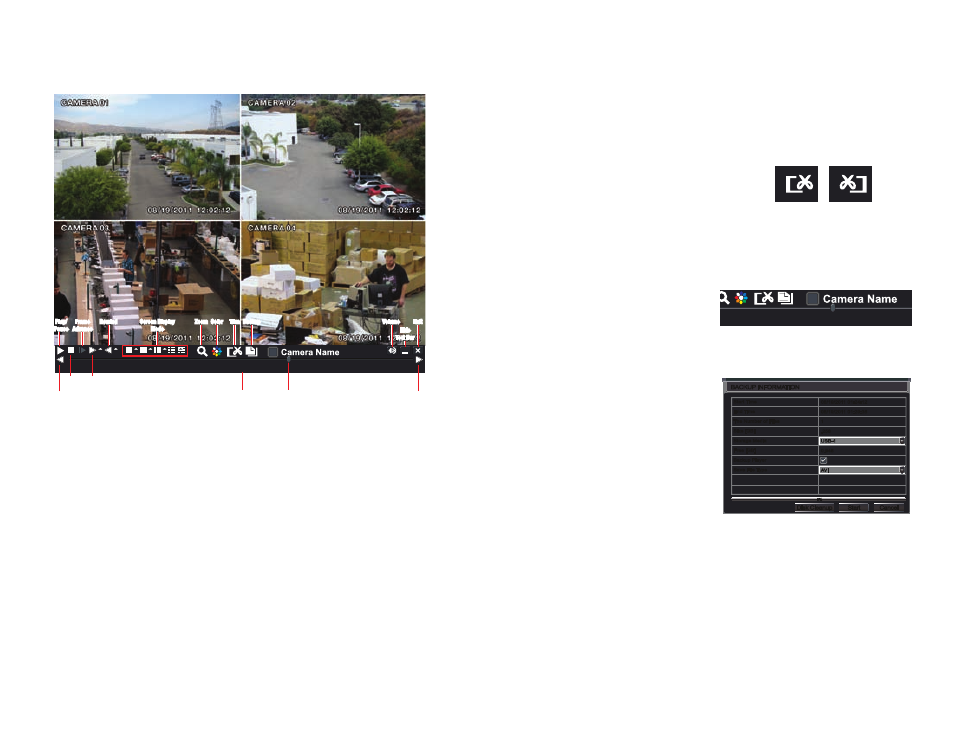
PICTURE 3-11
PICTURE 3-12
PICTURE 3-13
PICTURE 3-14
Play/
Pause
Rewind
Screen Display
Mode
Volume
Hide
Tool Bar
Exit
Frame
Advance
Zoom Color Trim Backup
Previous
Record
Play/
Pause
Stop
Fast
Forward
Rewind
Screen Display
Mode
Volume
Hide
Tool Bar
Exit
Frame
Advance
Next
Record
Playback
Progress Bar
Zoom Color Trim Backup
Playback
Speed
>>1 X
08/19/2011 12:02:00
PLAYBACK CONTROL BAR
The controls operate in a similar fashion to those of a conventional DVR or other video
playback device but with a few additional commands available to you:
Previous/Next Record: Moves to the prior or following recorded event, respectively.
Fast Forward/Rewind: In addition to their normal operation, clicking on these buttons
multiple times will speed up or slow down the rate or progression - forwards or backwards
- through the file. The speed can also be selected directly by clicking on the small upward
pointing arrows to the right of each button. You can select from 1/4 speed to 16-times
normal speed forward and rewind speeds of 8-times, 16-times and 32-times normal speed.
The current speed will be displayed at the bottom center of the Playback bar.
Screen Display Mode: As with the Control Bar, these icons allow you to choose the
number of channels you wish to view in playback. Clicking on the upward pointing arrows to
the right of each icon will allow you to select which channels to view in that mode. Channels
with no recordings will appear blank.
Zoom: Available in single screen display mode, this digitally enlarges a section of the display.
Select this tool and then click-and-drag to select a portion of the video feed to enlarge it.
Clicking and dragging within the zoomed-in area will allow you to move to other areas of the
image. Right-clicking will return the video to regular display mode.
Color: Adjust the brightness, hue, saturation and contrast for any channel. Please note that
this will only effect the playback for this channel on the DVR itself. It will not change the
recording.
Playback Progress Bar: The slider moves along the Playback Progress Bar as the video
plays. Moving this with the mouse will go to another segment of the video. You can move to
another point in a single video by first clicking on that channel and then moving the slider to
the desired time. Other channels will continue progressing normally.
Trim: Using this tool allows you to save a segment of the video record rather than having to
back up the entire file.
To select a segment move the Playback
Progress Bar to before the desired
location in the video and begin playback.
Once you reach the desired starting
point, click on the Trim button to set the
beginning of the clip. The button’s icon
will flip indicating that it is waiting for you
to select the ending point. When you
have reached that point, click the button
again to complete your edit. The starting
and ending times will be displayed at the
bottom of the
Playback Control Bar.
Backup: Once you have created your video
clip, the Backup button will turn white
indicating that you can save your clip
directly to a USB drive connected to the
USB port on the front of the DVR. The drive
must be connected before clicking on the
Backup button.
When the Backup button is clicked,
the
Backup window will open. It will
list details about the file and the storage
media that you have connected. If you
have more than one drive connected -
including ESATA, USB CD/DVD burners or
other external media, you can chose the
desired destination in the Storage Media
pull-down.
If you do not have enough space on the
disk to save your file, you may select Disk
Cleanup to remove all files from that disk.
Begin
Clip
End
Clip
>>1 X
00:00:17-00:01:19
BACKUP INFORMATION
BACKUP INFORMATION
Disk Cleanup
Disk Cleanup
Start
Start
Cancel
Cancel
Start Time
End Time
The Number of Files
Size [GB]
Storage Media
Free [GB]
Backup Player
Save File Type
08/19/2011 01:24:12
08/19/2011 01:29:36
1
.258
USB-1
0.946
AVI
08/19/2011 01:24:12
08/19/2011 01:29:36
1
.258
USB-1
0.946
AVI
Start Time
End Time
The Number of Files
Size [GB]
Storage Media
Free [GB]
Backup Player
Save File Type
0%
0%
Chose the format in which you want to save your video clip. The .DVR format requires a
special player program which will be included in a second folder on the drive. The .AVI
format will work with most standard media playback software on PC or Mac computers. If
selecting .AVI as the format for your files then you should deselect the Backup Player box.
Click Start to begin the download and the progress bar at the bottom will fill up as the file is
transferred.
For more information regarding backing up files, please see Chapter 5.