3 record configuration – Q-See QSEE H264 User Manual
Page 26
50
51
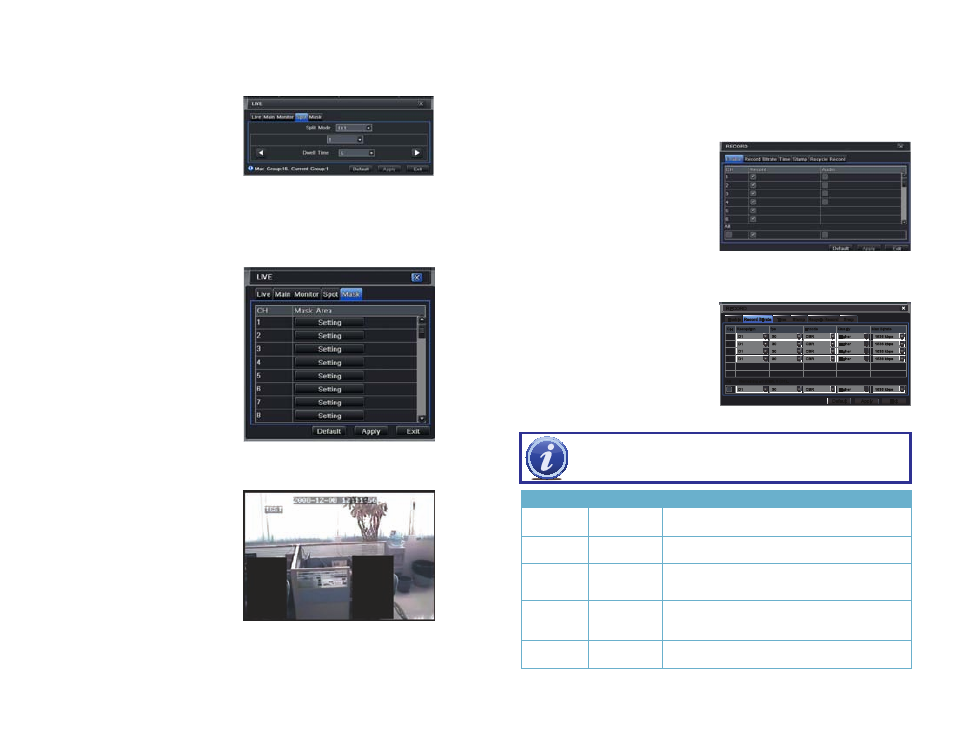
Spot Tab
This allows select feeds to be viewed on a separate monitor that is connected to the DVR but
may be in another room, for example. There will be no menu access on this auxiliary display.
PICTURE 4-10
PICTURE 4-11
PICTURE 4-12
Only one channel can be displayed at a
time on this monitor. You can choose which
channels (each channel is a “group”), the
order and their dwell time. The left and right
arrows allow you to move to the next group. A
channel can appear in more than one group.
Mask Tab
Set up masks on individual cameras to block out select areas on each screen. This is to grant
privacy in situations when other users may be able to view the camera feeds and you wish to
restrict viewing of certain areas or activities.
Click on the Setting button next to a given
camera to apply a mask to its view.
Up to three areas may be masked in an
image. Simply click and drag to cover the
area. To delete, double-click on a mask.
Right-click to exit the screen, your masks will
be saved.
The masks will appear on that channel’s
image in the live area as well as on
recordings.
4.3 RECORD CONFIGURATION
QT4 Series DVRs are set to record in real-time (30 frames per second) in the CIF format.
Depending on the model, one or more channels may be set to record in the higher resolution
in real-time, or all channels may record in D1, but at a reduced frame rate. QT5 Series DVRs,
along with the QT454, are configured to record in real-time on all channels in the high-
resolution D1 format. The QT2124 can only record in the CIF format. There are five sets of
options;
Enable, Record Bitrate, Time, Stamp and Recycle Record.
Enable
Enable
Snap
Snap
Record Bitrate
Record Bitrate
Recycle Record
Recycle Record
Time
Time
Stamp
Stamp
Default
Default
Apply
Apply
Exit
Exit
CH Resolution
fps
Encode
Quality
Max Bitrate
1
2
3
4
CH Resolution
fps
Encode
Quality
Max Bitrate
1
2
3
4
All
All
Remaining : 0 (CIF), 0 (D1).
Remaining : 0 (CIF), 0 (D1).
30
30
30
30
30
30
30
30
CBR
CBR
CBR
CBR
CBR
CBR
CBR
CBR
Higher
Higher
Higher
Higher
Higher
Higher
Higher
Higher
1536 kbps
1536 kbps
1536 kbps
1536 kbps
1536 kbps
1536 kbps
1536 kbps
1536 kbps
D1
D1
D1
D1
D1
D1
D1
D1
30
30
CBR
CBR
Higher
Higher
1536 kbps
1536 kbps
D1
D1
RECORD
RECORD
Enable Tab
Select some or all of the cameras to record
to the DVR. Depending on your DVR model,
you can set up to 16 cameras to record
audio in addition to video. This will require
cameras equipped with microphones or
separate microphones co-located with the
camera(s). You can globally select all the
cameras regardless of their individual settings
by selecting the All box below each column.
Record Bitrate Tab
Set up the resolution, quality, encoding,
quality and maximum bitrate of the video
stream according to your needs. You can set
each camera individually, or globally by using
the All function at the bottom of the window.
PICTURE 4-13
PICTURE 4-14
NOTE! While each camera can have its resolution and frame rate set
independently of the other cameras, the DVR may limit the frame rate available
to a camera based on the settings of other cameras.
Parameter
Options
What it Means
Resolution
D1, CIF
D1 = Full TV resolution, CIF = 1/2 D1. D1 takes more
room on the hard drive than CIF
FPS
1-30
Frames per second. More frames makes for smoother
video but takes up more room on the hard drive.
Encode
VBR, CBR
Variable Bit Rate versus Constant Bit Rate. VBR provides
better image quality for video with motion in it, but at the
expense of a larger file size.
Quality
Lowest
– Highest
Only available when VBR is selected. The higher the
quality, the more drive space required. CBR’s default
setting is for higher quality.
Max Bitrate
256-2084kbps
This sets the maximum bitrate that each camera will
record at with VBR encoding selected.