DR Power 3-Point Hitch Top-Discharge User Manual
Page 9
9
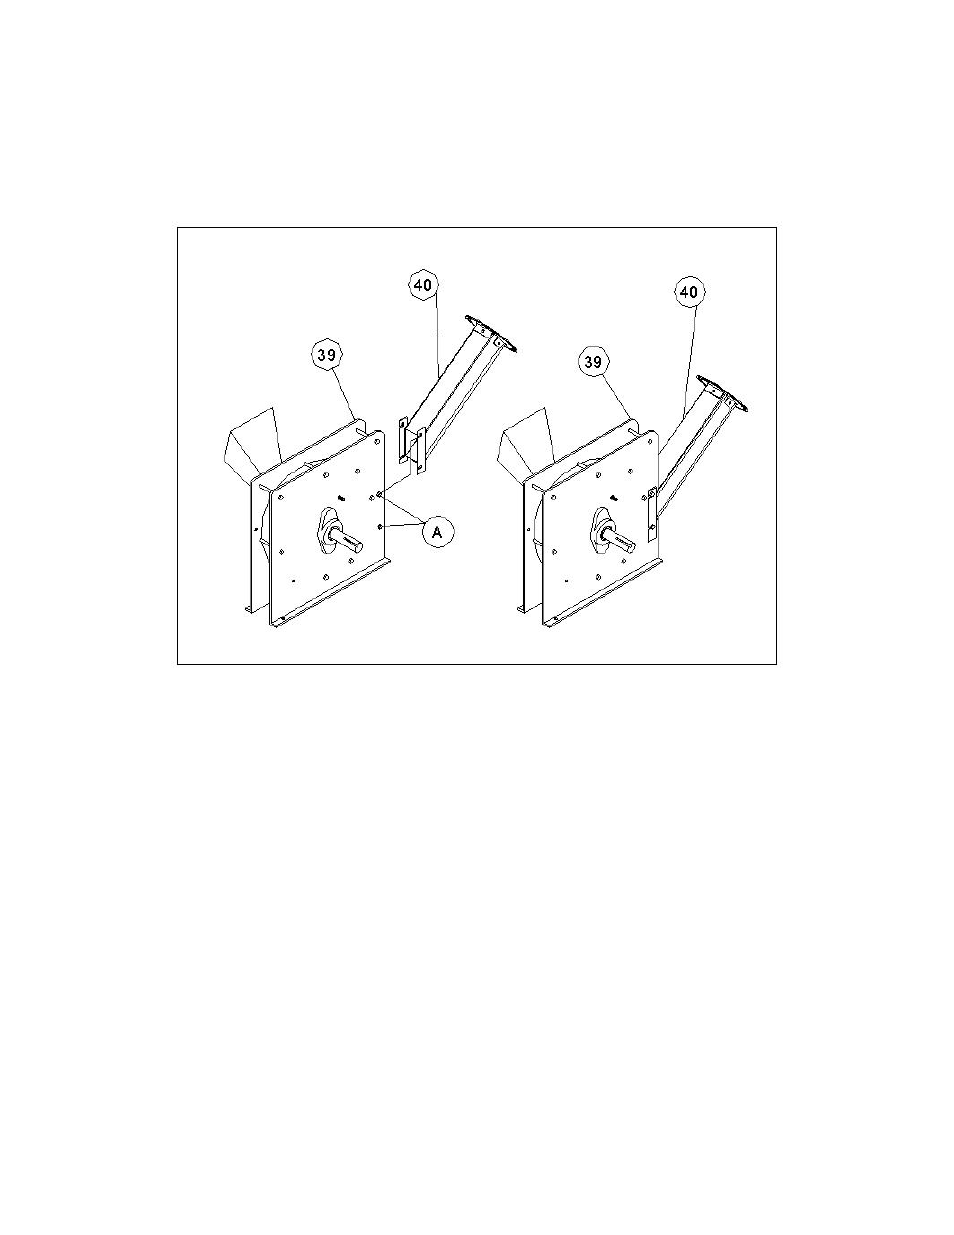
STEP III – ATTACHING THE DISCHARGE CHUTE
• Loosen the two 5/16-18 x 4” bolts (A) on the chipper basic (#39, pg 25) enough that the mounting plates on
the discharge chute (#40, pg. 25) will slide onto the bolts. You may have to slightly tap the nut side of the
bolt to center it before the discharge chute can easily slide into place.
• Slide the top L shaped slot on first, and then pivot the discharge chute down so that the lower slot slides
over the lower bolt as shown.
• Once the discharge chute is in place, tightly secure the two-nylock nuts.
This manual is related to the following products:
See also other documents in the category DR Power Gardening equipment:
- 42 Grader/Snow Blade (2 pages)
- 42 Lawn Mower Deck (24 pages)
- Attachment Chipper (32 pages)
- Bladeless Mowing Attachment (1 page)
- 46 Lawn Mower Deck (42 pages)
- 30 Snow Thrower (44 pages)
- 6000-Watt Generator (40 pages)
- Walk-behind 11.5 - 17 HP (September 2005 - December 2010) (44 pages)
- Walk-behind 12.5 Premier (32 pages)
- Scout 8.25 (January 2007 and Later) (54 pages)
- Scout 8.25 (September 2005 - December 2006) (50 pages)
- Walk-behind 13 - 17 HP (February 2003 - March 2005) (54 pages)
- Walk-behind 8 - 15 HP (1998 - 2001) (40 pages)
- Walk-behind 13 - 17 HP (May 2001 - February 2003) (36 pages)
- Walk-behind 12.5 HP Tecumseh with 42 Lawn Deck (64 pages)
- Tow Behind 20hp Kohler w/o EPA Fuel Tank (40 pages)
- 3-Point Hitch (August 2012 - May 2015) (28 pages)
- Tow-Behind Yard Trimmer (28 pages)
- Tow-Behind All Terrain (28 pages)
- Power Take-Off (PTO) System (22 pages)
- Self-Propelled Pro-XL Self-Propelled 8.26fpt Subaru (40 pages)
- Walk-Behind 8.25 Commercial Model (2004 - September 2010) (68 pages)
- Walk-Behind 6.25 Sprint (September 2010 - January 2013) (48 pages)
- Sprint (2000 - 2004) (36 pages)
- Walk-Behind Pro (1985 - 2000) (44 pages)
- Walk-Behind Pro (2000 - 2001) (48 pages)
- Sprint (1985 - 2000) (40 pages)
- Pro-XL 8.26fpt Subaru (32 pages)
- Tow-Behind Deck Adapter (September 2014 - Present) (4 pages)
- Tow-Behind Extra Hose Kit (September 2014 - Present) (2 pages)
- Tow-Behind 16.96 Pro-XL (September 2014 - Present) (44 pages)
- Tow-Behind Optional Vac and Mulch Discharge (September 2014 - Present) (12 pages)
- Tow-Behind 8.00 Premier (August 2010 - August 2014) (44 pages)
- Tow-Behind 9.00 Premier (Pre-August 2010 (72 pages)
- Tow-Behind Universal Deck Boot (Pre-August 2010) (32 pages)
- Tow-Behind 7 HP Commercial (Dec 2006 - May 2006) (72 pages)
- Walk-Behind On Board Vacuum Hose (2 pages)
- Walk-Behind 11.50 fpt (August 2010 - Present) (32 pages)
- RapidFire Premier Yard Tow Kit (August 2014 - Present) (2 pages)
- Walk-Behind On Board Vacuum Hose (July 2010 and Prior) (16 pages)
- Walk-Behind 6 HP (Pre-August 2010) (62 pages)
- RapidFire 3.0 HP DR (June 2014 - Present) Engine Manual (24 pages)
- RapidFire 6 HP Subaru (July 2013 - Present) Operating Manual (32 pages)
- RapidFire 5.5 HP DR (July 2012 - Aug 2013) (28 pages)
- RapidFire 6 HP Subaru (Aug 2011 - Sept 2012) (28 pages)