Connection, Technical specifications, Mounting – Delta Dore TYPHONE 2 SV User Manual
Page 5
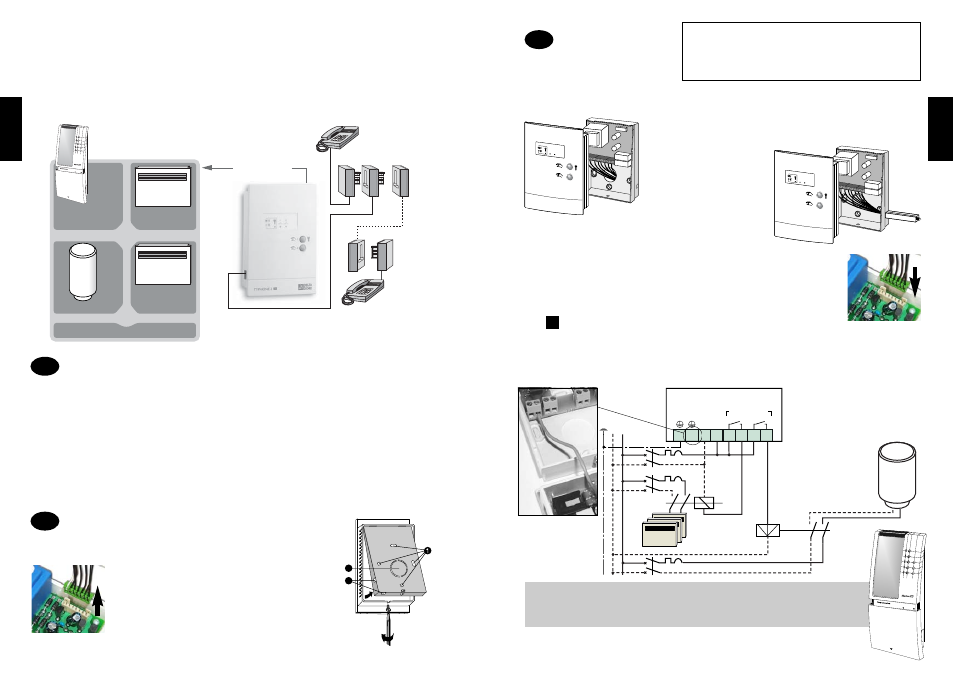
CONNECTION
Before any operation switch off the power supply.
In order to be connected, the product must be separated from its base.
Flush-mounting box : use the hole in the bottom of the case to
connect the wires.
Wall-mounting :
breakable partition can be
removed to allow
the connection cables to pass.
The connection to the telephone line can be made by the
“RJ11 plug / telephone plug” cable.
The RJ11 plug has to be connected on the side on the product.
IMPORTANT : when reassembling do not forget to connect the flat
(connection) strap between the front case and its base.
On/Off Control
Certain appliances may require an additional relay contactor to be fitted (check amperage
required).
Please note that terminal 1 of the integrated lightning arrester (see technical specification) has to
be earthed at the installation, and terminal 2 has to be connected with the yellow/green earth-wire
coming from the front case of the appliance (see picture).
3 4 5
N
L
Day/night relay
contactor
Heat convectors
6 7 8
1 2
N
L
TYPHONE 2 SV
E.g. : Control 2
contact closed
=
Immersion heater enabled
The connection to the telephone line
can be made by the RJ11 plug
on the side on the product.
Max. 2A 230 V
~
2
1
Immersion heater
(hot water supply)
Switch
Mains supply
230V
E.g. : Control 1
contact closed
=
Heating enabled
Please note: Full wiring circuits are not shown in the diagram for reasons of
clarity. Safety devices and other mandatory accessories are not shown.
- The device must be fitted in compliance with UTE C15-100 and state-of-
the-art specifications.
- Appliances connected to or in the vicinity of the device must comply with
EC directive 2004/108 on electrical interference.
3
2
1
2
1
2
1
2
1
PLEASE NOTE :
TYPHONE 2
SV
can also be used to control the Away or Frost-protection mode for the following
DELTA DORE programmers, energy management systems, power management systems, etc. :
STARBOX F01, STARBOX F02, DRIVER C20, GECPL 1, DRIVER C…
English
- 9 -
TECHNICAL SPECIFICATIONS
• Can control 2 separate appliances
(e.g. heating, immersion heater, lighting…)
via your telephone line
• Secure control access code
• Easy to use voice synthesis technology
• Manual override controls
• Usable with an answering machines
• 4 languages (French, English, Spanish,
German)
• Complies with European Standard CTR21
Heating On/Off
Frost-protection
control
Choice of controls
(any 2)
Remote
telephone
Home
telephone
Connections
according to use
or
Other controls...
or
Central control panel
Off-Switch or minimum
temperature
Fil Pilote
convector
Immersion
heater
Hot water supply
• Mains voltage : 230V, 50Hz
• Insulation class II
• Power consumption : 4 VA
• 2 x 2Amps 230 V normally open contact
outputs (reverse NO/NC available by
software)
• 6 or 7 rings before connection
• Manual output contact control
• Access code indicator
• Output state indicators
• Telephone line-in lightning arrester integrated
in device case
- standard 48V telephone input
- current throughput :
10kAmps with 8/20 pulse,
residual voltage < 900V
• Room case : 128 × 85 × 31 mm
• Wall mounting
1
Mounting
In order to mount the device on the wall, it must be separated from its base.
To do this, unscrew the lockingscrew, open the case and disconnect the flat
(connection) strap as indicated.
After separation from the case, the base must be fixed to
the wall using screws and plugs or on a flush-mounting
box (centre-to-centre distance 60 mm) using the holes
➊.
Breakable partitions can be removed to allow the
connection cable to pass, if necessary
(
➋ : flush-mounting box, ➌ : wall mounting)
2
3
2
English
- 8 -