Delta Dore PACK DELTA 630 User Manual
Delta 630 master
DELTA 630 Master
Centralised programmer
DELTA 630 Master
Unit compliant with the requirements
of directives: R&TTE 1999/5/CE (radio)
Installation
DELTA DORE
Bonnemain - 35270 COMBOURG - France
E-mail : [email protected]
*2702091_Rev.1*
• Programming the activation / shutdown of
the heat pump
• Managing change-over (summer / winter)
• Programming for 6 separate zones
Configuration / Use
To associate, configure and use your unit,
refer to the DELTA 630 pack instructions
(Management for ductable air conditioning
system).
Technical characteristics
• Power supplied by two 1.5 V LR03 or AAA
alkaline batteries, included, range about 2 years
under normal use
• Class III insulation
• Clock backup when replacing the batteries: 30
seconds
• Radio range: 100 to 300 metres outside, variable
depending on the associated equipment (the
range can vary depending on the installation
conditions and the electromagnetic environment)
• Radio frequency 868 MHz, class I (standard EN
300 220)
• Wireless remote control device
• Backlit display
• Dimensions: LxHxD: 80 x 103 x 16 mm
• Protection index: IP 30
• Storage temperature: -10°C to +70°C
• Operating temperature: 0°C to +40°C
• Installation in an environment with normal
pollution levels
• Attachment with screws or on a base
Because of changes in standards and equipment, the
characteristics given in the text and the illustrations in
this document are not binding unless confirmed
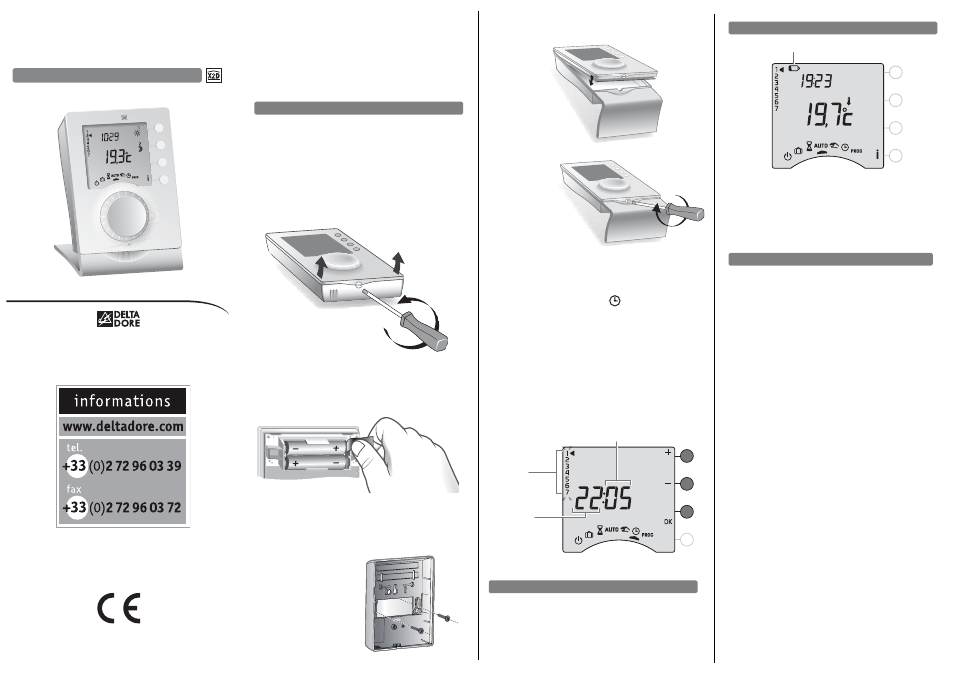
Battery replacement
Attachment with screws
Attach the base using screws and plugs
suitable for the support or to a flush-mounting
box, then close and
lock the unit.
The DELTA 630 Master can be installed:
- on the wall, at a height of about 1.5 m, with
screws / plugs,
- on a wall mount, placed on a piece of
furniture or on a shelf.
Separate the unit from its base by unlocking
the unit.
Activation
The first time you activate the unit, you must
set the clock.
Remove the protective tab from the batteries.
Fitting the thermostat to its base
Press + or - to set the day, then OK to
confirm and go to the next setting.
Repeat these steps to set the hour and
minutes.
To exit the “time setting” mode, turn the
selector knob.
Min
u
te
s
Ho
u
r
s
D
a
y
s
(1: Mond
a
y ...
7:
Su
nd
a
y)
Setting the time
Turn the selector knob to
.
The days flash.
When the battery level symbol appears, you
have approximately 1 month to replace them
(two 1.5 V alkaline batteries, either LR03 or
AAA).
B
a
ttery level
s
ym
b
ol
Place the
thermostat on
its base
Lock the
thermostat