Step 7: configuring units, Configuring units, Prism 2 technical guide 23 – Auto-Zone Control Systems Prism 2 Graphical Interface Technical Guide (Version 01J) User Manual
Page 23
STEP 7: CONFIGURING UNITS
Prism 2 Technical Guide
23
Configuring Units
Select
to view each setpoint screen associated with
the control type. You must have a Level 3 passcode to access most
of the setpoints on these screens.
Select
to open the normal trend log screen and
perform whatever task you normally would from that screen.
Select
to send the printout to a preview window where you
can then select the printer. The printout will be in text format with
a list of the important status information.
Select
to immediately cancel all force
modes. Force Modes will automatically cancel on their own 10
minutes after Prism 2 goes Off Line.
Controller Override, Schedule, and Holiday
Confi guration
At the top of the status screen next to the Occupied/Unoccupied
indicator are the buttons
< Override>
,
< Schedule>
,
< Holidays>
,
and
.
The
button overrides the current occupied/unoccupied
operating mode. The
button accesses the weekly
schedule and the
button accesses the holiday schedule.
The
button accesses the Unit Alarm Status &
Confi guration Screen, discussed on page 27.
Controller Overrides
If the controller supports it, you can override the
schedule mode of operations by clicking on the
button. The
Overrides Window will
appear.
You can choose
Force Schedule
ON
or
Force Schedule OFF
or
you can choose
Fan Only Mode
to
force the Main Fan to operate
without any cooling or heating
being activated due to space
temperature demands.
A scheduled force override will
remain in effect until cancelled.
To cancel an override, select the
Auto Scheduling
option.
NOTE:
Not all units support the
Fan Only Mode
. In
these cases, it will not be displayed as an option.
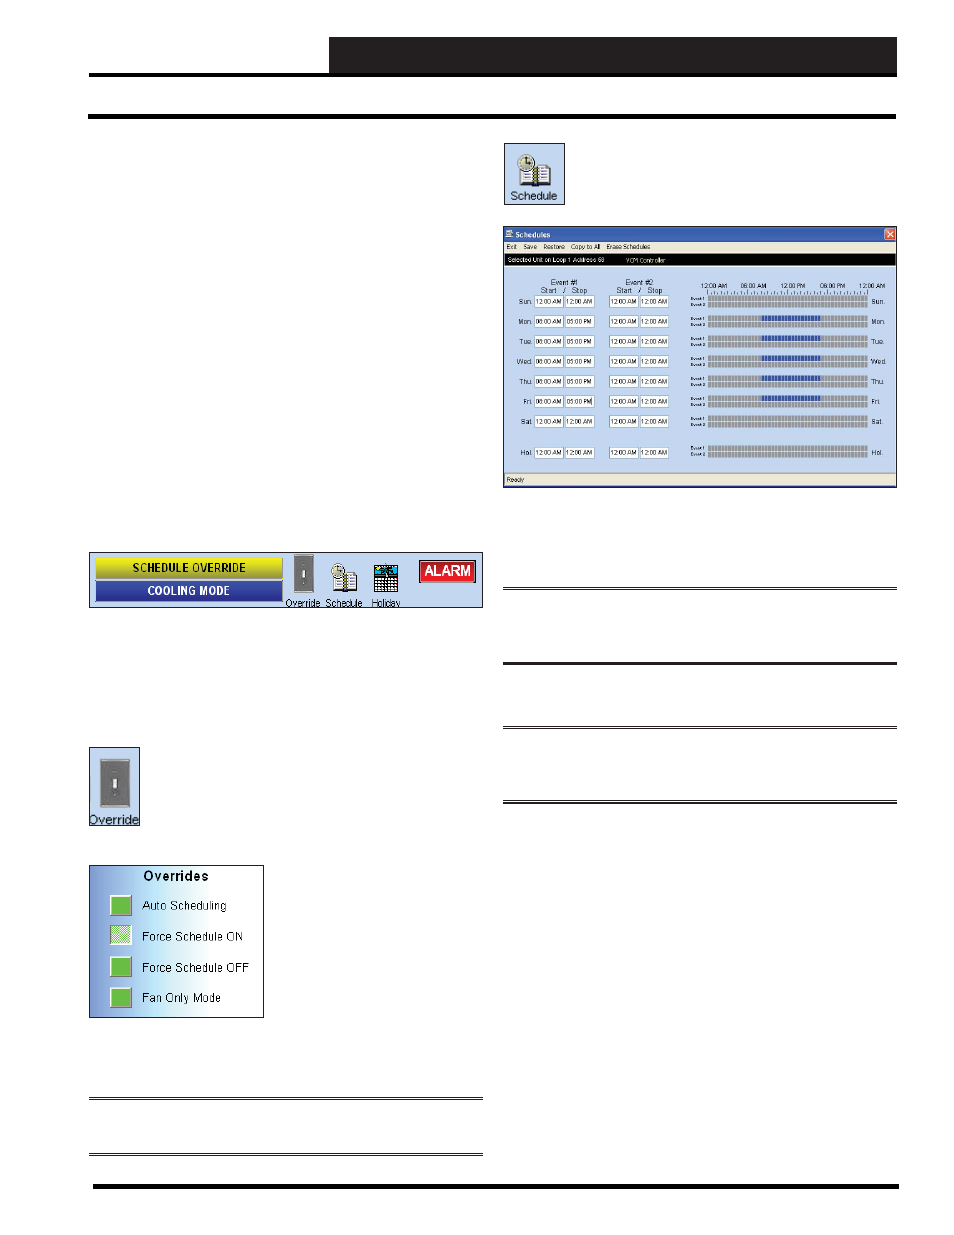
Controller Weekly Time Schedules
When you select the
button, the
Schedules Window will appear.
The Schedules Window in the example shows an 8:00 AM to 5:00
PM operating schedule for Monday through Friday. The bars on
the right side of the screen give a visual indication of the selected
time periods.
NOTE:
Some controllers do not have two start/stop events per
day. The Schedules Window will refl ect this by having the Event
#2 columns grayed out.
When you enter a time in any fi eld, you must designate AM or PM
and press
.
NOTE:
You MUST press
to have the system accept
your entry. If you do not press
, the bar graph to the
right will either not display or will not change.
The holiday start and stop times will override the standard
operating hours. The holidays themselves are scheduled in the
Holiday Schedule Window described on page 24.
To eliminate a schedule from any event, simply type a zero and
press
for the Start and Stop time for that day. The screen
will display 12:00 AM for both the Start and Stop times, indicating
that the equipment will not activate for that day.
If you want the controller to run the full 24 hours, type a zero
and
press
to set 12:00 AM for the Start time and type 11:59
PM and press
for the Stop time. This ensures the full 24-
hour period will remain in the occupied mode without interruption.
Select
< Save>
to save your schedule. Select
< Restore>
to restore
a previously saved schedule. Select
< Copy to All>
to copy the
schedule to all like controllers, and select
< Erase Schedules>
to
completely erase the schedule appearing in the window.