Hanna Instruments HI 504 User Manual
Page 50
99
98
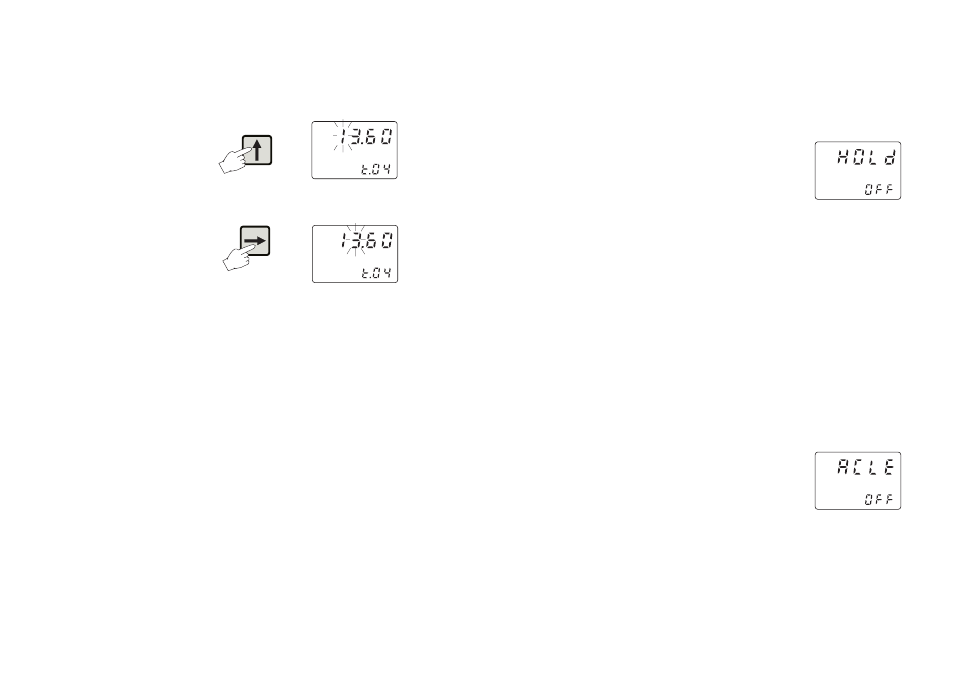
a blinking “GO”.
• Press CFM key to confirm or the
æ (or ) key again to
return to the previous status.
• If confirmation is given when the “OFF” message is blink-
ing, no action is performed and it will move to the next
setup item (t.07).
• Once the test is confirmed, the pri-
mary LCD will display the “HOLd”
message, while the secondary LCD
shows the status (“OFF” or “On”)
of the digital input corresponding to
the hold command.
• Toggle the digital input between high and low levels and
verify the corresponding status on the secondary LCD.
• To exit the test press the CFM key; the instrument will remain
in the setup menu and move to the next setup item (t.07).
ADVANCED CLEANING DIGITAL INPUT TEST
• To enter the test procedure select the setup item t.07 and an
“OFF” blinking message will appear on the LCD.
• Press the
æ (or ) key once and the message will switch to
a blinking “GO”.
• Press CFM key to confirm or the
æ (or ) key again to
return to the previous status.
• If confirmation is given when the “OFF” message is blink-
ing, no action is performed and it will move to the next
setup item (t.08).
• Once the test is confirmed, the
“ACLE” message will appear on the
primary LCD, while the secondary
LCD shows the status (“OFF” or
“On”) of the digital input corre-
sponding to the advanced cleaning.
• To perform this test, relays #3 and #4 have to be config-
ured for the advanced cleaning, otherwise the cleaning
will never start and on the secondary display is indicated
the digital input status only.
• To avoid continuous cleaning it is necessary to configure
the minimum pause time between two consequent clean-
value of the analog output type chosen with setup item
O.11 (analog output 1) and O.21 (analog output 2).
• A new output value can be edited manually. It is possible
to change the value of the first blinking digit by pressing
the
æ or key.
• To move to the next digit press the key once; the first digit
will be fixed and the second one will start blinking.
• Pressing repeatedly the key will result in cycling through
the digits on the primary LCD.
• Once a value is selected, the corresponding current is
immediately erogated by the selected output and no confir-
mation is required.
• The minimum and maximum values let out are 3.6, 22 mA
for the 4-20 mA output and 0, 22 mA for the 0-20 mA
output. This depends on the possibility of the fault currents
to be let out (see “Alarm - error configuration” section for
more details).
• To verify the erogated current use a multimeter connected
to the corresponding output.
• To exit the test press the CFM key; the instrument will re-
main in the setup menu and move to the next setup item.
HOLD DIGITAL INPUT TEST
This test is made to verify if the instrument recognizes the
digital input signal at the hold input.
• To enter the test procedure select the setup item t.06 and an
“OFF” blinking message will appear on the LCD.
• Press the
æ (or ) key once and the message will switch to