Bryant PAYNE 619C User Manual
Page 3
Attention! The text in this document has been recognized automatically. To view the original document, you can use the "Original mode".
II. SELECT LOCATION
Consult local building codes and NEC for special installation
requirements.
There are several ways the unit may be installed to different
types of ceiling construction. These instructions do not cover
all installation methods. As a typical installation, these in
structions focus primarily on mounting the unit to metal in
new construction. Plan your installation carefully before you
begin. Listed below are some guidelines that should be fol
lowed when determining location for the unit.
1. Place unit adjacent to an outside wall if fresh air is re
quired, ensuring that location allows for complete air
distribution.
2. Determine a convenient and accessible location to mount
the wired remote controller. Note that because the con
troller is not used to sense room conditions, it is not nec
essary to consider this factor when determining the
controller location.
The controller cable can be routed through walls and does
not need to be surface mounted. For additional informa
tion on remote controller, see separate controller kit in
stallation instructions.
3. Allow sufficient space for airflow clearance, wiring,
refrigerant piping, and servicing unit (Fig. 3).
4. Make sure the unit is easily accessible to electrical power.
5. Run refrigerant piping as directly as possible, avoiding
any unnecessary turns or bends.
6. Condensate piping can be directed through the inside
wall to an approved drain, or directed straight outside.
NOTE:
The piping hole for condensate line must slope at a
minimum pitch of 1 in. per 10 ft to ensure proper drainage. If
proper pitch cannot be achieved, install accessory conden
sate pump at this time.
NOTE;
The accessory condensate pump should be installed
before hanging the unit.
III. MOUNT UNIT
Refer to Fig. 6 for clearances and dimensions. Use mounting
template included inside box to locate mounting bolt holes,
piping holes, electrical connections, and accessory outdoor-
air intake, if used.
Select proper type of hardware from the guidelines below. See
Fig. 4.
Wooden Structure
Install hanging bolts on a square wooden piece placed over
beams.
Newly Built Concrete Slab
Install hanging bolts with inserts, embedded bolts, etc.
Metal Structure
Install hanging bolts utilizing an existing angle or by install
ing a new support angle.
Previously Built Concrete Slab
Install hanging bolts with expansion anchor.
A. To Mount Unit:
1. Remove mounting bracket and reinstall the 2 hex-head
bolts (factory supplied) into each side of indoor unit as
shown in Fig. 5. Allow approximately 3/8-in. space be
tween bolt head and unit.
2. Determine installation position, paying particular at
tention to piping lengths and wiring connections, clear
ances, etc. See Fig. 3 for connection locations. Fig. 6 for
clearances, and Fig. 7 and 8 for bolt locations.
3. Open knockout if right-side piping connections are re
quired (Fig. 9).
4. Cut the slit portion in rear of the side panel with a saw
or cutter knife. (Fig. 9).
If indoor unit accessory louver guard is to be installed, in
stall at this time and refer to installation instructions pack
aged with this accessory.
5. Mount hanging brackets on ceiling (Fig. 10) for either
concealed or exposed bolt hanging position.
6. Lift the unit into place, and fit the hex-head bolts on
sides of indoor unit into slit grooves of mounting brack
ets (Fig. 11). Ensure unit is mounted level to assure proper
drainage.
7. Tighten bolts securely.
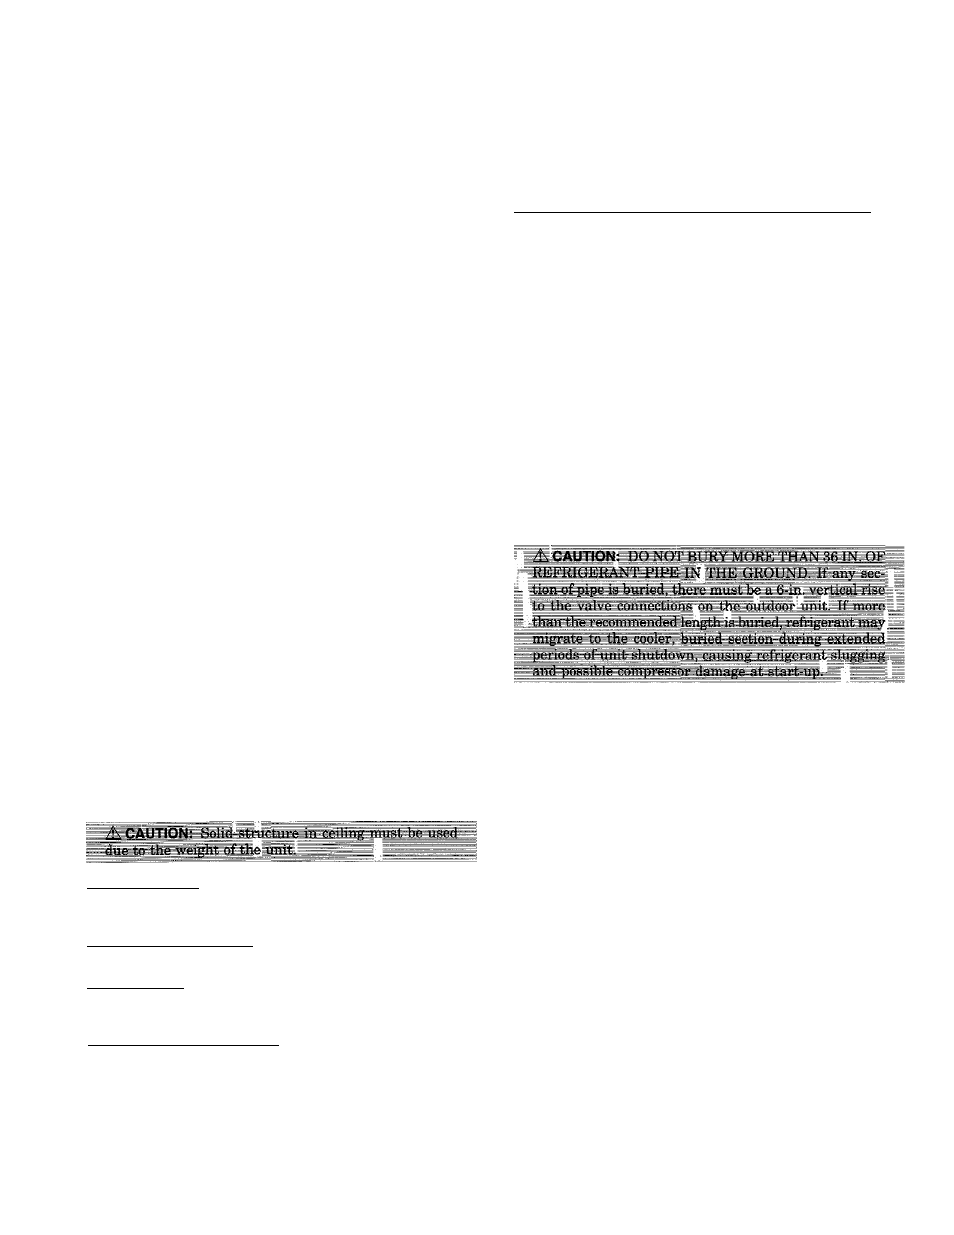
IV. CONNECT REFRIGERANT PIPING
Fan coil units may be connected to condensing units using
field-supplied refrigerant grade piping. Refer to Table 3 for
the correct size piping. The length of refrigerant pipe de
pends on the unit placement and building structure; keep in
mind to run pipes as directly as possible. For piping require
ments over 50 ft of total run, or more than 25 ft of lift, con
sult the long line application guidelines available from your
distributor.
Use the following instructions to connect piping.
1. Install insulation. Insulate all refrigerant lines on heat
pumps to prevent condensation. It is extremely impor
tant that all refrigerant lines and the Check-Flo-
Rater"' metering device be insulated on heat pumps. On
cooling only units, the liquid line may be left uninsu
lated. Use any acceptable heat resistant closed-cell foam
insulation (minimum 3/8-in. wall thickness). When in
sulating piping, cap ends and slide insulation over the
piping. Insulation can also be cut and placed over
piping.
2. Run liquid and gas refrigerant piping.
a. Run pipes as directly as possible, avoiding any un
necessary turns and bends.
b. Suspend refrigerant pipes so that the insulation is
not damaged and vibrations are not transmitted to
the structure.
c. Leave slack in the refrigerant pipe between the struc
ture and the unit to absorb vibrations.
d. Install flare connection on tubing to liquid line at fan
coil (Fig. 12). The correct piston size is shipped in ths
Check-Flo-Rater body with 619C units. If you have
any questions, use Table 4 to determine required pis
ton size for the system being installed. The arrow on
the metering device body must face away from the
indoor coil.
-
3
-