B. external heaters, Ii. ductwork requirements, Iii. wiring – Bryant 559B User Manual
Page 9: A. line-power connections
Attention! The text in this document has been recognized automatically. To view the original document, you can use the "Original mode".
FAN
HEATER
S
ection
LINE POWER
LEADS
INTERNAL
ELECTRIC
HEATER
CONTROL
-WIRING PLUG
SUPPLY
AIR CONN
Figure 5—Internal Electric Heater Installation
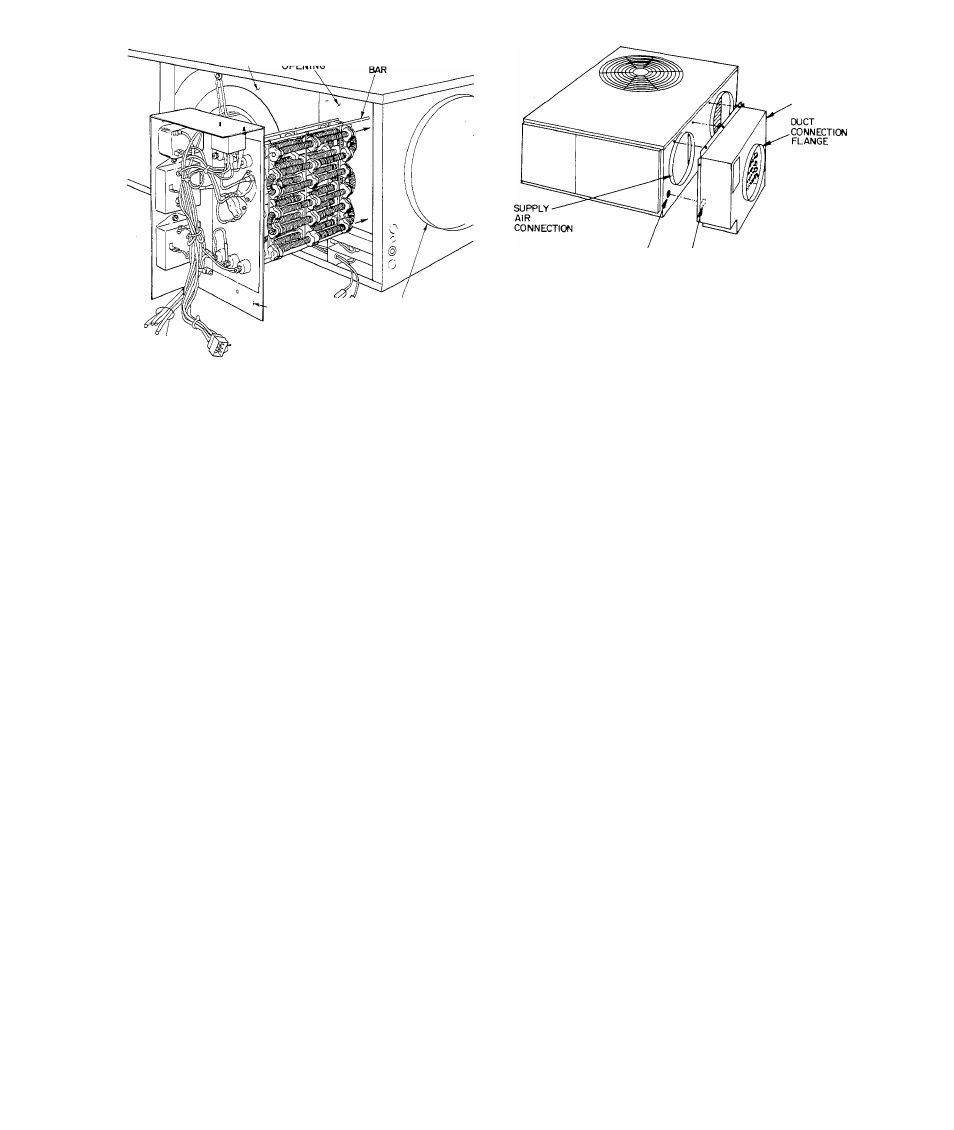
B. External Heaters
The external heaters are self-locating on the 559B
evaporator fan supply air connection. See Figure 6. Flanges
are provided on the heater for connection to the 559B with
sheet metal screws. See Figure 2. Before installing the
heater, ensure the factory-supplied gasket is in place
around the heater entering air connection as shown in
Figures 2 and 3. Complete installation as follows;
NOTE: When installing external heaters, remove the in
ternal air baffle from the 559B. The external heaters have
their own air baffle.
1. Remove top electrical knockout on 559B. See Figure 6.
2. Place heater over 559B supply air connection. See
Figure 6.
3. Align control wiring hole in entering air side of heater
(Figure 2) with top electrical knockout in 559B. See
Figure 6.
4. Drill holes in 559B to align with screw clearance holes
in heater flanges. See Figure 2 for location of clearance
holes in flanges.
NOTE: Mark the drilling locations while holding the
heater in place against the 559B.
( Al TION: I).. nol pem-lraif drill more iliaii 1 inch iusitlc
5. Fasten heater in place with sheet metal screws.
6. Installation is now ready for electrical connections.
See “Wiring”, Section III.
II. DUCTWORK REQUIREMENTS
Refer to Connecting Ductwork section on page 1 of these
instructions for complete duct installation details. The
following ductwork recommendations pertain to electric
heater applications:
1. Flexible connectors are required between duct con
nection flanges and ductwork to prevent transmission
of vibration. When electric heater is installed, it is
recommended that asbestos (or similar heat-resistant
material) connector be used between ductwork and
heater duct connection flange. If non-heat-resistant
flexible duct is used, it is recommended that a sheet
metal sleeve be inserted inside of duct. Heat-resistant
HEATER
TOP ELECTRICAL KNOCKOUT CONTROL WIRING HOLE
Figure 6—External Heater Installation
duct connector (or sheet metal sleeve) should extend 24
inches from electric heater element.
2. Single-phase external heaters are provided with
means for attachment of circular ductwork only.
Three-phase external heaters are provided with
means for attachment of circular or square ductwork.
3. When electric heater is used, the ductwork must be
capable of handling minimum air quantities shown in
Table III.
III. WIRING
Field wiring must be made in accordance with the National
Electrical Code and local electrical codes governing such
wiring. Provide a separate fused disconnect for each electric
heater circuit. See Table II. Refer to heat package wiring
label.
A. Line-Power Connections
On internal heater installations, bring the line-power
leads from the fused disconnect(s) through the power holes
in the 559B unit panel. Knockouts are provided on the ex
ternal heater cabinet for passage of the line-power leads.
See Figure 3.
Connect the line-power leads to the heater line-power
pigtails or to the heater high-voltage terminal block. See
Figure 10 and Table II for branch circuit data and line-
power connections. Use screw connectors provided for
pigtail connections, and tape each connection. The screw
connectors and terminal block are suitable for copper or
aluminum wire.
If aluminum conductors are used, the wire gauge selected
must have current capacity not less than the copper wire
specifled and must not create a voltage drop between the
service panel and the unit in excess of 2% of the unit rated
voltage.
NOTE: If aluminum conductors are used, the connections
must be made in accordance with the National Electrical
Code. In preparing the wire, just before installing the con
nector, all aluminum wire must be “brush-scratched” and
the wire coated with a corrosion inhibitor, such as Pentrox
A. When it is suspected that the connection will be exposed
to moisture, it is very important to cover the entire con
nection completely to prevent an electro-chemical action
that will cause the connection to fail very quickly. Reducing
the effective size of the wire, such as cutting off strands so
that the wire will fit a connector, is very poor practice.
Proper size connectors should be used.
-
9
-