Kodak EKTAGRAPHIC 470 User Manual
Page 15
Attention! The text in this document has been recognized automatically. To view the original document, you can use the "Original mode".
Preventing Accidental
Erasures of Your
Program Tapes
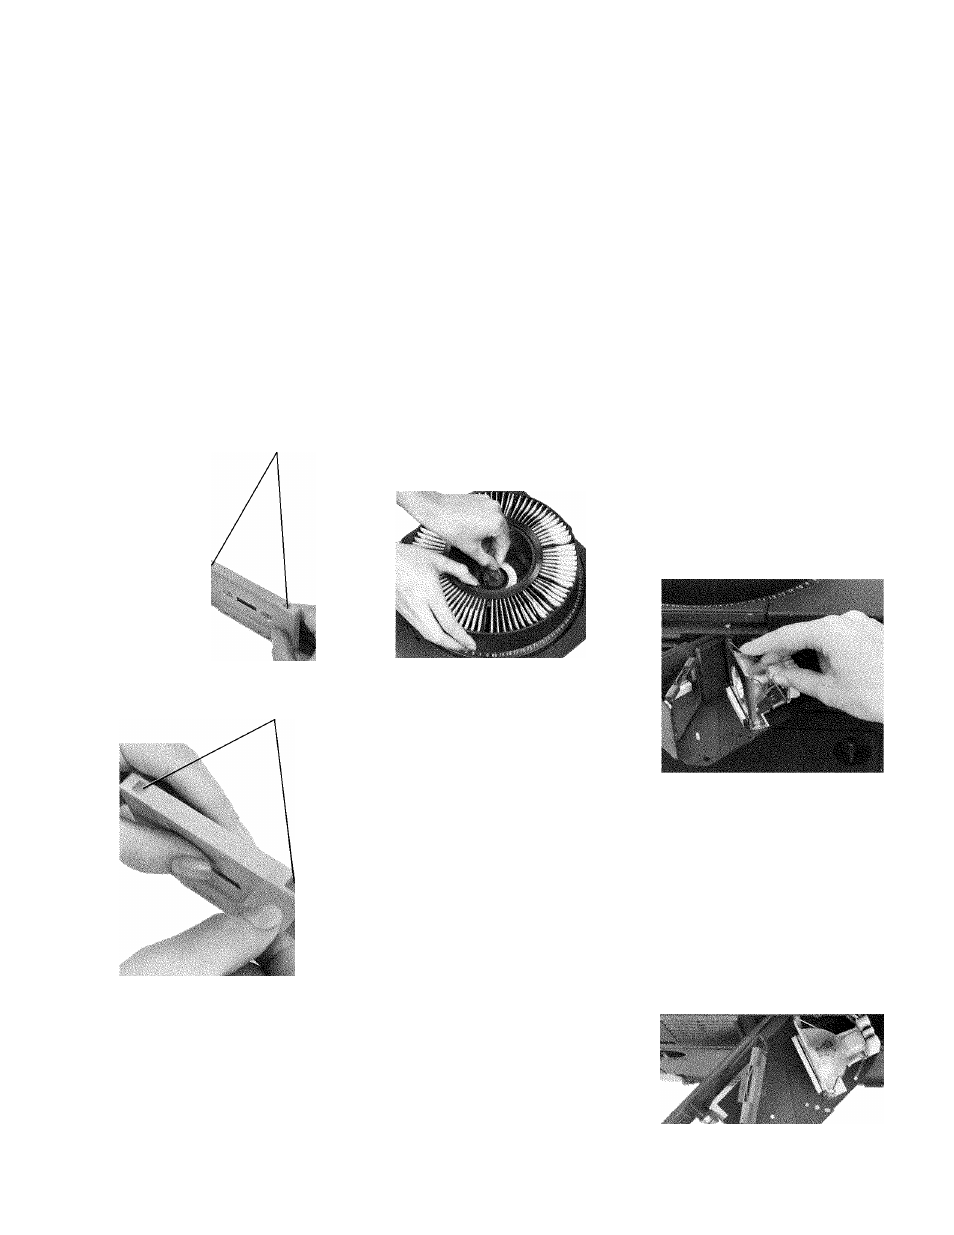
With a suitable tool, break out the
plastic tabs from the edge of your
valuable recorded cassettes so the
tape cannot be accidentally erased
and recorded. With the tabs removed
from the edge of the cassette, the tape
record button (RECORD) cannot be
pressed in to put the AudioViewer/
Projector into the recording mode.
To erase and record the tape again,
cover the tab holes with pressure-
sensitive (cellophane) tape; then you
can record the cassette again.
Be sure to remove the cellophane
tape after recording the new program.
TABS
CELLOPHANE TAPE
IN CASE OF DIFFICULTY
Slide Tray Jammed?
The AudioViewer/Projector is de
signed to stop to reduce the possibili
ty of damage if a bent slide is caught
(jammed) in the gate.
To reset the slide mechanism of the
AudioViewer/Projector after a jam,
follow these steps:
1. Stop the program cassette tape by
pressing the stop/eject button.
2. Make a note of the number of the
slide in the gate.
3. Turn the large coin-slotted tray-
removal screw (located in the hub
of the projector housing in the
center of the tray) in either direc
tion as far as it will go and then
remove the tray. (The tray-remov-
al screw does not come out.)
12
4. Be sure the lock ring on the tray
is tight before inverting the tray.
5. Turn the slide tray upside down
and rotate the bottom metal plate
of the tray until it locks in the "0”
position.
6. Press the slide-select button
(SELECT) to lift the jammed slide
out of the gate, and then remove
the slide.
7. Press the slide-select button a
second time to reset the slide
mechanism.
NOTE: In some cases it may
be necessary to turn the
AudioViewer/Projector power
off and on before pressing the
slide-select button to reset the
slide mechanism.
8. Turn the tray upright and loosen
and remove the lock ring of the
tray.
9. Check the slide for damage, and
replace it if necessary.
10. Replace the lock ring on the tray,
replace the tray on the Audio
Viewer/Projector at the correct
slide number, and resume the
program.
Projection Lamp Burned Out?
(How to Change the Projection
Lamp)
CAUTION: Unplug power
cord from power outlet
before changing the lamp!
The lamp may still be hot!
Wear protective gloves!
Replace the projection lamp if the
screen remains dark (no image) when
power is on, the projection-lamp
switch is in the LO or HI position,
and a slide is in the gate. To replace
the projection lamp
1. Keep power on until the fan cools
the lamp area; then switch the
AudioViewer/Projector off.
2. Turn the screw on the lamp-access
door counterclockwise and swing
open the lamp door.
3. Pull back on the lamp lever to
move the lamp up for removal.
4. Before inserting a new lamp, latch
the lamp lever first.
5. Insert the new lamp and press it
down against the socket to be sure
it is tightly seated.
6. Wipe off any fingerprints from the
lamp with a cloth moistened with
rubbing alcohol. (Avoid touching
the mirror on the lamp-access
door.)
7. Close the door, retighten the
screw, and plug the AudioViewer/
Projector in.
8. Turn the AudioViewer/Projector
on and advance the tray to a slide
to see if the image is projected on
the screen.