H-B Instrument 580 User Manual
Page 2
DEUTSCH
GROSSER MEHRFACH-COUNTDOWN/COUNTUP-TIMER
FUNKTIONSMERKMALE:
Anzeige mit großen Ziffern
4 Timer für gleichzeitigen Countdown/Countup
Maximaler Countdown/bis zu 99 Std. 59 Min. 59 Sek.
Speicher für Vorgabeeinstellung
12/24-Stundenformat
Einklappbarer Ständer
Magnethalterung
TECHNISCHE DATEN:
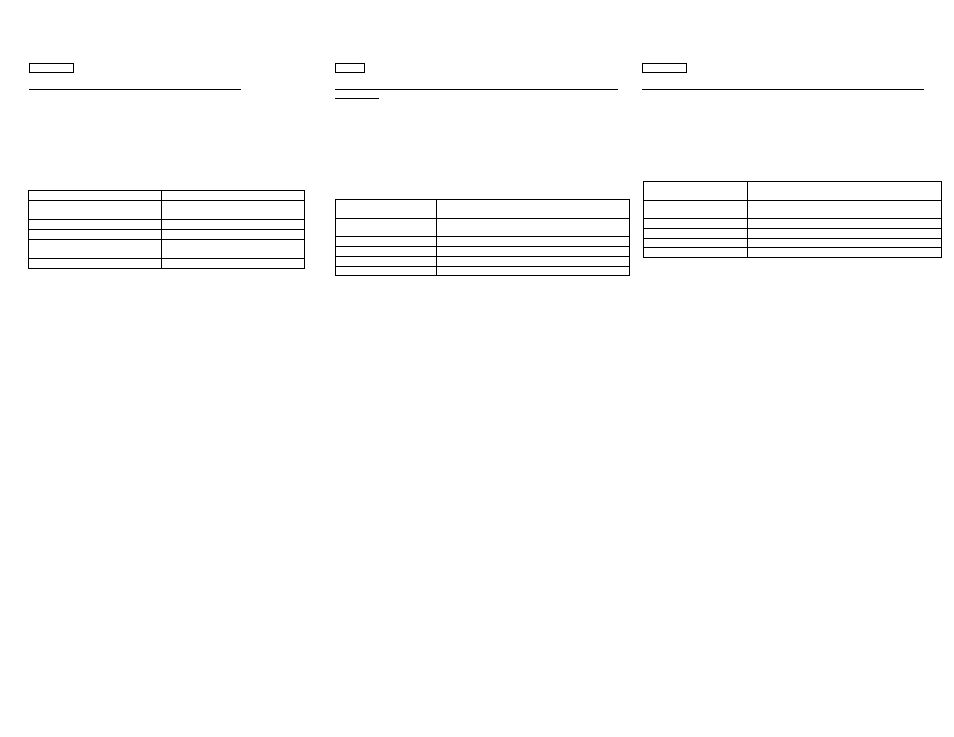
MAXIMALER COUNTDOWN/COUNTUP
99 Stunden, 59 Minuten 59 Sekunden
COUNTDOWN/COUNTUP
ANZEIGE-AUFLÖSUNG
1 Sekunde
ANZEIGEGRÖSSE
66 (B) x 22 (H) mm
ZAHLENANZEIGE GRÖSSE
10 (B) x 18 (H) mm
BATTERIE
1,5V; Größe "AAA" oder äquivalent x 1
Stück (mitgeliefert)
ABMESSUNGEN GERÄT
80 (B) x 80 (H) x 25 (T) mm
BATTERIEN INSTALLATION:
1. Schieben Sie das Batteriefach auf.
2. Legen Sie die Batterien unter Beachtung der Polarisierungsangaben ein.
3. Schließen Sie das Batteriefach wieder.
4. Ziehen Sie die Schutzfolie von der Anzeige ab.
5. Halten Sie [CLOCK] gedrückt, bis die Anzeige blinkt.
6. Betätigen Sie [12/24] an der Rückseite, und stellen Sie das 12/24-Stundenformat
für die Anzeige ein.
7. Halten Sie [HR], [MIN] und [SEC] gedrückt, um die Zeit korrekt einzustellen.*
8. Betätigen Sie [CLOCK], um die Einstellung abzuschließen.
EINSATZ
COUNTDOWN
1. Betätigen Sie [T1], um "Timer 1" auszuwählen.
2. Betätigen Sie [HR], [MIN] und [SEK], um die gewünschte Countdown-Zeit
einzustellen.*
3. Betätigen Sie [START/STOP/MEMORY], um den Countdown für "TIMER 1"
(T1) zu starten.
4. Betätigen Sie die Taste nochmals, um zu pausieren.
5. Betätigen Sie die Taste einmal, um den Countdown fortzusetzen.
6. Der Timeralarm wird ausgelöst, sobald die Anzeige auf "0:00 00" herunter
gezählt hat; die Anzeige zählt anschließend aufwärts, und zeigt die vergangene
Zeit an.
7. Betätigen Sie [START/STOP/MEMORY], um den TIMER 1 anzuhalten.
8. Betätigen Sie die Taste nochmals, um wieder den gespeicherten Vorgabewert
einzustellen.
9. Betätigen Sie [CLEAR] (LÖSCHEN), um alle Werte zu löschen.
10. Betätigen Sie T2, T3 oder T4, um den gewünschten Timer auszuwählen.
11. Wiederholen Sie die Schritte 2 bis 9, um den jeweils ausgewählten Timer
einzustellen und zu aktivieren.
COUNT-UP
1. Betätigen Sie T1, T2, T3 oder T4, um den gewünschten Timer auszuwählen.
2. Betätigen Sie [CLEAR] (LÖSCHEN), um die Anzeigewerte zu löschen.
3. Betätigen Sie [START/STOP/MEMORY], um den Countup zu starten.
4. Betätigen Sie die Taste nochmals, um zu pausieren.
5. Betätigen Sie die Taste nochmals, um den Countup fortzusetzen.
*
Halten Sie die Tasten [HR], [MIN] oder [SEC] während des Einstellvorgangs
gedrückt, um die Einstellung schnell aufwärts vorzunehmen.
ITALIA
Timer Multifunzione con Conto alla rovescia e Cronometro– Display con
cifre grandi
Caratteristiche:
Display con cifre grandi
4 timer simultanei conto alla rovescia e cronometro
Tempo massimo conto alla rovescia/cronometro 99ore 59minuti 59secondi
Memoria del valore impostato
Formato orario 12/24 ore
Piedistallo da tavolo
Calamita per il fissaggio
Specifiche tecniche:
Tempo massimo conto
alla rovescia/cronometro
99 ore 59 minuti 59 secondi
Risoluzione display Conto
alla rovescia/cronometro
1 secondo
Misure display
66(Larghezza) X 22(H) mm
Misure cifre
10(Larghezza) X 18(H) mm
Batteria
1.5 volt, tipo AAA o equivalente X 1 pezzo (inclusa)
Misura totale
80(Larghezza) X 80 (H) X 25(Diametro) mm
INSTALLAZIONE:
1. Far scorrere il coperchio del vano batteria verso il basso.
2. Installare la batteria secondo l’esatta posizione delle polarità.
3. Reinserire il coperchio del vano batteria.
4. Rimuovere il velo protettivo dal display.
5. Premere [CLOCK] finché il display inizia a lampeggiare.
6. Premere il tasto [12/24] sul retro per selezionare il formato orario 12 o 24.
7. Premere [HR], [MIN] e [SEC] per impostare l’orario. *
8. Premere [CLOCK] per terminare le impostazioni dell’orario.
OPERAZIONI:
CONTO ALLA ROVESCIA
1. Premere [T1] per selezionare il timer 1.
2. Premere [HR], [MIN] e [SEC] per impostare il tempo di conto alla rovescia
desiderato. *
3. Premere [START/STOP/MEMORY] per avviare il conto alla rovescia del
TIMER 1 [T1].
4. Premere di nuovo il tasto per mettere in pausa.
5. Premere il tasto nuovamente per riprendere il conto alla rovescia.
6. Il timer emetterà un suono una volta che il valore visualizzato sul display
sarà pari a 0:00 00 e inizierà a cronometrare il tempo trascorso.
7. Premere [START/STOP/MEMORY] per fermare il TIMER 1.
8. Premere di nuovo il tasto per visualizzare il valore preimpostato
memorizzato.
9. Premere [CLEAR] per cancellare tutti i valori.
10. Premere T2, T3 o T4 per selezionare il timer desiderato.
11. Ripetere i passaggi da 2 a 9 per impostare e avviare il timer selezionato.
CRONOMETRO
1. Premere T1, T2, T3, o T4 per selezionare il timer desiderato.
2. Premere [CLEAR] per cancellare i valori visualizzati sul display.
3. Premere [START/STOP/MOMERY] per avviare il cronometro.
4. Premere di nuovo il tasto per mettere in pausa.
5. Premere il tasto nuovamente per riprendere il cronometraggio.
* Nel corso delle impostazioni dei valori, questi aumenteranno
automaticamente premendo il tasto [HR], [MIN] o [SEC].
* Tutti i timer attivi da [T1] a [T4] sono mostrati nell’angolo in alto a destra del
display.I caratteri statici nell’angolo del display da [T1] a [T4] si riferiscono al
timer in funzione sul display; i caratteri lampeggianti si riferiscono agli altri
timer attivi.
Português
Cronómetro multi de contagem crescente / decrescente de dígitos grandes
Características:
Visor de dígitos grandes
4 cronómetros de contagem crescente / decrescente em simultâneo
Contagem crescente / decrescente máxima de 99hr 59min 59seg
Predefinição do valor em memória
Formato da hora de 12 / 24 horas
Suporte dobrável
Acessório magnético
Especificações:
Limite de contagem crescente /
decrescente máximo
99 horas 59 minutos 59 segundos
Resolução do visor da contagem
crescente / decrescente
1 segundo
Dimensões do visor
66(L) x 22(A) mm
Dimensões dos dígitos
10(L) x 18(A) mm
Pilha
1 pilha do tipo AAA ou equivalente de 1,5 volts (incluída)
Dimensões do produto
80(L) x 80(A) x 25(P) mm
INSTALAÇÃO:
1. Faça deslizar a tampa do compartimento da pilha.
2. Instale a pilha posicionando-a com a polaridade correcta.
3. Volte a colocar a tampa do compartimento da pilha.
4. Descole a folha protectora do visor.
5. Pressione e mantenha pressionado [RELÓGIO] até o visor começar a
piscar.
6. Pressione o botão [12/24] na parte de trás para seleccionar o formato da
hora para 12 ou 24 horas.
7. Pressione [HR], [MIN] e [SEG] para configurar a hora correcta. *
8. Pressione [RELÓGIO] para terminar a configuração do relógio.
FUNCIONAMENTO:
CONTAGEM DECRESCENTE
1. Pressione [T1] para seleccionar “CRONÓMETRO 1”.
2. Pressione [HR], [MIN] e [SEG] para configurar a contagem decrescente da
hora que deseja. *
3. Pressione
[INICIAR/PARAR/MEMÓRIA]
para
iniciar
a
contagem
decrescente de “CRONÓMETRO 1” [T1].
4. Pressione de novo o botão para pausar.
5. Pressione uma vez mais o botão para resumir a contagem decrescente.
6. O cronómetro emitirá um sinal sonoro quando o visor apresentar o valor
0:00 00 e a contagem começará mostrando o tempo decorrido.
7. Pressione [INICIAR/PARAR/MEMÓRIA] para parar “CRONÓMETRO 1”.
8. Pressione de novo o botão para chamar o valor predefinido em memória.
9. Pressione [APAGAR] para apagar todos os valores.
10. Pressione T2, T3 ou T4 para seleccionar o cronómetro que deseja.
11. Repita o passo 2 até ao 9 para configurar e pôr a funcionar o cronómetro
seleccionado.
CONTAGEM CRESCENTE
1. Pressione T1, T2, T3, ou T4 para seleccionar o cronómetro que deseja.
2. Pressione [APAGAR] para apagar os valores.
3.
Pressione [INICIAR/PARAR/MEMÓRIA] para começar a contagem crescente.
4. Pressione de novo o botão para pausar.
5. Pressione uma vez mais o botão para resumir a contagem crescente.
* Enquanto configura os valores, pressione e mantenha pressionado o botão
[HR], [MIN] ou [SEG] e os valores aumentarão automaticamente.
* Todos os cronómetros activos de [T1] a [T4] são mostrados no canto superior
direito do visor. Os caracteres fixos no canto do visor de [T1] a [T4] referem-se
à leitura do cronómetro no visor; os caracteres que piscam referem-se aos
outros cronómetros activos.
105-6