Top Flite Phasoar 035 User Manual
Page 6
supported w i t h a length of t r a i l i n g edge
Stock. With everything secure, t r i a l - f i t
the right wing half in place with its
polyhedral break supported 2-5/8" off of
the work surface. The resulting butt joint
should be as flush f i t t i n g as possible and
the leading and t r a i l i n g edges of both
inner panels should be straight; take your
time here and ensure that the f i t is the
best you can produce, with a l l parts
lining-up correctly. Once satisfied, apply
a t h i n , even coat of glue (5-minute epoxy)
to the inboard end of the right wing panel
and carefully f i t i t to the pinned down
left panel, again making sure the right
panel is raised 2-5/8" at the polyhedral
break. Carefully wipe off any oozing
adhesive. Now, f i t W-8 dihedral brace in
place, trimming if needed for a good fit.
Glue w-8 in place. Cut, f i t and glue the
left panel's spruce spar in place. Rear
dihedral brace w-9 can now be glued in
place.
9. With the left wing s t i l l down flat to your
work surface, locate the vertical grain
shear webs (1/16" balsa). Cut, f i t and
glue these in place between the remaining
w-2 ribs. out to the polyhedral break.
10. Remove the joined wing structure from the
bench. Pin or weight the right panel in
place to the bench and glue the remaining
top spruce spar in place followed by the
remaining vertical grain shear webs.
11. As you did with the wingtip panels,
carefully shave and sand the inner panel's
leading edges to conform w i t h the top
contours of the wing ribs. Use your
sanding block to l i g h t l y sand any high
points on the panel's top surfaces. When
done. the inner panels are ready to sheet.
Pin or weight one side or the other in
place on your work surface. Cut, f i t and
glue the leading edge sheeting in place
(again leaving a bit of a "shelf" at the
rear edge of the top spar). Cut, fit and
glue the center section sheeting in place
using the patterns shown on the plans.
Finally, install a l l of the remaining 1/16"
x 3/16" cap strips out to and including the
polyhedral break. Repeat this procedure
on the opposite wing panel.
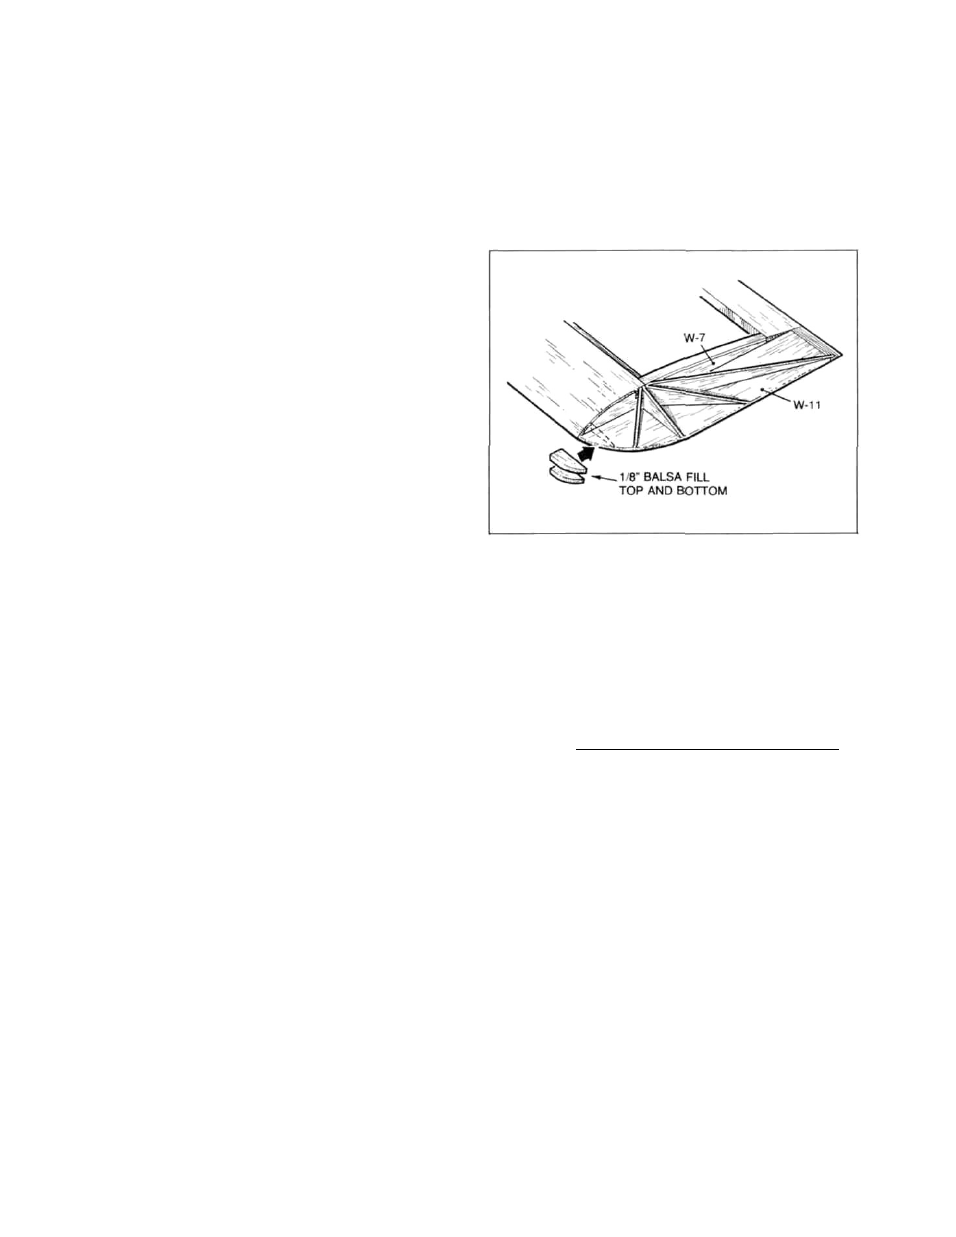
12. Locate and remove wing tip parts W-11 from
their die-cut sheets. Sand their inner
edges l i g h t l y to render them flat and
straight. Note the t i p reinforcement
option shown on the plans. This addition
of a length of 1/8" x 3/16" spar stock
really "beefs-up" an area prone to stress
in an accident. Glue the W - 1 1 wing tips in
place as shown on the plans ("End View of
Wing tip" left panel). Also as shown
below, cut a few scraps of 1/8" balsa to
f i l l in the leading edge of the wing tip
and glue these in place. From the
remaining 1/16" balsa sheet provided in
your kit, cut. f i t and glue in place the
wing tip braces as shown on the plans. On
our prototypes we added these braces top
and bottom.
The completed wing structure should be carefully
sanded to f i n a l shape including the leading edges.
At this point your PHASOAR's wing structure is
nearly complete. Later, after the FUSELAGE
ASSEMBLY, we w i l l insert the forward 3/16" dia. x
1-1/2" hold-down dowel, d r i l l the center section
t r a i l i n g edge for the hold-down screw and add the
front and rear balsa wing/fuselage fairings.
VIII. STABILATOR CONSTRUCTION
Studying the plans you'll note that the entire tail
group (stabilator, fin and rudder) for your PHASOAR
consists of flat "plate" structures, which have
die-cut "core" parts and die-cut "cap" parts.
These structures are sanded to a i r f o i l shape (shown
on plans) after assembly. Although these
structures are quite straight-forward in design, it
remains important that care be taken in cutting and
gluing the required parts together.
1. From the small parts bag, locate and remove
the single 3" length of 1/16" I.D. aluminum
tubing and two of the four 1/16" dia. x 1-
1/2" lengths of music wire (M.W.).
Carefully measure and cut-off four(4) 5/8"
lengths of the aluminum tubing, using a
single-edge razor blade with a rolling
motion on a hard surface. Be sure to save
the remaining 1/2" length of this tubing
for later use.
6