Top Flite Elder 40 User Manual
Page 6
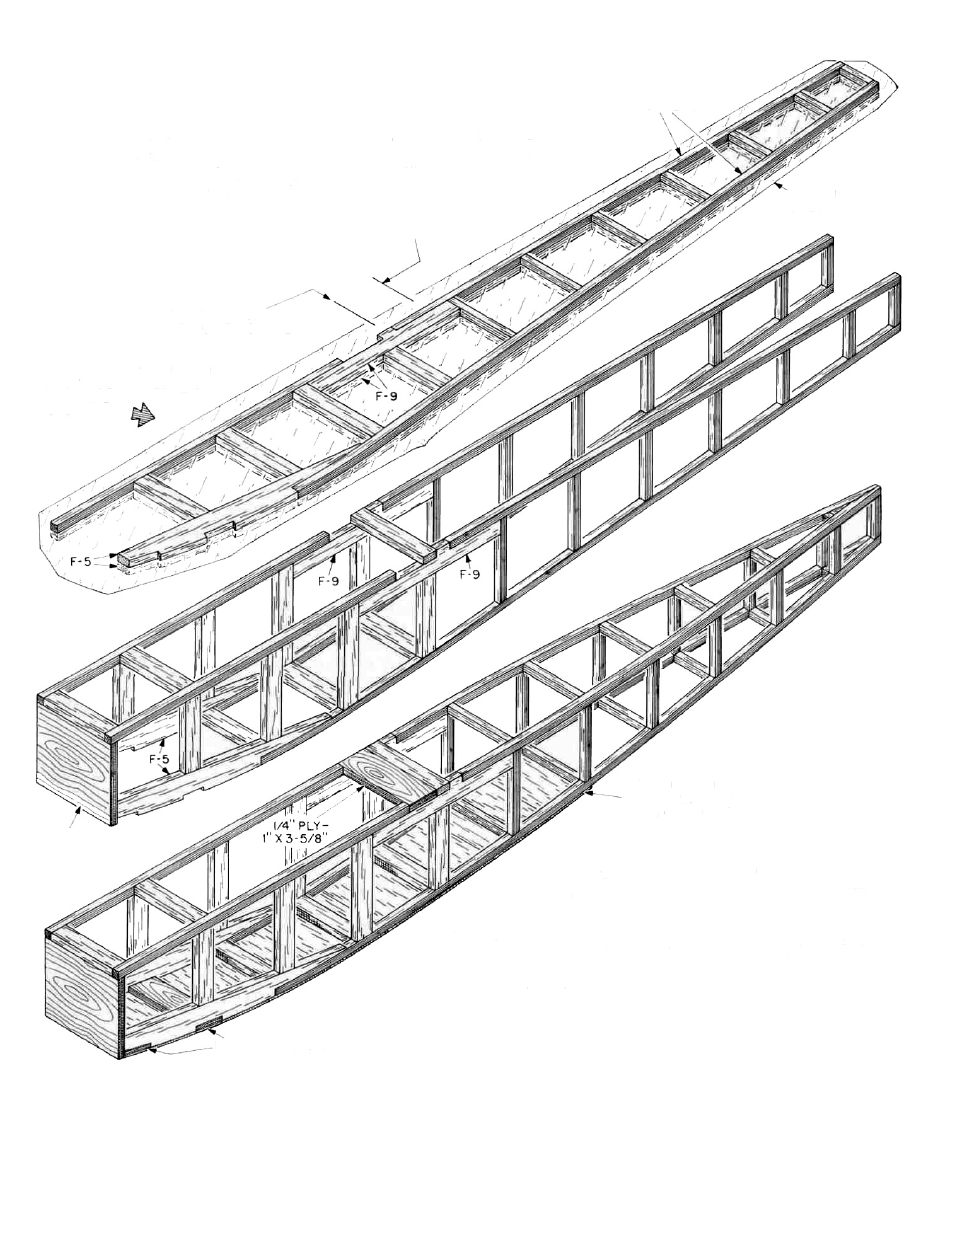
1/4" SQ. SPRUCE LONGERONS
CLEAR PLASTIC
SHEET
ALL UPRIGHTS 1/4" SQ. SPRUCE
AFT OF THIS LINE
IN THE FIRST STEP, THE FUSELAGE SIDES ARE ASSEMBLED DIRECTLY ON
FUSELAGE PLAN TO KEEP F R A M E FROM BEING GLUED TO PLAN, USE
MONOKOTE BACKING OR CLEAR P L A S T I C FOOD W R A P W H E N FIRST SIDE
HAS BEEN A S S E M B L E D , A G A I N USE CLEAR P L A S T I C SHEET TO KEEP
S E C O N D SIDE FROM A D H E R I N G TO THE FIRST SIDE FRAME
ALL UPRIGHTS 1/4" X 1/2" BALSA
F O R W A R D OF THIS LINE
THE FIRST PHASE OF SHEETING IS
SHOWN IN STEP 3--(1/8" SHEET, APPLIED
WITH G R A I N A C R O S S THE FUSELAGE)
STEP 2 - JOIN BOTH SIDES WITH 1/4"X 1/2" BALSA
C R O S S PIECES AS S H O W N A L S O GLUE FIREWALL
(1/4" PLY-3-3/8" X 3 - 5 / 8 " ) IN P L A C E
STEP 3 - A D D THREE 1/4" PLY (1" X 3 - 5 / 8 " ) CROSS PIECES AS
SHOWN ( T W O A R E L G M O U N T S , ONE AT F U S E L A G E T O P ) THEN
BEVEL I N N E R R E A R ENDS OF F R A M E S A N D GLUE TOGETHER.
CUT R E M A I N I N G C R O S S PIECES TO SIZE (BEVEL ENDS FOR AN
EXACT FIT) AND GLUE IN PLACE.
1/4" PLY, 1" X 3-5/8"
IN THIS " F I R S T STEP" SKETCH,
SECOND SIDE HAS BEEN MADE
AND IS SEPARATED FROM
FIRST SIDE BY PLASTIC
SHEET.
FIREWALL
3
2
1
9. Locate the 1/4" ply firewall. You must now use the
plans to locate the position of your motor mount on
the firewall. This mount is installed inverted. Mark
the location of the four mounting holes onto the
firewall. Use a drill to drill the holes through the
firewall with a 1/8" dia. bit. Epoxy the four 4-40 blind
mounting nuts in place to the back of the firewall in-
to the holes just drilled—keeping adhesive out of
the threads. Test mount the motor mount with the
4-40 x 7/8" bolts provided. Remove the mount and
epoxy the firewall to the front of the fuselage frame.
Align it carefully and allow to cure.
6