Optional robart retractable landing gear, Additional items required – Top Flite TOPA0705 User Manual
Page 4
4
Depending on your choice of receiver and the number
of channels you will be using you may have to use
“Y” harnesses on the aileron, flaps and elevator.
(FUTM4130)
❍ 1500 mAh NiCad receiver battery or equivalent
(FUTM1285).
❍ 2 - Heavy duty switch harness (FUTM4385).
❍ 2 - Ernst Charge Receptacle (ERNM3001).
❍ 2 - 1" Servo arms
❍ 1 - 2" Servo arm
(There are a number of options for servo arms. We
used the Du-Bro Super Strength Arms. (DUBM6670)
This package includes eight servo arms, including the
two needed for this model).
ENGINE RECOMMENDATIONS
The recommended engine size range for the P-40 is
43cc to 55cc [2.6 - 3.3 cu in] two-stroke gasoline engine.
We used the DLE
™
55 engine for our model. We have
provided instructions and hardware for the Fuji-Imvac
™
43 EI (FJIG134) and the DLE 55 (DLEG0055). Other
engines can also be used but you may need to make
modifi cations for mounting those engines.
OPTIONAL ROBART
RETRACTABLE LANDING GEAR
Robart makes a very realistic, high quality, scale landing
gear for the P-40. This landing gear rotates just the
same as the full scale airplane providing a very realistic
operation. This is a tremendous addition to the airplane.
If you choose to use them you will need the following.
❍ 100 Degree retract large scale (ROBQ1665)
❍ 157VR Large Air Control Kit (ROBQ2305)
❍ 169 Pressure Tubing 10' Red/Purple
(ROBQ2369)
❍ #160LWC LH Offset Pneumatic Tail Wheel
(ROBQ2225)
ADDITIONAL ITEMS REQUIRED
REQUIRED HARDWARE & ACCESSORIES
This is the list of hardware and accessories required
to fi nish the P-40.
Order numbers are provided in
parentheses.
❍ R/C foam rubber (1/4" [6mm] - HCAQ1000, or
1/2" [13mm] - HCAQ1050)
❍ 3' [900mm] gasoline fuel tubing (GPMQ4135)
❍ 1 oz. [30g] Thin Pro
™
CA (GPMR6002)
❍ 1 oz. [30g] Medium Pro CA+ (GPMR6008)
❍ Pro 30-minute epoxy (GPMR6047)
❍ Pro 6-minute epoxy (GPMR6045)
❍ Silver solder w/fl ux (STAR2000)
❍ Hobbico
®
Soldering Iron 60 Watt (HCAR0776)
❍ #1 Hobby knife (HCAR0105)
❍ #11 blades (5-pack, HCAR0211)
❍ R/C-56 canopy glue (JOZR5007)
❍ Epoxy brushes (6, GPMR8060)
❍ Mixing sticks (50, GPMR8055)
❍ Mixing cups (GPMR8056)
❍ Masking tape (TOPR8018)
❍ Threadlocker thread locking cement
(GPMR6060)
❍ Denatured alcohol (for epoxy clean up)
❍ Panel Line Pen (TOPQ2510)
❍ Rotary tool such as Dremel
®
❍ Rotary tool reinforced cut-off wheel
(GPMR8200)
❍ Drill bits: 1/16" [1.6mm], 1/8" [3.2mm], 5/64"
[2mm], 3/32" [2.4mm], 7/64" [2.8mm}, 3/16"
[4.8mm], 5/16" [8mm], 1/4" [6.4mm].
❍ Du-Bro Fuel Line Barb 1/8" (DUBQ0670)
OPTIONAL SUPPLIES & TOOLS
Here is a list of optional tools mentioned in the manual
that will help you build the P-40.
❍ 21
st
Century
®
sealing iron (COVR2700)
❍ 21
st
Century
®
iron cover (COVR2702)
❍ 2 oz. [57g] spray CA activator (GPMR6035)
❍ 4 oz. [113g] aerosol CA activator (GPMR634)
❍ Epoxy brushes (6, GPMR8060)
❍ Mixing sticks (50, GPMR8055)
❍ Mixing cups (GPMR8056)
❍ Denatured alcohol (for epoxy clean up)
❍ Panel Line Pen (TOPQ2510)
❍ Rotary tool such as Dremel
®
❍ Rotary tool reinforced cut-off wheel
(GPMR8200)
IMPORTANT BUILDING NOTES
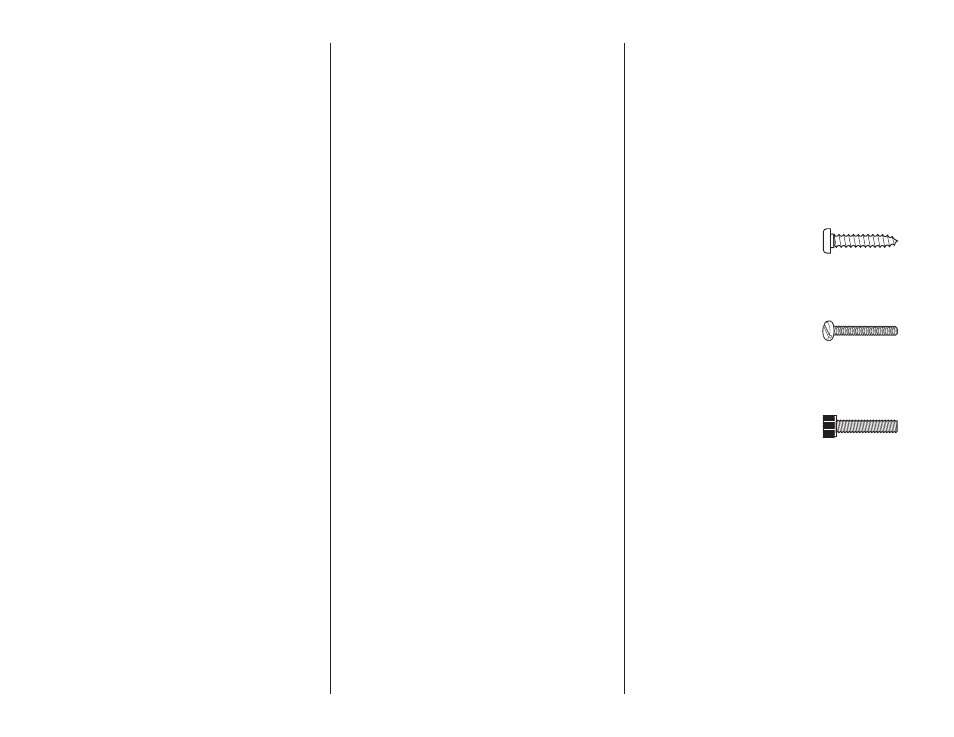
● There are three types of screws used in this kit:
Sheet Metal Screws
are designated by a number
and a length. For example #6
× 3/4" [19mm].
This is a number six screw
that is 3/4" [19mm] long.
Machine Screws
are designated by a number,
threads per inch,
and a length. For example
4-40
× 3/4" [19mm].
This is a number four screw
that is 3/4" [19mm] long with
forty threads per inch.
Socket Head Cap Screws
(SHCS)
are designated
by a number,
threads per inch
, and a length. For
example 4-40 × 3/4" [19mm].
This is a 4-40 SHCS that is
3/4" [19mm]
long with forty
threads per inch
● When you see the term
test fi t
in the instructions,
it means that you should fi rst position the part on
the assembly
without using any glue
, then slightly
modify or
custom fi t
the part as necessary for the
best fi t.
● Whenever the term
glue
is written you should rely
upon your experience to decide what type of glue
to use. When a specifi c type of adhesive works
best for that step, the instructions will make a
recommendation.
● Whenever just
epoxy
is specifi ed you may use
either
30-minute (or 45-minute) epoxy
or
6-minute
epoxy. When 30-minute epoxy is specifi ed it is
highly
recommended that you use only 30-minute
(or 45-minute) epoxy, because you will need the
working time and/or the additional strength.