Ccoon ntteen nd deerr f fu un n f fa acctt – Top Flite TOPA0210 User Manual
Page 12
❏ 11. Locate the die-cut 1/8" [3.2mm] ply forward
dowel guide and the die-cut 1/8" [3.2mm] ply aft
dowel guide. Measure the distance between the
center of the holes in the forward dowel guide. Draw
a centerline on the forward dowel guide.
❏ 12. Use 6-minute epoxy to glue the die-cut 1/8"
[3.2mm] ply forward dowel guide and the die-cut 1/8"
[3.2mm] ply aft dowel guide in place between the two
W-1 ribs as shown on the plan. Be sure that the side
of the forward dowel guide with the centerline on it is
facing the front of the wing.
❏ 13. Locate the two die-cut balsa 3/32" [2.4mm] half
ribs W-1A. There is a pin punch mark on the top of
each rib. Glue the two W-1A ribs to each other
forming one 3/16" W-1A rib. Make sure that the
punch marks are aligned.
❏ 14. Glue the W-1A rib assembly in place between
the W-1 ribs in the location shown on the plan. W-1A
supports the wing sheeting you will be adding later
so make sure it is properly centered. Glue W-1A in
position with the side of the rib with the pin punch
nearest your building board.
❏ ❏ 15. Locate two 3/32" x 1-1/4 “ x 30" [2.4 x 32 x
762mm] balsa sub LE sticks. Test fit the sub LE
against the front of the ribs on the right side of the
wing making sure that each rib comes in contact with
the sub LE. Sand the front of the ribs as needed.
When you are satisfied with the fit, glue the sub LE
to the front of the ribs and the front of the forward
dowel guide. Be sure that the joining of the two sub
LE sticks is directly over the centerline that you
drew on the forward dowel guide.
❏ ❏ 16. Sand the sub LE stick so that it is flush with
the wing ribs.
❏ 17. Repeat step 15 and 16 for the left side of the wing.
❏ ❏ 18. Locate the two maple landing gear rails and
two maple torque blocks. Measure in from the end of
the landing gear rail 1/4" [6.4mm]. Mark a line with a
pen. Use 6-minute epoxy to glue a torque block to
one of the landing gear rails at the mark you just
made. Do the same for the remaining landing gear
rail and torque block. Set it aside and allow the
epoxy to cure.
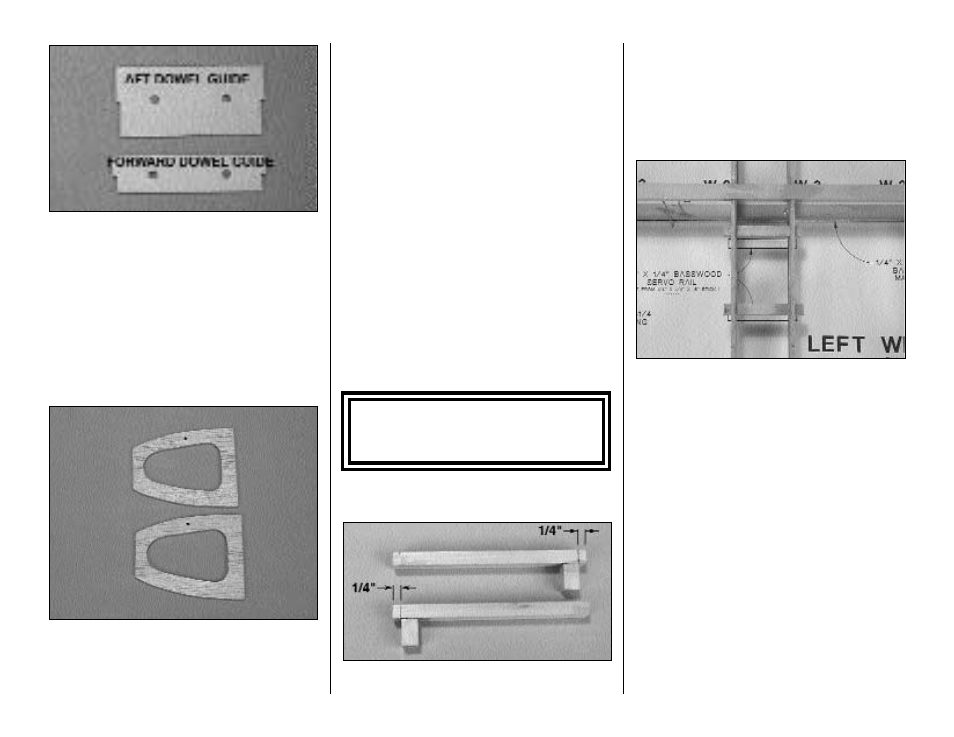
❏ ❏ 19. From the 1/4" x 1/4" x 18" [6.4 x 6.4 x
457mm] basswood stick, cut four 2" [51mm] sticks to
be used for the servo rails. Glue two rails into the
slots in the two W-3 ribs in the left wing. The slot in
the aft of rib W-3 is longer than the forward slot. This
is to allow you to get exact spacing for your brand of
servo. Be sure to position the rear servo rail for your
servo. Glue them in place when you are satisfied
with the fit.
❏ 20. Repeat step 19 for the servo rails in the right wing.
❏ 21. If you plan to install the optional flap, (and if
you’re not, how come? It really is a lot of fun and
adds another dimension to flying the Contender!) cut
two additional 4-1/4" [108.4mm] servo rails from the
remainder of the 1/4" x 1/4" x 18" [6.4 x 6.4 x 457mm]
basswood stick. These will serve as the servo rails
for the flap servo. Install these in the slots between
the two W-1 ribs in the same way you did for the
aileron servos.
C
Coon
ntteen
nd
deerr F
Fu
un
n F
Fa
acctt
The original Contender was designed by
renowned scale modeler Dave Platt in 1969!
12