Tie Down Jet Rail User Manual
Page 3
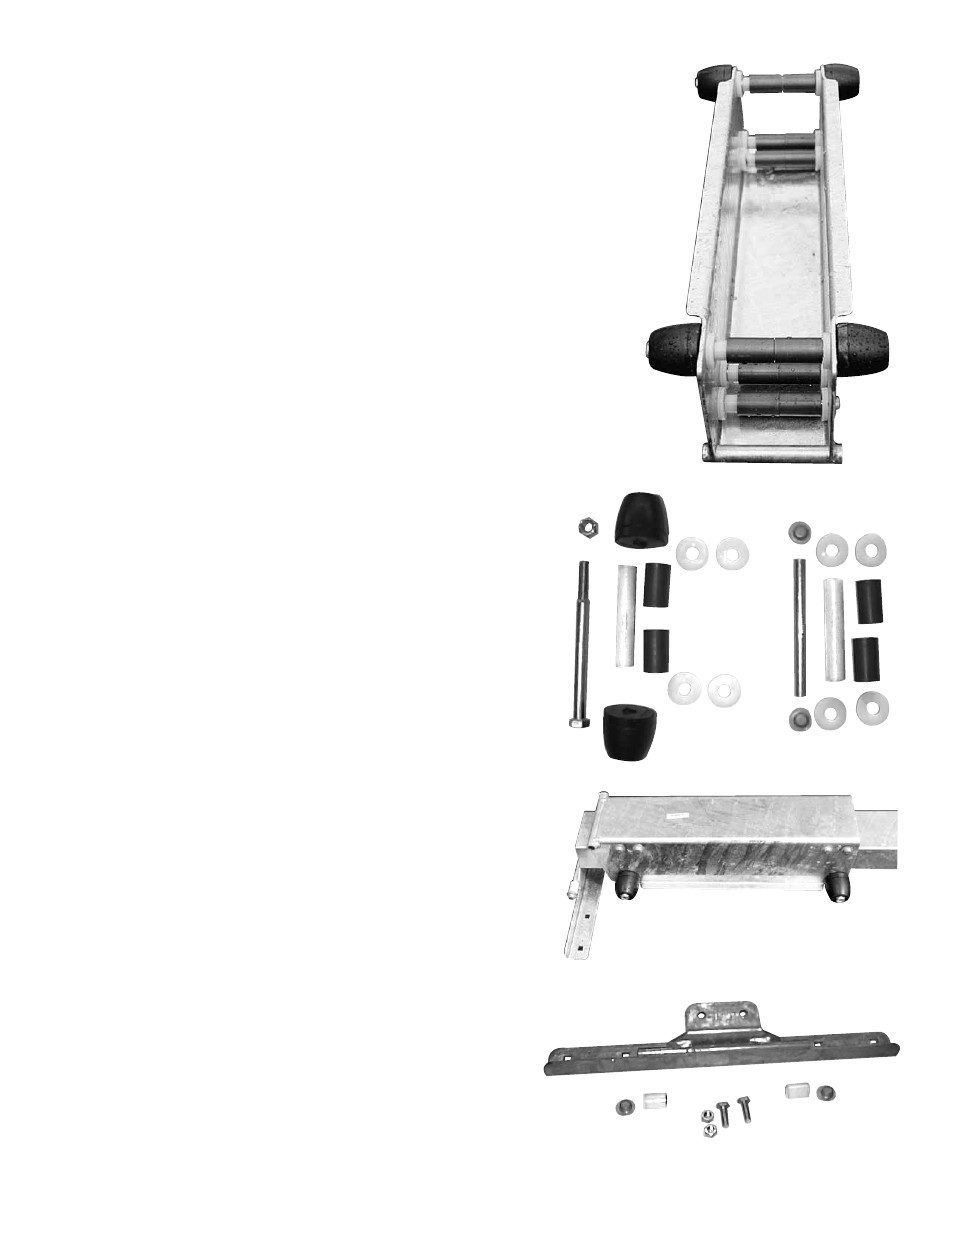
1. Assembly of Carriage
Picture 1
Step One
Roller assemblies are installed in the top four holes of the Jet Rail Carriage.
Hammer a palnut on one end of each of the four rods. Lay carriage upside
down as shown in picture 1. In "bottom" four holes, slide the rods through
one side of the carriage. Install 2 - 1/2" nylon washers, the 4" nylon bush-
ing, 2 - short nylon bushings over the 4" bushing, 2 nylon washers, through
the other side of the carriage, hammer palnut on end of rod. Repeat for the
remaining three rods. (Picture 2 shows bushing/washer line up)
Step Two
Install roller assemblies in two "upper" holes as shown in
Picture 1. Use 8" bolt as shown in picture 2 to assemble the roller
assemblies. Picture 1 shows finished assembly.
Parts required for this step.
#
Stk. #
Description
Qty.
2
26606
Jet Rail Carriage
1
17
44610
1/2" x 5-1/2" Rod
4
21
BBBPELNUT500 Palnut
8
36
B58-15208
Nylon Bushing
8
14
45245
Bushing, 4"
4
35
10504
1/2" Nylon Flat Washer
16
Parts required for this step.
#
Stk. #
Description
Qty.
36
B58-15208
Nylon Bushing
4
14
45245
Bushing, 4"
2
35
10504
1/2" Nylon Flat Washer
8
19
17085
2" End Cap
4
32 10937
1/2" x 8-1/2" Hex Head Bolt
2
33
10645
1/2" Nyloc Nut
2
3. Assemble & Attach Rear Deck Mount
Slide 1" bushings over rods on rear deck mount (Picture 4).
Secure with 1/2" palnuts. Use a hammer to attach palnuts to
rods. Using the two 3/8" x 1" hex head bolts and nyloc nuts,
attach the rear deck mount to the Jet Rail Frame Tube as
shown in Picture 3.
Parts required for this step.
#
Stk. #
Description
Qty.
3
26607
Rear Deck Mount
1
1
26605
Frame Tube
1
15
45246
1" Bushings
2
21
BBPELNUT500
1/2" Palnuts
2
27
BBB3750100
3/8"x1" Hex Head Bolts
2
34
BBN375NL
3/8" Nyloc Nuts
2
Picture 3
3
2. Attach Carriage to Frame Tube
Place carriage onto 72" frame tube, so that the swivel tube on
carriage points to the rear. Rear of frame tube has two holes
together on bottom to attach rear deck mount as shown in
Picture 3. (Front of tube has a single hole on each side of the
tube as shown in Picture 6)
19
19
32
36
35
33
14
21
21
27
34
15
15
3
Picture 4
Picture 2