Rear panel functions, Hardware operation, Menu section navigation – Millennia HV-3R Eight Channel Remote-Control Microphone Preamp v 1.4.2 User Manual
Page 8: Getting started, Locking front panel in remote
Millennia Media HV-3R page 8 of 40
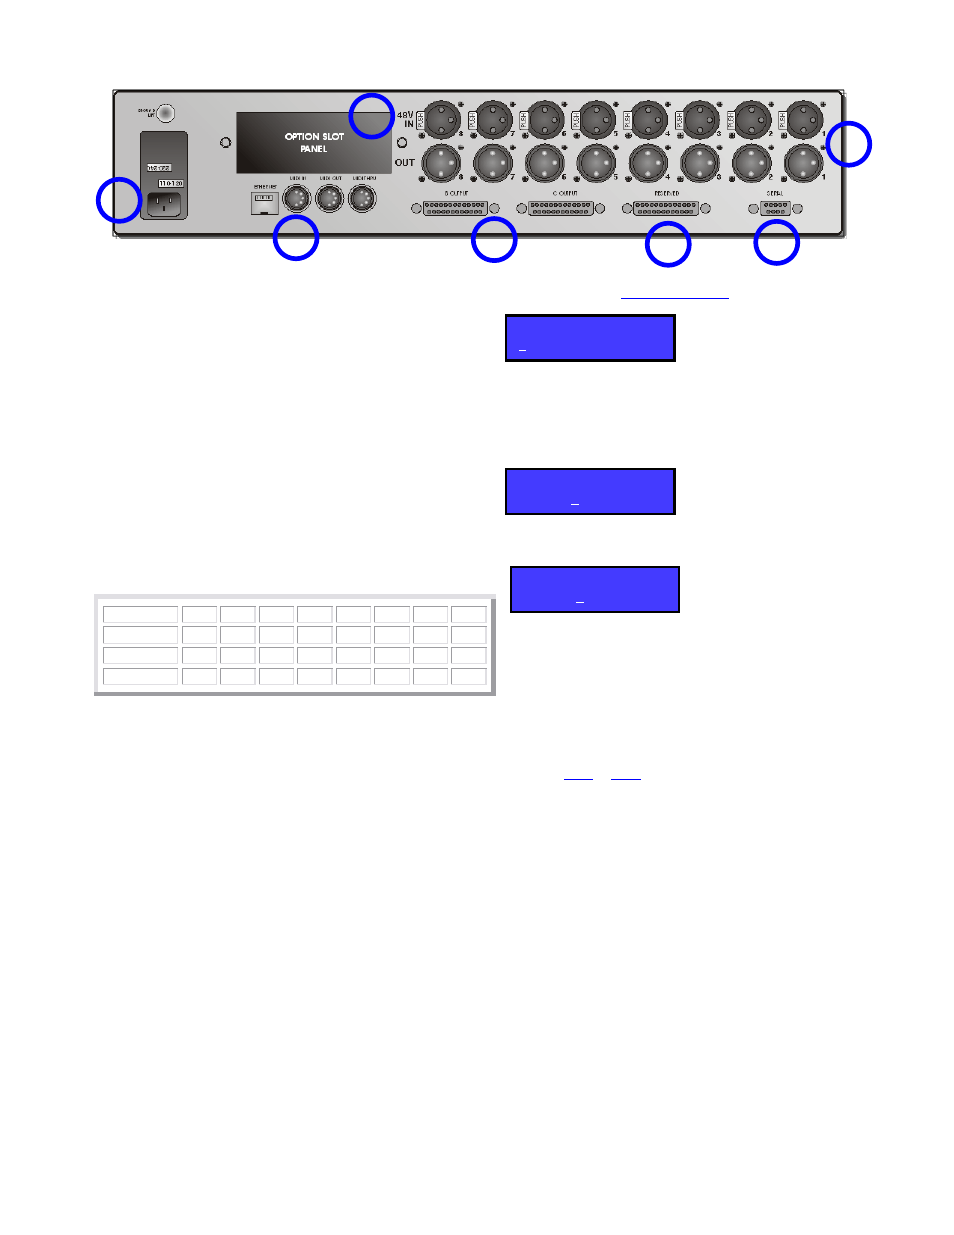
Rear Panel Functions
1. AC Power – Worldwide (user configurable
100-240VAC) IEC power inlet.
2. MIDI and LAN Connection – Allow remote
control of the HV-3R.
3. Option Slot – Above the MIDI and LAN ports is
an option slot for the AD-R96 Expansion Card. This
option slot can also host I/O for analog to digital
converters and different remote control protocols.
(Future options)
4. Analog I/O – Eight channels of XLR analog I/O
connectors. Eight female XLRs for microphone-level
input and eight male XLRs for line-level output.
5. HROE Option I/O – two DB25s wired in the
Tascam format for two additional buffered outputs.
6. Reserved DB25 – for future options.
7. Serial – For future control expansion.
Hardware Operation
Menu Section Navigation
The Menu Section LCD can be navigated using the
five buttons below it: Left, Right, ENTER, Up and
Down.
This manual assumes the user has a basic knowledge
of how to use the Left, Right, and ENTER buttons.
The Up arrow in most cases acts as an escape from
the current Edit screen, and when pressed
repeatedly will eventually return to the top of the
Main Menu (Shown Below).
Getting Started
The HV-3R is shipped to start up in Local mode.
Below is the default menu screen that appears when
a Unit is powered up for the first time. This menu
screen is referred to as the top of the main menu.
For a description of the menu items and flow chart,
go to the section “
”.
If your unit powers up with one of the screens below
(## will be the ID number or MIDI channel of the
unit), it has been custom configured by the factory
at the time of your order for a remote system. Push
the enter key to select Local operation.
or
Choosing to Startup in Local or Remote Mode –
The HV-3R is shipped to startup in Local mode. If
the user wishes to startup the unit in Remote mode
(LAN or MIDI) these steps must be followed.
1. Choose “Setup” from the main menu.
2. Choose “Startup”.
3. Choose “Mode”.
4. Choose “Remote” (See sections on how to use
or
).
5. Press the Up arrow three times to return to the
top of the main menu.
Locking Front Panel in Remote
The front panel can be locked in Remote mode by
pressing < and ^ at the same time when in Local
mode. To unlock it to go back to Local mode,
press < and ^ at the same time.
Channel
1
2
3
4
5
6
7
8
+ Pins
24
10
21
7
18
4
15
1
- Pins
12
23
9
20
6
17
3
14
Gnd Pins
25
11
22
8
19
5
16
2
MIDI Remote ##
Local
LAN Remote ##
Local
Local
Remote, Save >
1
2
3
4
5
6
7