Great Planes SlowPoke Sport 40 Kit - GPMA0492 User Manual
Page 26
NOTE: This section is VERY important and must NOT be
omitted! A model that is not properly balanced will be
unstable and possibly unflyable.
❏
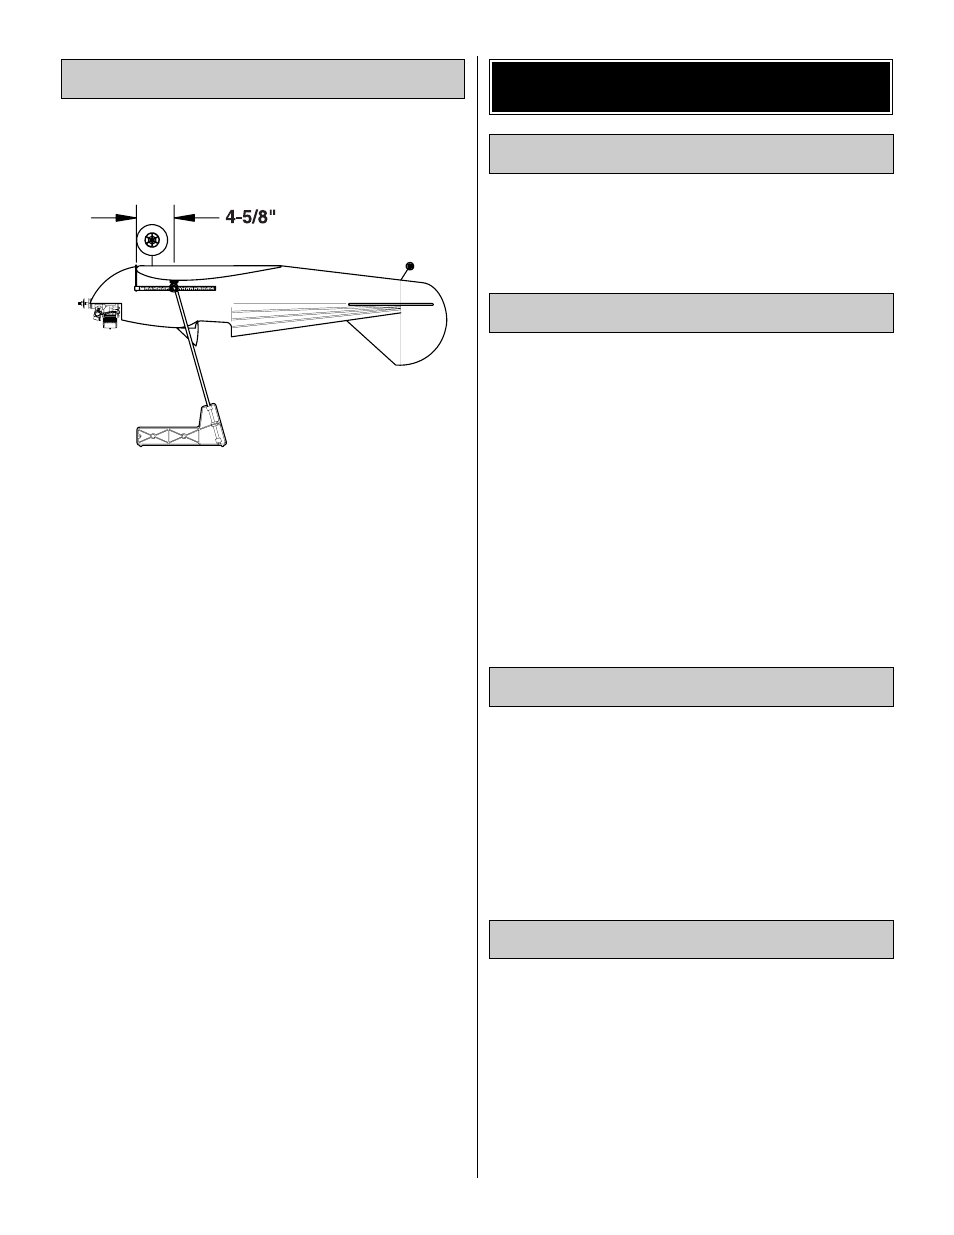
1. Accurately mark the balance point on the top of the wing
on both sides of the fuselage. The balance point is shown on
the plan (CG) and is located 4-5/8" back from the leading
edge as shown in the sketch and on the plan. Hint: Use the
full-size wing plan to help you accurately locate the proper
balance point on the wing. This is the balance point at which
your model should balance for your first flights. Later, you
may wish to experiment by shifting the balance up to 3/8"
forward or back to change the flying characteristics. Moving
the balance forward may improve the smoothness and
arrow-like tracking, but it may then require more speed for
takeoff and make it more difficult to slow down for landing.
Moving the balance aft makes the model more agile with a
lighter and snappier “feel” and often improves aerobatic
capabilities. In any case, please start at the location we
recommend and do not at any time balance your model
outside the recommended range.
❏
2. With the wing attached to the fuselage, all parts of the
model installed (ready to fly) and an empty fuel tank, hold
the model upside down with the stabilizer level.
❏
3. Lift the model at the balance point. If the tail drops
when you lift, the model is “tail heavy” and you must add
weight* to the nose to balance. If the nose drops, it is “nose
heavy” and you must add weight* to the tail to balance.
NOTE: Nose weight may be easily installed by using a
Heavy Spinner Hub or gluing lead weights into the engine
compartment. Tail weight may be added by using Great
Planes (GPMQ4485) “stick-on” lead weights and, later, if
the balance proves to be OK you can open the fuse bottom
and glue these in permanently.
*
If possible, first attempt to balance the model by changing
the position of the receiver battery and receiver. If you are
unable to obtain good balance by doing so, then it will be
necessary to add weight to the nose or tail to achieve the
proper balance point.
Follow the battery charging procedures in your radio instruction
manual. You should always charge your transmitter and
receiver batteries the night before you go flying and at other
times as recommended by the radio manufacturer.
The best place to fly your R/C model is an AMA (Academy of
Model Aeronautics) chartered club field. Ask your hobby shop
dealer if there is such a club in your area and join. Club fields
are set up for R/C flying and that makes your outing safer and
more enjoyable. The AMA also can tell you the name of a club
in your area. We recommend that you join AMA and a local
club so you can have a safe place to fly and have insurance
to cover you in case of a flying accident. (The AMA address
is listed on page 2 of this instruction book).
If a club and its flying site are not available, you need to find
a large, grassy area at least 6 miles away from any other
R/C radio operation like R/C boats and R/C cars and away
from houses, buildings and streets. A schoolyard may look
inviting but it is too close to people, power lines and possible
radio interference.
If you are not thoroughly familiar with the operation of R/C
models, ask an experienced modeler to check to see that you
have the radio installed correctly and that all the control
surfaces do what they are supposed to. The engine operation
also must be checked and the engine “broken-in” on the
ground by running the engine for at least two tanks of fuel.
Follow the engine manufacturer’s recommendations for
break-in. Check to make sure all screws remain tight, that
the hinges are secure and that the prop is on tight.
Wherever you do fly, you need to check the operation of the
radio before every time you fly. This means with the
transmitter antenna collapsed and the receiver and
transmitter on, you should be able to walk at least 100 feet
away from the model and still have control. Have someone
help you. Have them stand by your model and, while you
work the controls, tell you what the various control surfaces
are doing. Repeat this test with the engine running at
various speeds with an assistant holding the model. If the
control surfaces are not always acting correctly, do not fly!
Find and correct the problem first.
Range Check Your Radio
Ground Check the Model
Find a Safe Place to Fly
Charge the Batteries
PREFLIGHT
Balance Your Model
26