Installation instructions, Ab c e h, Structural member – Golden Lighting 8106-363/15L CDB User Manual
Page 4
WARNING ! SHUT OFF POWER AT FUSE OR CIRCUIT BREAKER.
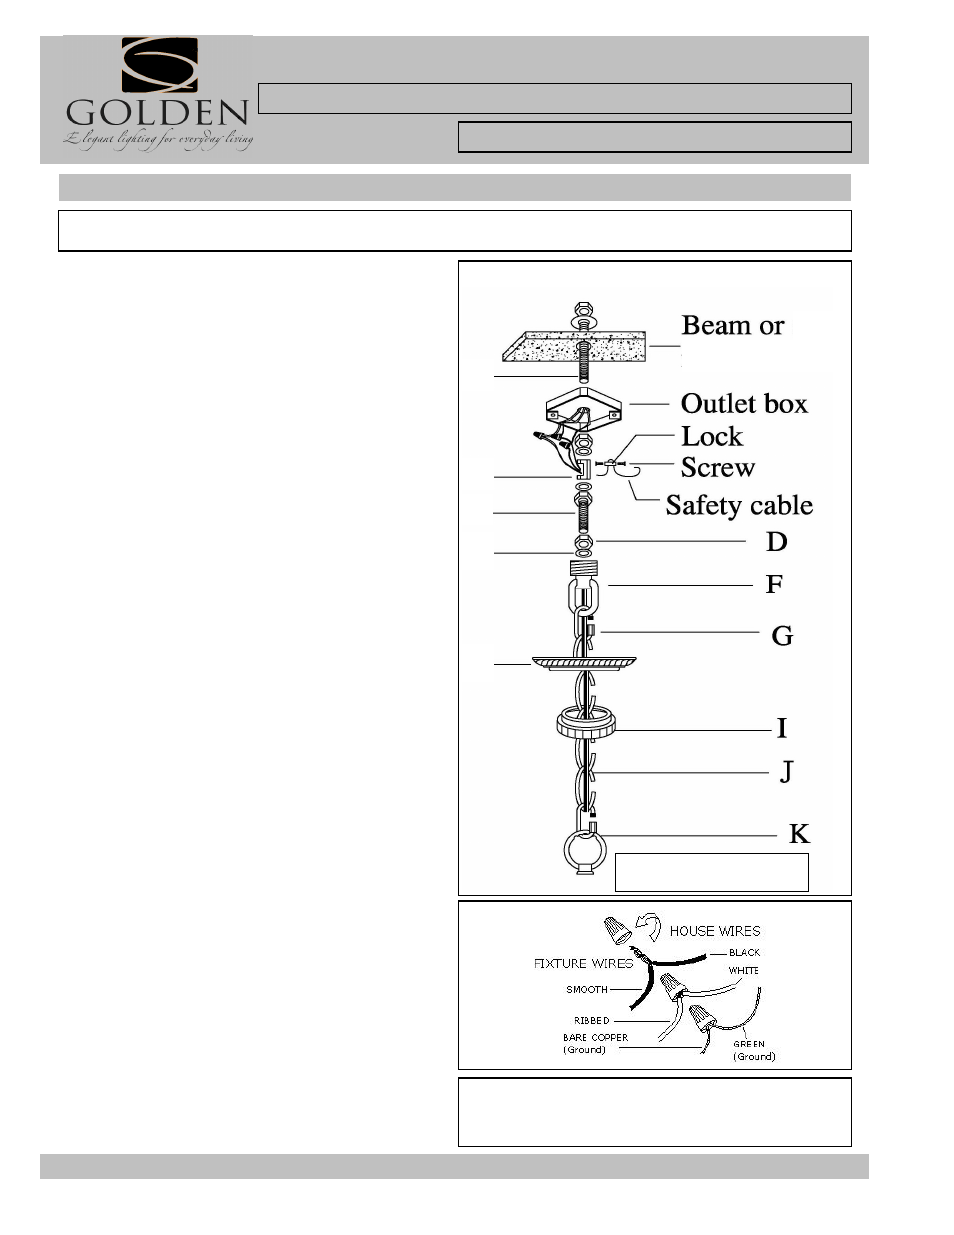
HANGING THE FIXTURE (Fig.1)
1. Carefully remove the new fixture from the carton and the yellow bag
that holds all parts. Check that all parts are included as shown in the
illustration and parts list.
2. Shut off the power at the circuit breaker and remove old fixture from
ceiling, including the old mounting strap.
3. Mount the long Nipple to a beam or structural member with the
Fender washers, toothlock washers and Hex nuts provided. The other
end should protrude through the center of the outlet box as shown.
4. Place Hex nut (D) and Lock washer (E) over the end of Nipple (A)
Thread the Hickey (B)onto the Nipple (A).
5. Place Hex nuts (D) and Lock washer (E) over end of short Nipple
(C), thread Nipple(C) into Canopy Loop (F) until snug.
6. Thread other end of the Nipple (C) with Canopy Loop attached into
Hickey (B).
Fig. 1
CONNECTING THE WIRES (Fig 2)
11. Attach the power supply wires to the fixture lead wires by
connecting BLACK to BLACK (or SMOOTH) and WHITE to WHITE (or
RIBBED).
12. Attach the GROUND wire(GREEN or COPPER) from the Junction
Box and the fixture Ground wire using the wire connectors. NOTE:
Twist the wires together in the same direction you twist the wire
connector onto the wires.
13. Tuck these wire connections neatly into the Junction Box.
Fig. 2
IMPORTANT! FOR A SAFE AND SECURE INSTALLATION THESE FIXTURES MUST BE INSTALLED BY MEANS
OF SUPPORT THAT ARE INDEPENDENT OF THE OUTLET BOX.
7. Unscrew the Canopy loop collar (I) from the Canopy loop. Take the
canopy and pass over the Canopy loop. approximatly one half of the
canopy loop exterior threads should be exposed. Adjust until desired
height is reached. *the Canopy loop collar should fit snugly on the
Canopy loop after the canopy is installed. Remove Canopy and
Canopy lock collar. When the adjustments have been completed
secure the three Hex nuts (D)and lock screws on Hickey (B).
14. Raise Canopy (H) to the ceiling and secure in place by tightening
the Canopy loop collar(I) into the Canopy Loop(F)
15. Install the light bulbs and glass shade as per the fixture assembly
sheet.
YOUR INSTALLATION IS NOW COMPLETE. RETURN
POWER TO THE JUNCTION BOX AND TEST THE
FIXTURE.
For Customer Service, contact the place of purchase to arrange for replacement parts.
8. Assemble the fixture and have an assistant or secure support hold
the weight of the fixture while you complete the wiring connections.
9.Thread the fixture wires, ground wire and safety cable of the
assembled fixture through the canopy loop and nipple, exiting through
the side of Hickey/coupler.
10. Thread the safety cable through the lock and coil around the hickey
twice, through the lock again, tighten it with screw into lock. Run cable
through the top of the outlet box and secure to structural member.
INSTALLATION INSTRUCTIONS
Fixture Name:
Torbellino 8106-363/15L CDB
For Chandelier Light Fixture
A
B
C
E
H
structural member
Parts in diagram not shown to
actual proportion.