Garelick 31800 OUTBOARD MOTOR CARRIER User Manual
Page 2
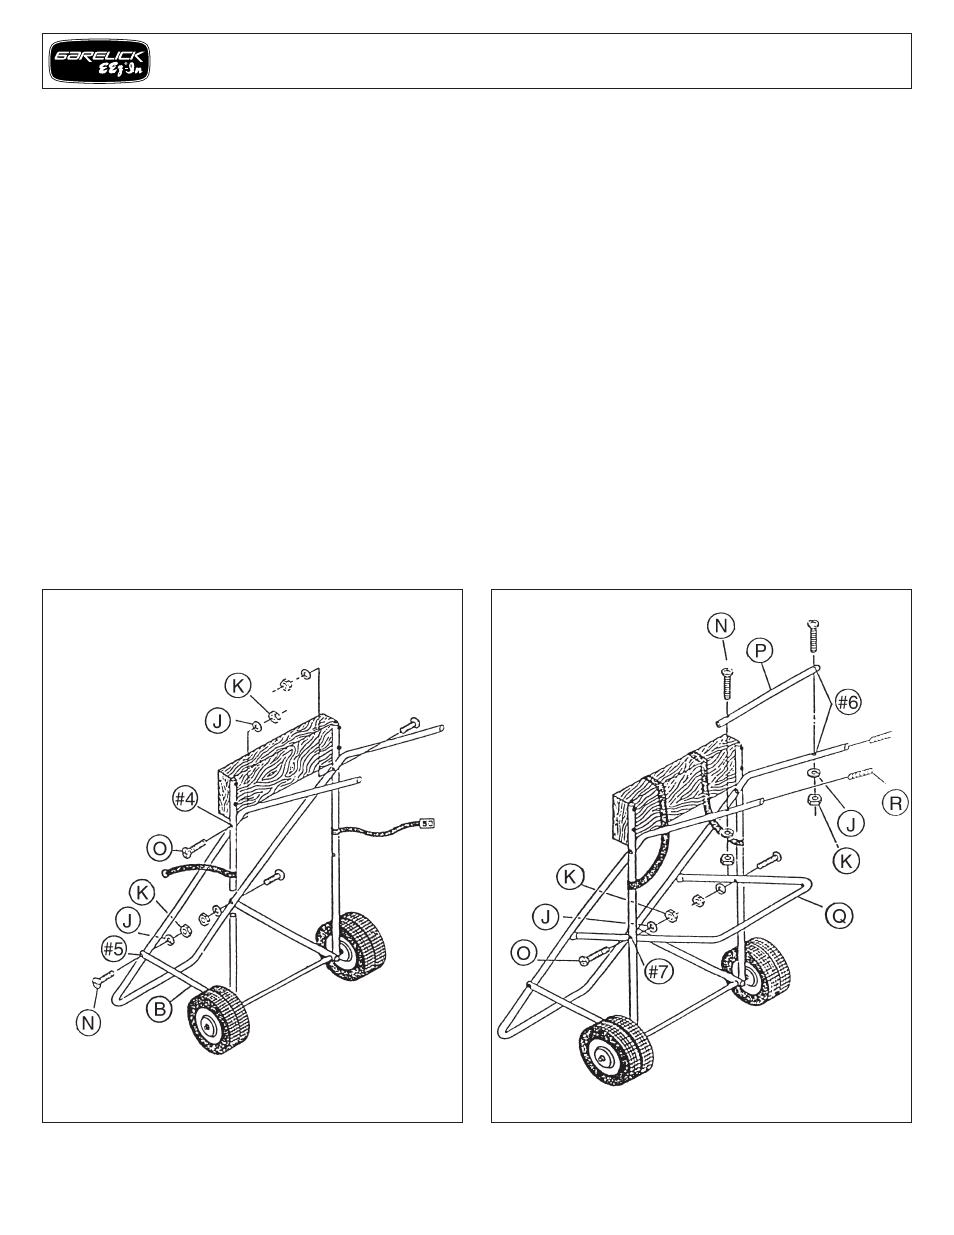
Refer to Fig. 3:
1. Slide handle assembly (Fig. 2) into upright support
assembly (Fig. 1) as shown. NOTE: Handle assembly will
rest on the INSIDES of upright support tubes.
2. Align holes #4, insert 2 bolts (O), and secure with
fasteners (J and K) as illustrated (finger tighten).
3. Align holes #5 of braces (B) and handle assembly.
NOTE: Place braces on the OUTSIDE of handle assembly.
4. Place bolts (N) from Fig. 2 through holes #5 of braces and
secure with fasteners (J and K) as illustrated (finger
tighten).
Refer to Fig. 4:
1. Attach handle brace (P) across TOPS of handles by
aligning holes #6, inserting bolts (N) and securing with
fasteners (J and K) as illustrated (finger tighten).
2. Drape tank tiestraps (H) over woodblock so loops are
above holes #7.
3. Position tankholder U-tube (Q) as illustrated. NOTE: Place
tankholder on the INSIDES of main upright tubes; U opens
out facing forward.
4. Align holes #7, insert bolts (O) and secure with fasteners
(J and K) as illustrated (finger tighten).
5. Tighten all nuts and bolts on carrier.
6. Slip poly handgrips (R) on handles. NOTE: Grips go on
more easily if they are first heated in warm water.
STORAGE AND MAINTENANCE
1. For storage, carrier can be folded by removing two bolts
at holes #4, folding up tankholder U-tube and securing in
position with tank tiestraps.
2. Periodically lubricate wheels and polish* aluminum to
ensure a long life.
*EEz-In marine polish, Model 65010, available.
FIG. 3
FIG. 4
Assembly Instructions – Model 31800 Motor Carrier
Form 12.122