Garelick 18118 TRANSOM LADDER User Manual
Garelick Accessories for water
Instructions for: 18117 / 18118
TRANSOM LADDER
Write for Garelick Mfg. Co. Phone: 651-459-9795
A complete 644 2
ND
Street, P.O. Box 8 E-mail: [email protected]
EEz-In Catalog St. Paul Park, Minnesota 55071 Website: www.garelick.com
Rev A 09/11
12.630
Thank you for selecting our superior quality Garelick
EEz-In Brand Boarding Ladder. Your ladder is
designed and manufactured using the finest material
available to provide long product life. Choosing the
proper size ladder for location and correct fit is
important to assure safe, convenient, and reliable use.
Although mounting hardware is not provided due to
the wide variety of applications and diversity of boat
shapes and sizes mounting holes have been provided
and it is recommended to use at a minimum 1/4"
diameter fasteners. These fasteners should be through
bolted with a backing plate.
SAFETY GUIDELINES
No jumping or diving!
Do not use when motor is running
This ladder designed for boat use only
Face ladder when entering boat or water
Only one person on ladder at a time
Check all steps and hardware before using
Never operate your boat with the ladder in
“down” position. Serious injury or damage to
your boat or ladder may result.
When underway, fold ladder up and
insert back into tube ensuring locking
pin snaps into place.
MAINTENANCE
Safety tip
Periodically check mounting hardware and re-
tighten (due to normal boat operation.)
Keep that bright finish!
Local weather conditions may contribute to
minor corrosion. Stainless, like other metals, is
not completely free from corrosion attack.
Regular fresh water rinsing and periodic cleaning
with a mild abrasive cleaner will help to retain
luster.
Assembly / Installation Instructions:
Note: Read all instructions completely before
starting installation.
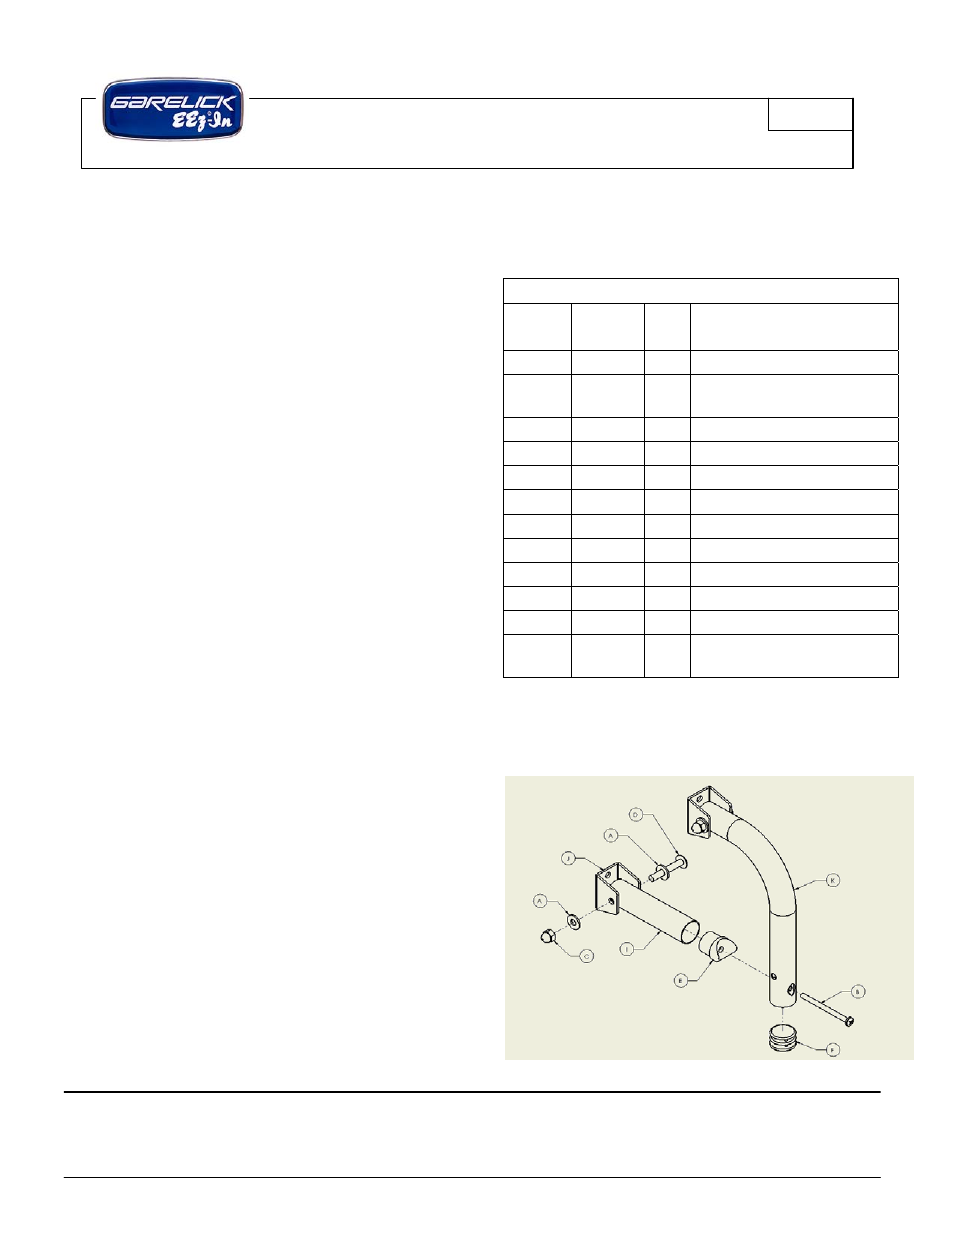
PARTS LIST
REF
LETTER
PART
NO
QTY
DESCRIPTION
A
03.184
16
Wshr SS 1/4"
B
03.202
2
Screw PPH SS 10‐24 x 2
1/2"
C
03.662
8
1/4‐20 SS Acorn Lock Nut
D
03.842
8
Screw PTH SS 1/4‐20 x 1.63
E
06.031
2
Tube Connector
F
06.184
2
Flat Plug
G
49.205
1
Velcro Strap
H
50.124
2
Hinge
I
50.324
2
Standoff Assembly
J
50.455
4
"U" Mtg Bracket
K
50.658
2
Curved Vrt Section
L
NA
1
Lower Ldr Section
Assembly
Step 1: Using “Figure 1” assemble the two upper
sections of the ladder assembly. It is recommended
that fasteners be kept loose until final fit-up to your
boat is complete.
Figure 1: Upper Ldr Section Assembly