Checkline ETMPB User Manual
Page 9
– 9 –
6.0 STORING AND RECALLING TENSION VALUES
The tension meter features a data logger which stores the followng data obtained during
a measuring period:
Average value
Last value
Maximum value (MAX),
Minimum value (MIN),
Minimum peak value (MIN PEAK)
Maximum peak value (MAX PEAK)
NOTE: The measured data remain stored in the ETMB memory even after the
instrument is switched off.
6.1 Storing Tension Values
NOTE: The stored tension values remain stored in the ETMB memory even after the
instrument is switched off.
1. Turn off the tension meter.
2. Insert the process material.
3. Press the MEM key to start the measuring period.
While the tension data are stored, the MEM indicator blinks on the
DISPLAY and the currently measured value is displayed.
When you want to end the measuring period, press the MEM key once again. Data
logging is stopped. The DISPLAY shows MEM and the current reading.
6.2 Recalling Stored Tension Values
1. Be sure that the tension meter is ON.
NOTE: You can end recall at anytime by pressing the POWER key.
2. Press the RECALL key. The display blinks, showing
the average value of the measuring period and the
indicated symbol.
3. Press the RECALL key. The display blinks, showing the
last value of the measuring period (no symbol).
4. Press the RECALL key. The display blinks, showing
the maximum value of the measuring period and the
indicated symbol.
5. Press the RECALL key. The display blinks, showing
the minimum value of the measuring period and the
indicated symbol.
3
D
cN
MEM
22
D
cN
23
D
cN
24
D
cN
21
D
cN
– 12 –
7.0 STATIC VERIFICATION OF MEASURING ACCURACY
All tension meters are calibrated with standard materials—such as polyamide
monoilament (PA)—according to the factory procedure. The diameters are given in
section 1.0. Any difference in process material size and rigidity from the standard
material may cause a deviation of the accuracy.
In 95% of all industrial applications, the factory calibration has been proven to provide
the best results and is used for comparative purposes.
NOTE: Before beginning, make sure that the tension meter is factory calibrated
for a vertical material path. The required reference weight is available.
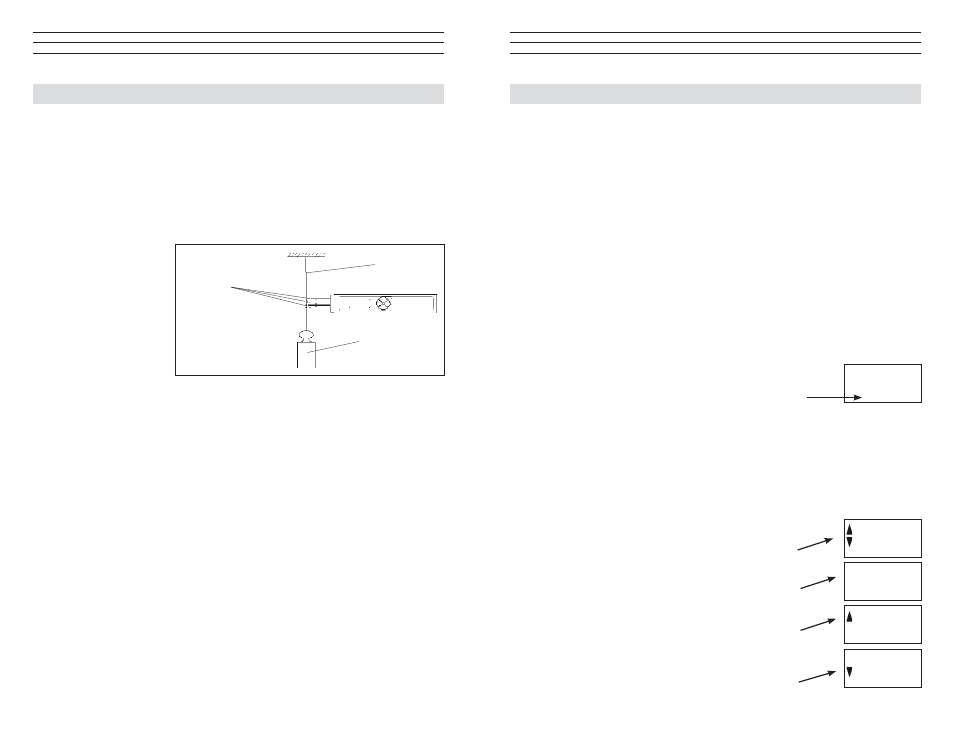
Veriication procedure:
1. Switch on the tension
meter.
2. Hang a weight
which corresponds
to the tension to be
measured from the
measured material,
vertically, as shown.
NOTE: Pay attention to the correct unit of measure cN or g (gram).
3. Press the LEVER down all the way down and thread the process material through
the MEASURING and GUIDE ROLLERS as described in section 4.1, then
slowly release pressure on the LEVER until the GUIDE ROLLERS return to
their original position.
4. Before verifying the calibration, move the instrument slowly up and down to
compensate for possible mechanical friction losses and thus ensure repeatability of
the measurements.
5. The tension value shown on the Display should be equal to the value of the
suspended weight (pay attention to the measuring units).
If this procedure shows a deviation, you can recalibrate the instrument following the
directions in Sec 8.0
MEASURING- and
GUIDE ROLLERS
Process
material
Weight