Checkline ETMPB User Manual
Page 6
– 6 –
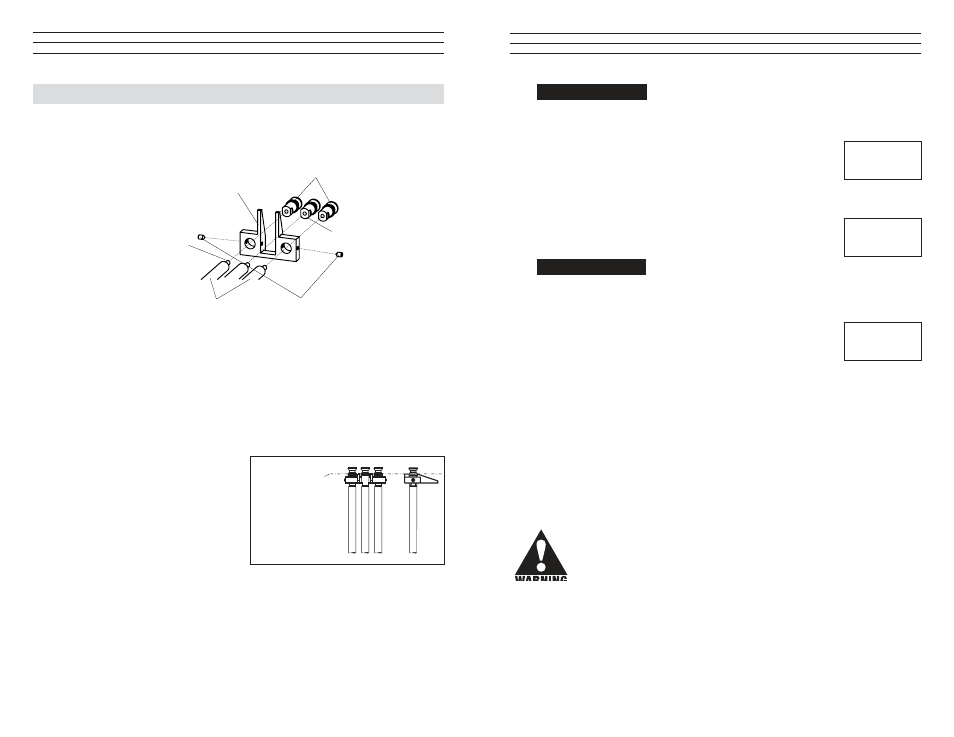
3.0 REMOVING AND REMOUNTING THE FILAMENT GUIDE
The tension meter is supplied with a FILAMENT GUIDE for fast and easy material
acquisition. For application in hard-to-reach areas with limited access space, you can
remove the FILAMENT GUIDE.
Removal Procedure
1 Loosen the SETSCREWS (2x) with the supplied screwdriver (1.5 mm blade).
2. Unscrew and remove the GUIDE ROLLERS (2x) with the supplied open end
wrench (jaw width 4 mm).
3. Slip the FILAMENT GUIDE off the ROLLER SHAFTS.
4. Screw the GUIDE ROLLERS (2x) back onto the ROLLER SHAFTS and carefully
tighten using the supplied open end wrench (jaw width 4 mm) until hand-tight.
Remounting Procedure
1. Unscrew and remove the GUIDE
ROLLERS (2x) with the supplied
open end wrench jaw width 4 mm).
2. Slip the ilament guide on to the
ROLLER SHAFTS.
3. Screw the GUIDE ROLLERS (2x)
back on to the ROLLER SHAFTS
and carefully tighten them using the supplied open end wrench (jaw width 4 mm)
until hand-tight.
4. Push the FILAMENT GUIDE forward far nough to ensure that the rollers do not rub
against the FILAMENT GUIDE and that the process material can slide unhindered
from the FILAMENT GUIDE into the roller grooves (ig. CENTER LINE).
5. Carefully tighten the SETSCREWS (2x) with the supplied screwdriver
(blade width 1.5 mm) until hand-tight.
GUIDE ROLLERS (2x)
ROLLER SHAFTS (2x)
FILAMENT GUIDE
SETSCREWS (2x)
GRUB SCREWS (3x)
MEASURING
ROLLER
CENTER LINE
– 15 –
o
3rd calibration point:
o
1. Repeat steps 1 through 4 from the preceding procedure using a weight which
corresponds to 70% of the tension range
2. Press the RECALL key. As long as the RECALL key is
depressed, the DISPLAY shows a decimal value which is
higher than the second decimal value, e.g., 8000. This decimal
value may vary from instrument to instrument. Write down the
value.
3. Release the RECALL key when the value shown on the
DISPLAY is stable (the reading might luctuate greatly).
The DISPLAY shows E 100
o
4th calibration point:
o
1. Repeat steps 1 through 4 from the preceding procedure using a weight which
corresponds to 100% of the tension range
2. Press the RECALL key. As long as the RECALL key is
depressed, the DISPLAY shows a decimal value which is
higher than the third decimal value, e.g., 9500. This decimal
value may vary from instrument to instrument. Write down the
value
3. Release the RECALL key when the value shown on the DISPLAY is stable (the
reading might luctuate greatly).
4. Press and then release the RECALL key. the DISPLAY switches off after
approximately 1 second. The new calibration is stored.
5. Press the POWER key. the instrument switches off.
6. Verify the new calibration, following the directions in Sec. 7.0 If this procedure
shows a deviation, you can recalibrate the tension meter again or restore the factory
calibration as described in Sec. 8.3.
If the veriication of the calibration according Sec.7.0 shows a deviation beyond
the allowable tolerance and a reliable operation is no longer allowed, the
instrument has to be returned to Electromatic for factory recalibration.
8000
9500
E 100