Llbbff – Checkline WTT-110 User Manual
Page 5
– 5 –
6 .0 O
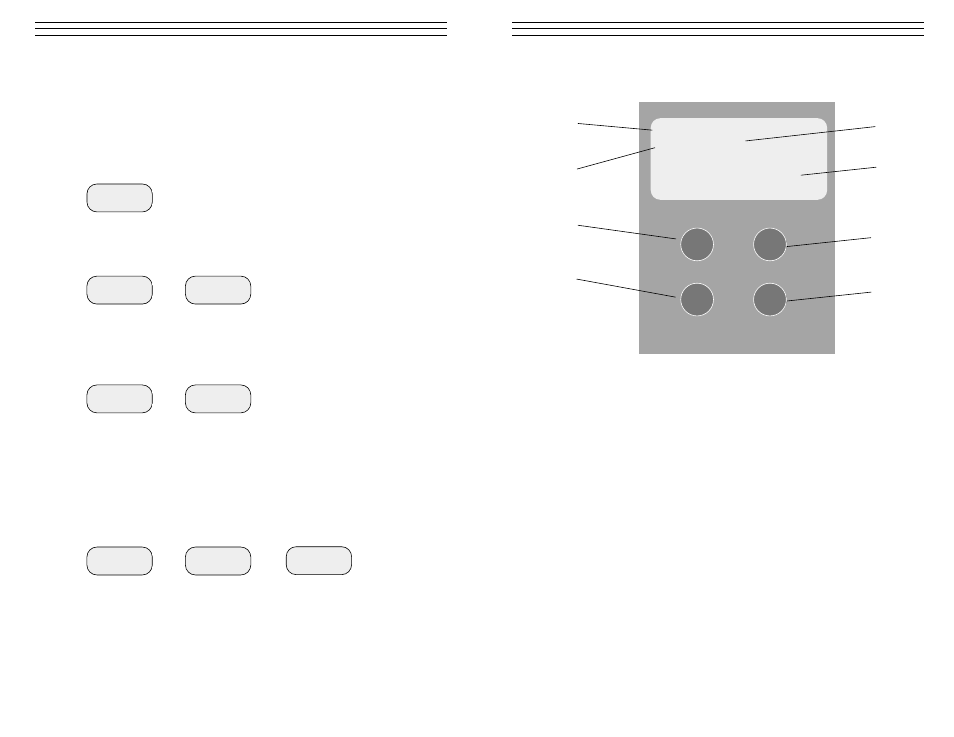
V ERV I EW OF
K
EY PAD
& LCD D
I SPLAY
1 Low Battery Indicator. Flashes when batteries need charging, turns off when fully
charged. Remains on while charging.
2 Peak Mode Indicator. Shown on display when configured for peak mode
(stores highest peak force until it is reset by pressing zero key)
3 Units Indicator. Displays currently selected units of measure (pounds, newtons
or kilograms). Changed by pressing UNITS key.
4 Force Value. Displays current or peak force value in user-selected units of measure.
5 PEAK Key. Turns on Peak Force Capture Mode. When selected, the highest peak
value will be shown on the display until reset by ZERO key.
6 UNITS Key. Selects desired units of measure. Each time this key is pressed, the
units will change from one to the next.
7 ZERO Key. Performs a “tare” on the system and resets display to zero. When in
peak mode, it erases the previously stored peak value.
8 ON/OFF Key. Turns the system on and off.
LL00-
-BBAATT
PPEEAAKK
LLbbff
00..00 00
PEAK
U N I T S
Z ERO
ON /OFF
1
2
3
4
5
6
7
8
– 16 –
Re-Calibration Procedures
1. Turn POWER off. Make sure the weight is NOT suspended from the sample.
2. Press and hold the UNIT, PEAK and ZERO keys simultaneously.
3. Press and release the On/Off key (while continuing to press UNIT, PEAK
and ZERO) until the smaller characters at the top of the display show CAL.
4. Release the UNITS, PEAK and ZERO keys.
5. The force gauge is now in calibration mode.
6. Press the UNITS switch. The display will show ZER after blinking SCN for
10 seconds.
7. The force gauge is now ready for zero point calibration.
8. Press ZERO key to confirm the zero calibration. Wait approximately 15–20
seconds. The display will change to show PEK after blinking SCN. Do not press
any other keys or disturb the instrument or weight during calibration.
9. Hang the 50 Kg calibration weight from the sample which is hooked on to one
of the teeth of the Wire Terminal Fixture. Make sure that the material path is
unobstructed and in a straight horizontal orientation. The force gauge is now
ready for full-scale calibration.
10. Press the PEAK key to begin full scale calibration. The display will blink SCN.
Do not press any other keys or touch the weight during calibration. After approxi-
mately 15– 20 seconds the display will blink END. Then after approximately 5
seconds the display blinks OK.
11. If calibration was successful, the display will show OK momentarily (see above
illustration). Press the UNITS key, then the power will automatically switch off.
12. If calibration was unsuccessful, the display will show ERR. Remove the cali-
bration weight, then press the UNIT key and repeat the above procedure again.
CAL
–00–
“oK”
88888
“SCN”
–00–
ZER
88888
➔
“SCN”
88888
PEK
88888
➔
“SCN”
88888
“End”
88888
➔
➔