Troubleshooting setting travel limits – Checkline MX2 User Manual
Page 5
5
12
RESET FROM OVERLOAD
If the test stand overloads or locks up during testing, turn off both
test stand and force gauge. Then turn on the test stand and using
the direction switch, back off the cross head (in the opposite
direction from the overload) to release the load.
EMERGENCY BRAKE STOP SWITCH
Push the
Emergency Stop
whenever you are in an emergency
situation. Turn the switch clockwise to release.
6
====================
EMERGENCY
STOP
====================
====================
RELEASE ALARM
RESTART SYSTEM
====================
CYCLE MODE
====================
LIMIT
====================
CYCLE MODE
====================
COUNTER FULL
====================
Error Screens
Emergency Stop– These first two
screens will display alternately. Turn
the Reset switch clockwise
Comparator Error– Make sure
Comparator menu item in Extra
Config is set to OFF, unless force
control is setup, then comparator
must be ON.
Limit– The travel limit has been
reached. Adjust the travel limit to
allow more space or move in the
opposite direction
Counter Full– Select Cycle Mode
and press the program dial to clear
the counter.
CYCLE MODE
=====================
COMPARATOR ERROR
=====================
TROUBLESHOOTING
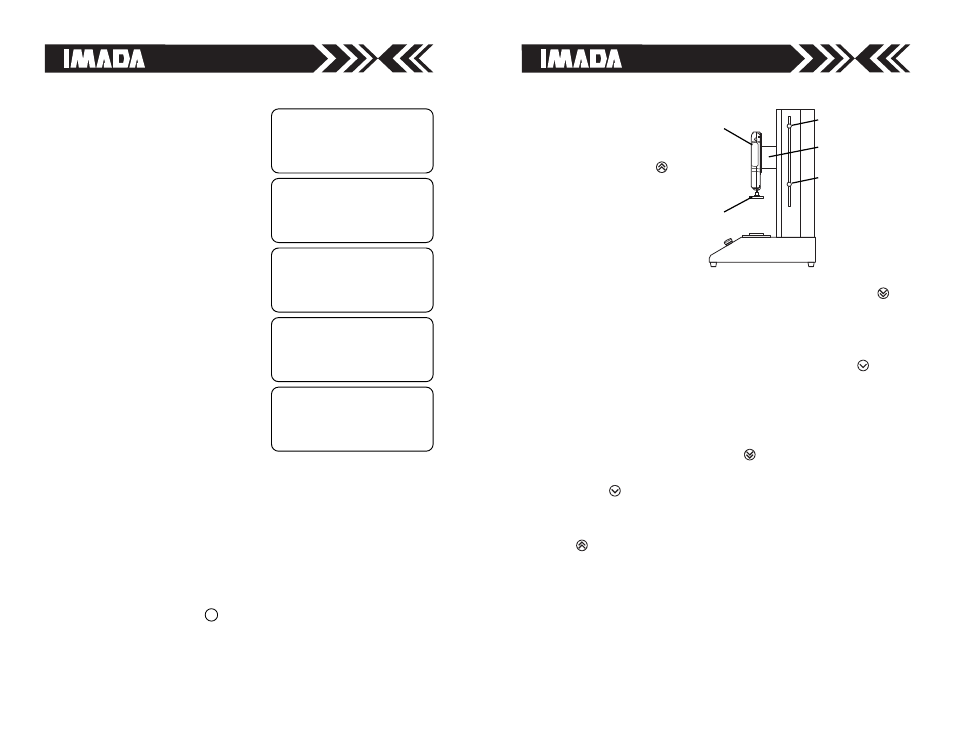
SETTING TRAVEL LIMITS
For a compression test
loosen the upper travel limit
thumbscrew and move it to
the top. Press and hold
to
move the force gauge and
attachment up until there is
adequate clearance for testing.
Then move the upper travel
limit down to this position
and tighten securely. Loosen
and move the lower travel limit to the bottom. *Press and hold
to
move the gauge and attachment and stop when they reach the test
material.The distance travelled during compression must be added to
determine the position of the lower travel limit. Be careful, the force
gauge can be overloaded whether on or off.
Press and hold
or use
Jog Move to move the gauge and attachment to the desired position.
Move the lower travel limt to this position and tighten securely.
For a tension test loosen the lower travel limit thumbscrew and
move it to the bottom. *Press and hold
and move the force gauge
and attachment down and stop when they reach the test material.
Press and hold
or use Jog Move to engage the test material. Be
careful, the force gauge can be overloaded whether on or off.
Move the lower travel limit to this position and tighten securely. Press
and hold
to move the force gauge and attachment up to allow
adequate clearance for testing. Move the upper travel limit to this
position and tighten securely.
*CAUTION: Set the lower travel limit to allow adequate clearance for
the gauge and attachments, so they do not crash into the test material.
To prevent accidental movement of the lower limit position, replace
the thumbscrew with an M4 Allen screw so an Allen wrench will be
required to adjust it.
FORCE GAUGE
UPPER TRAVEL LIMIT
THUMBSCREW
LOWER TRAVEL LIMIT
THUMBSCREW
CROSS HEAD
ATTACHMENT