Rice Lake Datamax-ONeil I-4212e Mark II - Manual User Manual
Page 32
Chapter 3 - Printer Operation
26
3.4.3 Standard Calibration
The Standard Calibration can be performed using the NETira CT Utility (see Section 3.3) or using
the front panel buttons via the printer’s menu, see Section 4.5. Standard Calibration provides
dynamic readings, which can be helpful when using media with small position-critical notches or
marks. Three calibration samples are required:
Empty – with nothing over the sensor;
Gap, Notch, Hole or Mark – with media liner, a notch, hole, or a mark over the sensor; and,
Paper – with the label (and liner, if any) over the sensor.
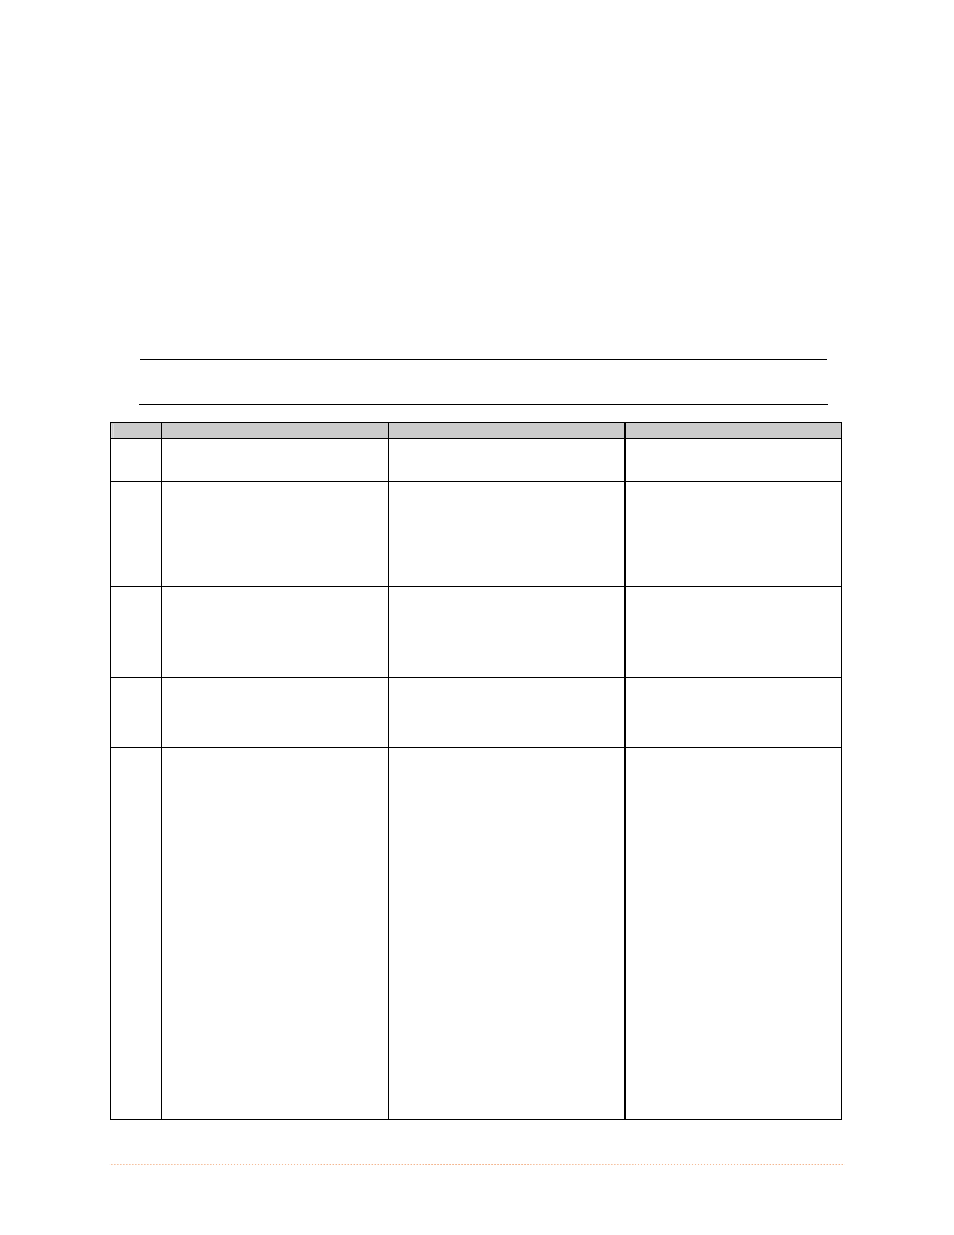
Calibrate the Media Sensor using the steps below:
The Sensor Calibration menu item is only accessible in the Advanced Menu mode.
Step
Action
Displayed Message
Comment
A
Turn ON the printer.
READY
Wait briefly for initialization to
complete.
B
Press MENU Button. Make sure
MEDIA SETTINGS is highlighted
and press ENTER.
Then using the DOWN Button,
scroll to SENSOR CALIBRATION.
(Printer Menu)
C
Press ENTER to access SENSOR
CALIBRATION. Then using the
DOWN Button, scroll to PERFORM
CALIBRATION. Press ENTER again
and then press YES to proceed.
PERFORM CALIBRATION
Press NO to abort this procedure.
D
With no media installed, press
ESC.
REMOVE LABEL STOCK
PRESS ESC KEY
Yyy
This sets the empty value, where
“yyy” represents the current
sensor reading.
E
Proceed according to the media
type:
Die-Cut – Remove a label or two
from the liner then install the
media. Position the Media Sensor
under the liner area and press
ESC.
Notched (or Reflective) – Install
media. Position the Media Sensor
under a notch (or black mark) and
press ESC.
Continuous – Press ESC then
proceed to Step F.
For die-cut media:
SCAN BACKING
PRESS ESC KEY
yyy
For Notched/Reflective media:
SCAN MARK
PRESS ESC KEY
yyy
For continuous media:
REMOVE LABEL STOCK
PRESS ESC KEY
Yyy
This sets the gap (or mark)
value, where “yyy” represents
the current sensor reading.
See Section 2.3 for sensor
adjustment instructions.
Do not position a perforation
over the sensor when taking the
sample.
(3) For small notches or
reflective marks, ensure that the
labels exit straight from the
printer.
(4) Unless otherwise noted, do
not move the Media Sensor after
this step.