Memory installation – Dataram DRHXW8600 User Manual
Page 2
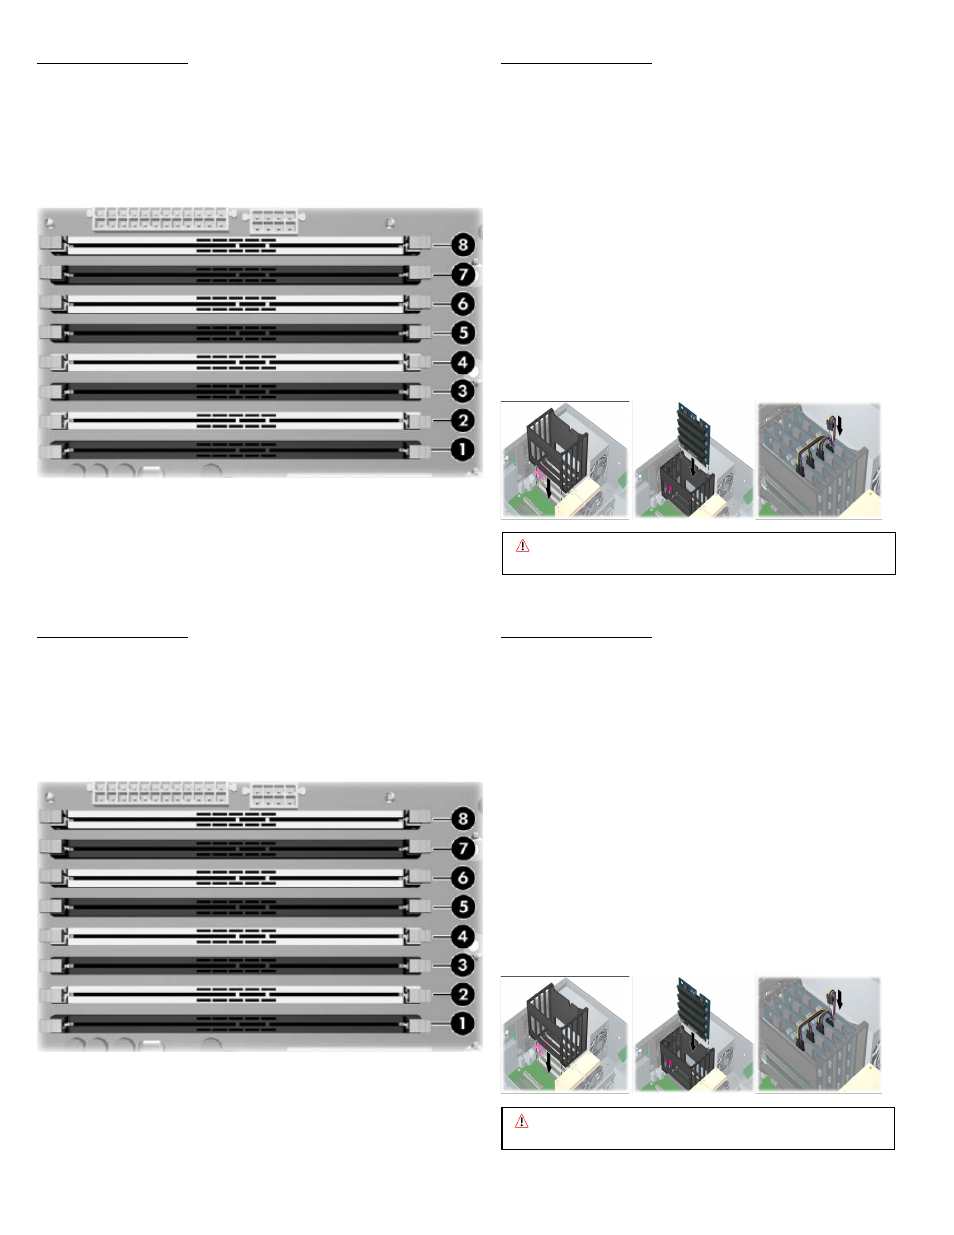
MEMORY INSTALLATION
Note: Refer to your system owner’s manual for detailed instructions.
System Board Configuration:
If installing only one DIMM, install it in socket 1.
If installing only two DIMMs, install them in socket pair: 1/5.
If installing four DIMMs, install them in socket pairs: 1/3 and 5/7.
If installing six DIMMs, install them in socket pairs: 1/3, 5/7, and 2/4.
If installing eight DIMMS, install them in socket pairs: 1/3, 5/7, 2/4, and 6/8.
•
Disconnect power and remove side access panel
•
Press the green button at the base of the fan and lift it up to expose
memory sockets.
•
Align the DIMM connector key with the DIMM socket key and press
down to seat the modules firmly, securing the socket levers.
•
Lower the memory fan until it snaps into place (ensuring all cables are
clear of the fan housing).
MEMORY INSTALLATION
Note: Refer to your system owner’s manual for detailed instructions.
Memory Riser Card Configuration:
Note: To use a memory riser assembly, your workstation must be
equipped with a 1050W power supply and high performance processor
heatsinks.
•
Install the memory riser card guide into memory slots 2, 4, 6, and
8 in the workstation chassis. (See Figure 1)
•
Install the DIMMs in the memory riser cards, using identical
DIMMs in each riser.
•
Install blank riser fillers in the slots that are not being used.
•
Install loaded memory risers into riser card guide. (See Figure 2)
•
Install the memory riser card power cable by connecting each
memory card power cable connector into the power connector on
a memory card. (See figure 3)
•
Insert the memory riser card power cable into the notch on the
riser card guide and connect memory riser cable to the power
supply cable.
•
Install the memory fan/duct assembly by placing the rear of the
assembly under the chassis lip. Lower it into the chassis, then
secure the assembly thumbscrews.
Figure 1 Figure 2 Figure 3
MEMORY INSTALLATION
Note: Refer to your system owner’s manual for detailed instructions.
System Board Configuration:
If installing only one DIMM, install it in socket 1.
If installing only two DIMMs, install them in socket pair: 1/5.
If installing four DIMMs, install them in socket pairs: 1/3 and 5/7.
If installing six DIMMs, install them in socket pairs: 1/3, 5/7, and 2/4.
If installing eight DIMMS, install them in socket pairs: 1/3, 5/7, 2/4, and 6/8.
•
Disconnect power and remove side access panel
•
Press the green button at the base of the fan and lift it up to expose
memory sockets.
•
Align the DIMM connector key with the DIMM socket key and press
down to seat the modules firmly, securing the socket levers.
•
Lower the memory fan until it snaps into place (ensuring all cables are
clear of the fan housing).
Caution:
System parts are sensitive to electrostatic discharge and can be damaged by
the static charge you may carry. You should wear a grounded wrist strap.
MEMORY INSTALLATION
Note: Refer to your system owner’s manual for detailed instructions.
Memory Riser Card Configuration:
Note: To use a memory riser assembly, your workstation must be
equipped with a 1050W power supply and high performance processor
heatsinks.
•
Install the memory riser card guide into memory slots 2, 4, 6, and
8 in the workstation chassis. (See Figure 1)
•
Install the DIMMs in the memory riser cards, using identical
DIMMs in each riser.
•
Install blank riser fillers in the slots that are not being used.
•
Install loaded memory risers into riser card guide. (See Figure 2)
•
Install the memory riser card power cable by connecting each
memory card power cable connector into the power connector on
a memory card. (See figure 3)
•
Insert the memory riser card power cable into the notch on the
riser card guide and connect memory riser cable to the power
supply cable.
•
Install the memory fan/duct assembly by placing the rear of the
assembly under the chassis lip. Lower it into the chassis, then
secure the assembly thumbscrews.
Figure 1 Figure 2 Figure 3
Caution:
System parts are sensitive to electrostatic discharge and can be damaged by
the static charge you may carry. You should wear a grounded wrist strap.