Memory installation – Dataram DRH8400 User Manual
Page 2
MEMORY INSTALLATION
Note: Refer to your system owner’s manual for detailed instructions.
MEMORY INSTALLATION
10. Replace the access panel, reconnect the power cords and external
cables, and turn on the system.
Caution: System parts are sensitive to electrostatic discharge and can be
damaged by the static charge you may carry. You should wear a
grounded wrist strap.
11. After you reboot, ensure the system recognizes the new memory
configuration.
4.
If replacing a DIMM, push down on the ejector levers on each side of the
DIMM until the DIMM is released.
5.
Grasp the top corners of the faulty DIMM and remove it from the system.
6.
To install a DIMM, open both ejector levers on each slot.
7.
Position the DIMM over the slot so that the alignment notches on the
DIMM match the notches on the connector.
8.
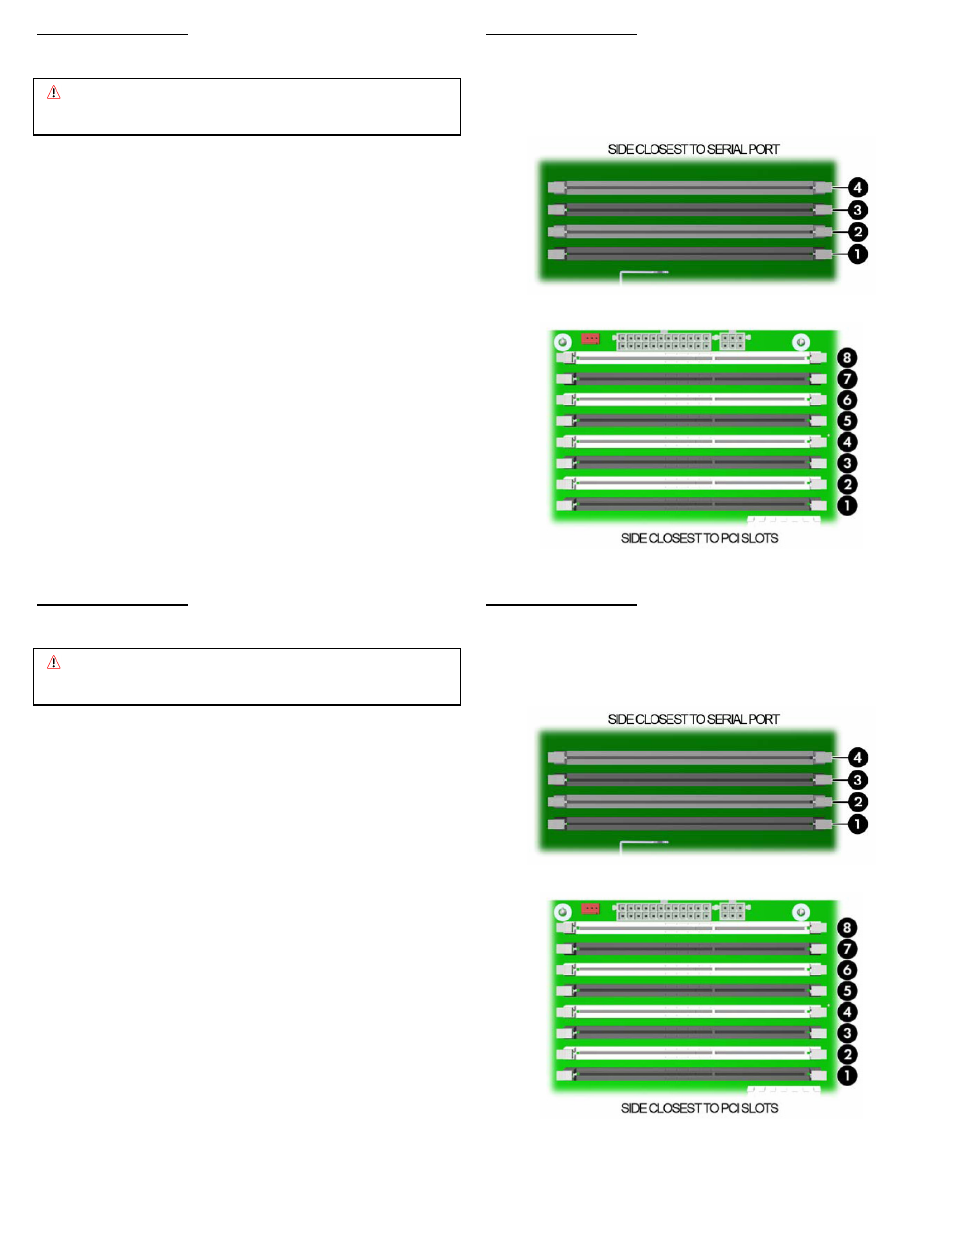
For the xw6400:
If installing only one DIMM, install it in slot 1. If installing two DIMMs,
install them in slots 1 & 3. If installing four DIMMs, install a pair in slots 1
& 3 and another pair in slots 2 & 4.
For the xw8400:
If installing only one DIMM, install it in slot 1. If installing two DIMMs,
install them in slots 1 & 3. If installing four DIMMs, install a pair in slots 1
& 3 and another pair in 5 & 7. If installing six DIMMs, install a pair in slots
1 & 3, a pair in 5 & 7, and a pair in 2 & 4. If installing eight DIMMs, fill all
of the slots.
xw6400
9.
Press firmly with your thumbs on both top ends of the module, applying
equal pressure until the module snaps into place. Lock the module in the
socket by pushing up on the ejector levers until they are in their upright
position.
xw8400
MEMORY INSTALLATION
MEMORY INSTALLATION
Note: Refer to your system owner’s manual for detailed instructions.
10. Replace the access panel, reconnect the power cords and external
cables, and turn on the system.
Caution: System parts are sensitive to electrostatic discharge and can be
damaged by the static charge you may carry. You should wear a
grounded wrist strap.
11. After you reboot, ensure the system recognizes the new memory
configuration.
4.
If replacing a DIMM, push down on the ejector levers on each side of the
DIMM until the DIMM is released.
5.
Grasp the top corners of the faulty DIMM and remove it from the system.
6.
To install a DIMM, open both ejector levers on each slot.
7.
Position the DIMM over the slot so that the alignment notches on the
DIMM match the notches on the connector.
8.
For the xw6400:
If installing only one DIMM, install it in slot 1. If installing two DIMMs,
install them in slots 1 & 3. If installing four DIMMs, install a pair in slots 1
& 3 and another pair in slots 2 & 4.
For the xw8400:
If installing only one DIMM, install it in slot 1. If installing two DIMMs,
install them in slots 1 & 3. If installing four DIMMs, install a pair in slots 1
& 3 and another pair in 5 & 7. If installing six DIMMs, install a pair in slots
1 & 3, a pair in 5 & 7, and a pair in 2 & 4. If installing eight DIMMs, fill all
of the slots.
xw6400
9.
Press firmly with your thumbs on both top ends of the module, applying
equal pressure until the module snaps into place. Lock the module in the
socket by pushing up on the ejector levers until they are in their upright
position.
xw8400