Continued, Top rollers installation – Alumax P-DRC1Y User Manual
Page 22
22
7
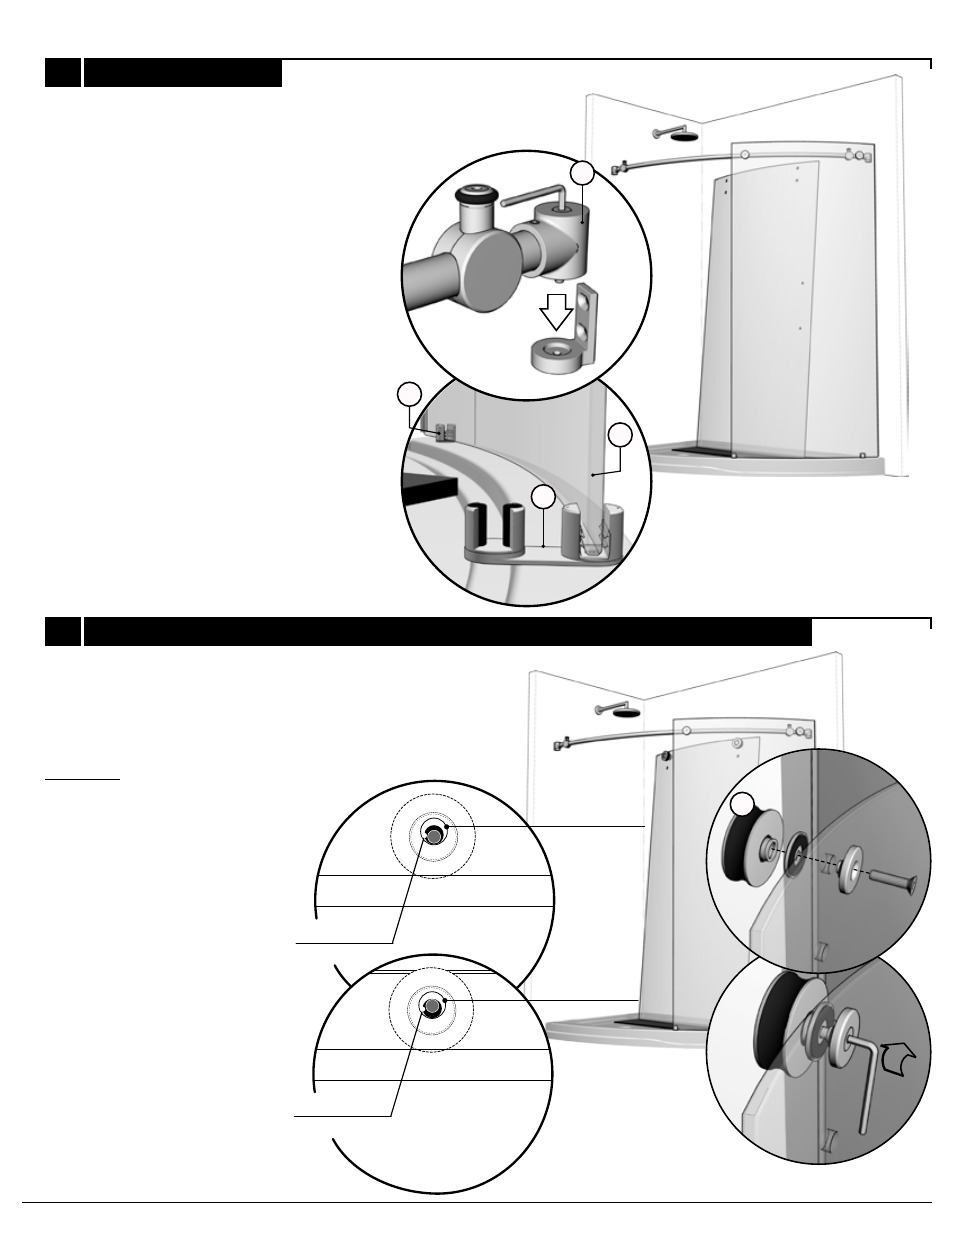
CONTINUED
6
TOP ROLLERS
INSTALLATION
Reposition the fixed panel assembly in
place, ensuring that the fixed panel (7) nests
within the bottom glass clip retainers (11)
(12) and that the wall bracket blocks (2)
insert themselves within their back plates.
Permanently secure the wall brackets by
way of the socket cap screws, as illustrated.
Assemble a set of double rollers (5)
to the door panel’s (6) top holes.
Note the position of the excentric
washers in the illustrations. The
washers are to be oriented to
Position 2 to ensure that the
door sits at its lowest position,
recommended for optimal
water retention.
2
GLASS HOLE
GLASS HOLE
POSITION 1
POSITION 2
WASHER
WASHER
12
5
7
11
See also other documents in the category Alumax For Home:
- 300c (9 pages)
- 300cv (8 pages)
- 300d (9 pages)
- 338 (9 pages)
- 340 (9 pages)
- 340 Deluxe (9 pages)
- 390c Supplement (5 pages)
- 390cv Supplement (4 pages)
- 391 (12 pages)
- 392 (11 pages)
- 393 (11 pages)
- 394 (11 pages)
- 640S (8 pages)
- 640 (8 pages)
- 640D (7 pages)
- 641 Side Panel (6 pages)
- 694 (6 pages)
- 700c (7 pages)
- 733 (8 pages)
- 738 (8 pages)
- 738 Towel Bar (1 page)
- 740D (8 pages)
- 790c Supplement (4 pages)
- 791 (11 pages)
- 792 (12 pages)
- 793 (12 pages)
- 793 Buttress Supplement (1 page)
- 794 (11 pages)
- 794s (9 pages)
- 795 (10 pages)
- 890 (9 pages)
- 890c (8 pages)
- 1040 (9 pages)
- Deluxe Towel Bar (1 page)
- Transportation Latch (1 page)
- DesignLine Hinge (5 pages)
- P-DR1W-48-60 (14 pages)
- P-DR1W-72 (15 pages)
- P-DR1WT-60 (14 pages)
- P-DR2W-48-60-CRP (18 pages)
- P-DR2W-48-60-CW (19 pages)
- P-DR2W-72-CRP (19 pages)
- P-DR2W-72-CW (19 pages)
- P-DR3W-60 (32 pages)
- P-DRA1Y (16 pages)