5c 5d, 5a 5b 5c 5d – Alumax P-DRC1Y User Manual
Page 12
12
5
CONTINUED
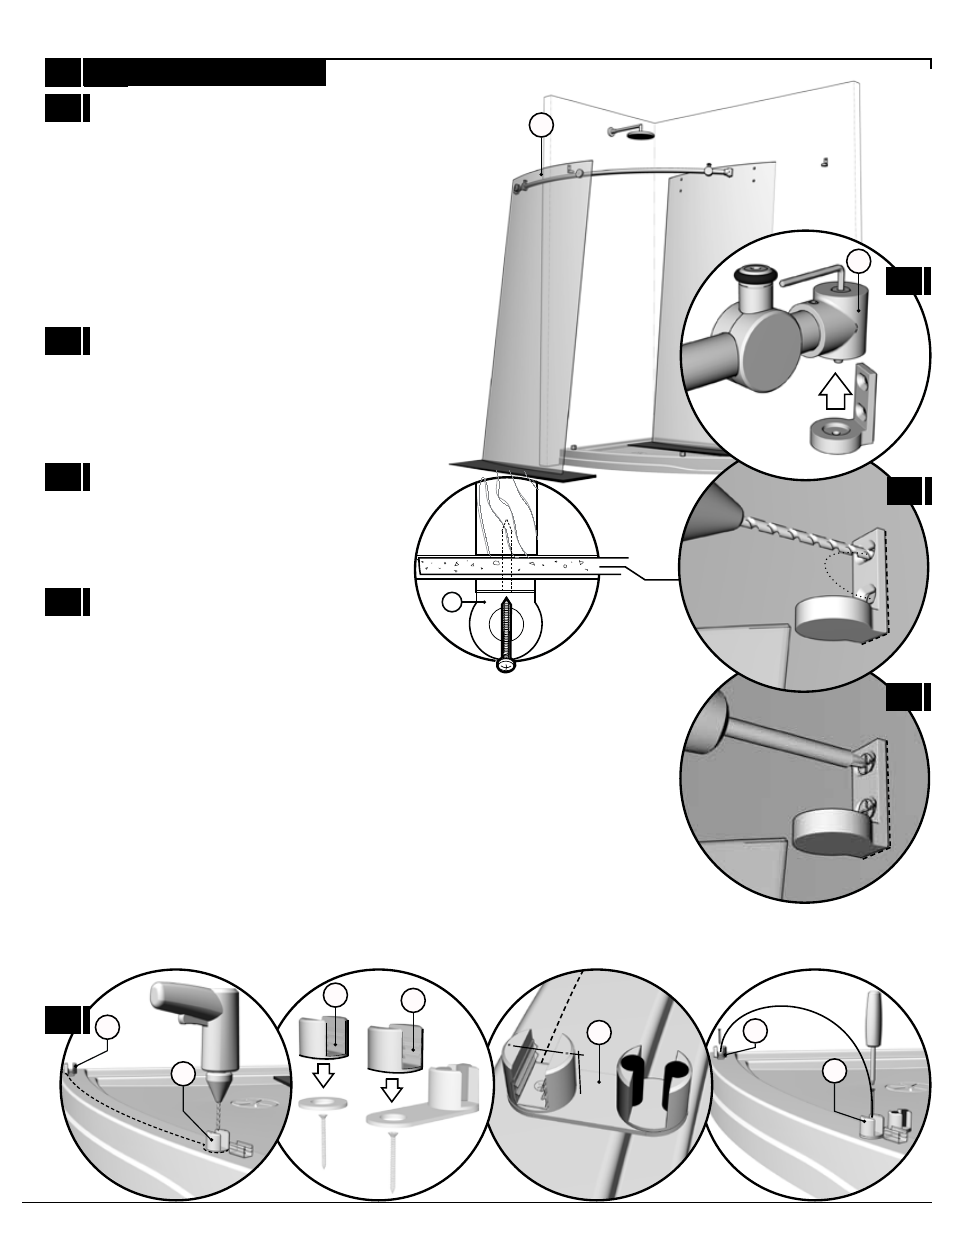
Remove the fixed panel assembly (7) and
carefully lean it to the side, ensure that it is
placed on a protective surface. Moreover,
ensure that the wall bracket supports (2) are
removed to proceed.
5A
Drill holes in walls with a drill bit, intended
for ceramic tiles, through to the wall stud.
5B
Fasten the wall brackets (2) with included
screws.
5C
5D
Drill holes in base through the the bottom glass clip’s
and bottom guide’s fixed panel retainers (11) (12)
ensuring that they are positioned where intially marked.
Use a 1/16” drill bit. Assemble retainers back into an assembly
to permanently install these components onto the base. Note the
alignment of the dots on the glass clip retainer of the bottom center
guide (12) with the line on the bridge.
WALL STUD
2
5A
5B
5C
5D
2
12
12
11
11
12
7
11
12
- 300c (9 pages)
- 300cv (8 pages)
- 300d (9 pages)
- 338 (9 pages)
- 340 (9 pages)
- 340 Deluxe (9 pages)
- 390c Supplement (5 pages)
- 390cv Supplement (4 pages)
- 391 (12 pages)
- 392 (11 pages)
- 393 (11 pages)
- 394 (11 pages)
- 640S (8 pages)
- 640 (8 pages)
- 640D (7 pages)
- 641 Side Panel (6 pages)
- 694 (6 pages)
- 700c (7 pages)
- 733 (8 pages)
- 738 (8 pages)
- 738 Towel Bar (1 page)
- 740D (8 pages)
- 790c Supplement (4 pages)
- 791 (11 pages)
- 792 (12 pages)
- 793 (12 pages)
- 793 Buttress Supplement (1 page)
- 794 (11 pages)
- 794s (9 pages)
- 795 (10 pages)
- 890 (9 pages)
- 890c (8 pages)
- 1040 (9 pages)
- Deluxe Towel Bar (1 page)
- Transportation Latch (1 page)
- DesignLine Hinge (5 pages)
- P-DR1W-48-60 (14 pages)
- P-DR1W-72 (15 pages)
- P-DR1WT-60 (14 pages)
- P-DR2W-48-60-CRP (18 pages)
- P-DR2W-48-60-CW (19 pages)
- P-DR2W-72-CRP (19 pages)
- P-DR2W-72-CW (19 pages)
- P-DR3W-60 (32 pages)
- P-DRA1Y (16 pages)