Basic operations, Amera recording, O stop recording momentarily [a – Sony CCD-TRV30 User Manual
Page 6: O finish recording [b, Lote on beep sound, To focus the viewfinder lens, Note on standby mode, Note on recording, Note on the tape counter, Note on the auto date feature
Attention! The text in this document has been recognized automatically. To view the original document, you can use the "Original mode".
Basic Operations
amera Recording
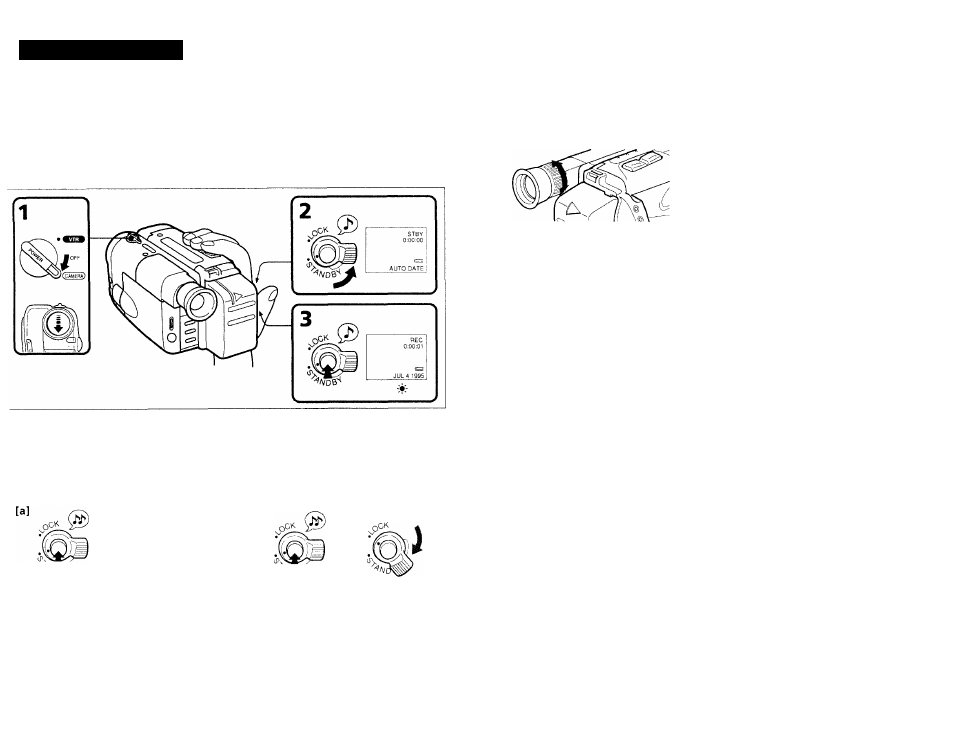
lake sure that the power source is installed and a cassette is inserted. The date is automatically
jcorded for 10 seconds after you start recording (AUTO DATE feature). This feature works only once
day. You can hear the beep sound to confirm your operation.
efore you record one-time events, you may want to make a trial recording to make sure that the
.imcorder is working correctly.
1)
While pressing the small green button on the POWER switch, turn it to CAMERA.
2)
Turn STANDBY up.
3)
Press START/STOP, The camcorder starts recording and the "REC" indicator appears and the red
lamp lights up in the viewfinder.
o Stop Recording Momentarily [a]
ress START/STOP again. The "STBY" indicator appears in the viewfinder
(Standby mode),
o Finish Recording [b]
less START/STOP to stop, l urn S l ANDBY down, and .set the POWER switch to OFF. The lens cover
OSes.
Then, eject the cassette (p.9) and remove the battery pack (p.8).
[b]
STBY
0:35:20
lote on beep sound
.s indicated by the ^ mark in the illustrations, a beep sounds when you turn the power on or when
ou start recording and two beeps sound when you stop recording, confirming the operation. Several
eeps also sound as a warning of any unusual condition of the camcorder (p.58). Note that the beep
)und is not recorded on the tape. If you do not want to hear the beep sound, select "OFF" in the menu
.-stem (p.32).
To Focus the Viewfinder Lens
If the viewfinder is not in focus at all or when you use the camcorder after someone else has used it,
focus the viewfinder lens. Turn the viewfinder lens adjustment ring so that the indicators in the
viewfinder come into sharp focus.
STBY
0:00 00
Note on Standby mode
It you leave the camcorder for
0
minutes or more with a cassette inserted in Standby mode, the
camcorder goes off automatically. This prevents wearing down the battery and wearing out the tape
1 o resume Standby mode, turn STANDBY do\\-n once and turn it up again. To start recording, press
START/STOP.
Note on recording
When you record from the beginning of the tape, run the tape for about l.S seconds beforr- starting Ih
actual recording. This will ensure that you won't miss an\- start-up scenes when \’ou pla\' hack tlie
tape. You can record tapes in SP (standard plav) mode only.
Note on the tape counter
Fhe tape counter indicates the recording or playback time. Use it as a guide. There will be a time lag
se\-eral seconds from the actual time. To set the counter to zero, press COU.N'I HR KFSFT located
behind the LCT3 panel. You can know the approximate remaining tape b\- tlie remaining tape indleat
(p.57).
Note on the AUTO DATE feature
1 he clock is set to the Fast Coast Standard 1 ime at the taetorv. d oii can reset tlie clock (p.24, .17)
A ou can change the AU I Cf D.Al F setting by selecting ON or Of-F in the menu si str-m Ip..32),
I he ,'\U lO D.'\TF feature works once a da\-.
once a da\- when:
• \'ou reset the date and lime.
• \'ou e|cct and insert the cassette again.
• N'ou stop recording within 10 seconds.
• \ oii set ,'\L rO D.Al F to OFF onci- and set
Flowei'er, tlie dall' ma\- autoi
to 0.\ in the menu
appei
When moving from indoors to outdoors (or vice versa)
I urn S! ,'WDBA' up and point the camcorder at a white paper for about 1.3 seconds
balance is properly adjusted.
1
that the w hite